|
|
|

|
A Good Reason to Remove Your Evaporator by josef644
| Started on | : 08-18-2012 01:13 PM |
| Replies | : 63 (6107 views) |
| Last post by | : fierofool on 07-07-2018 01:04 PM |
|
|
|
|
Aug 18th, 2012
|
josef644
Member Posts: 6939
From: Dickinson, Texas USA
Registered: Nov 2006
|
In the process of re newing my AC system I removed my evaporator to flush it out. As I was pulling the cover out a ways I found this: 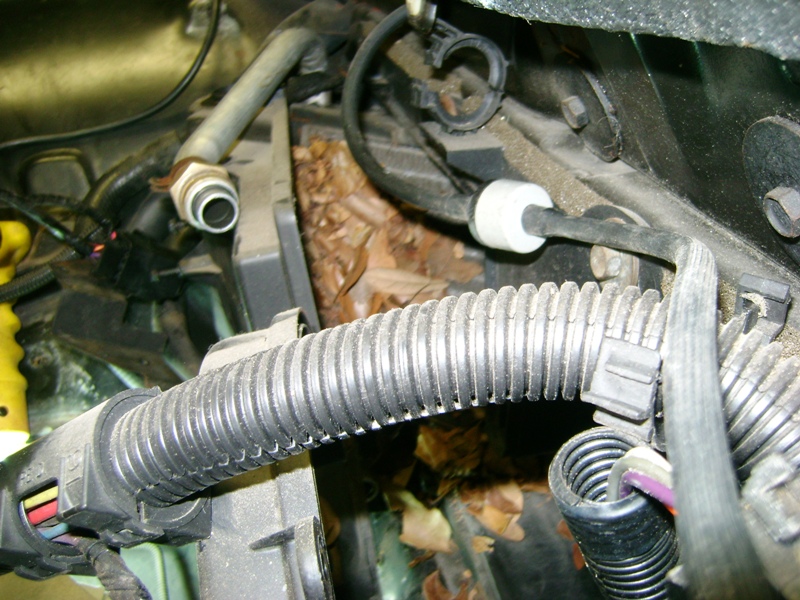 Pulled out a bit more: 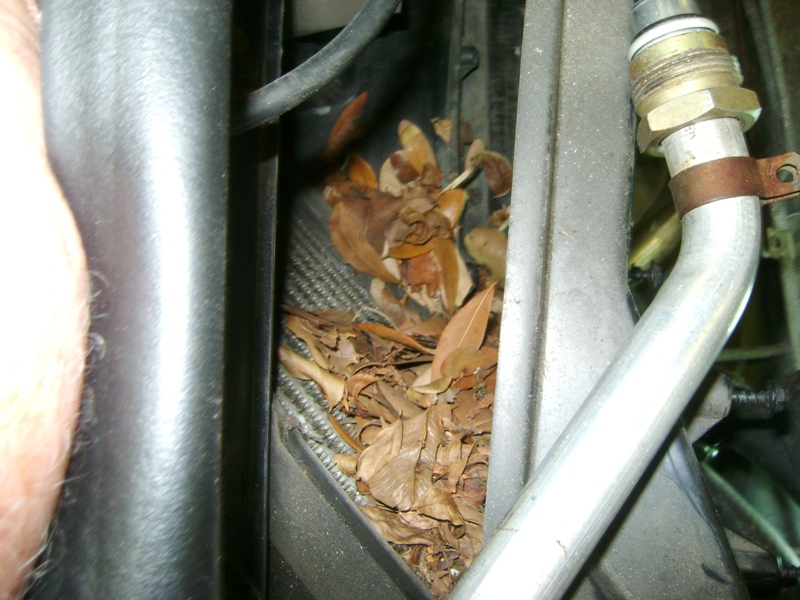 And the cover all the way off the car, about 33% blockage: 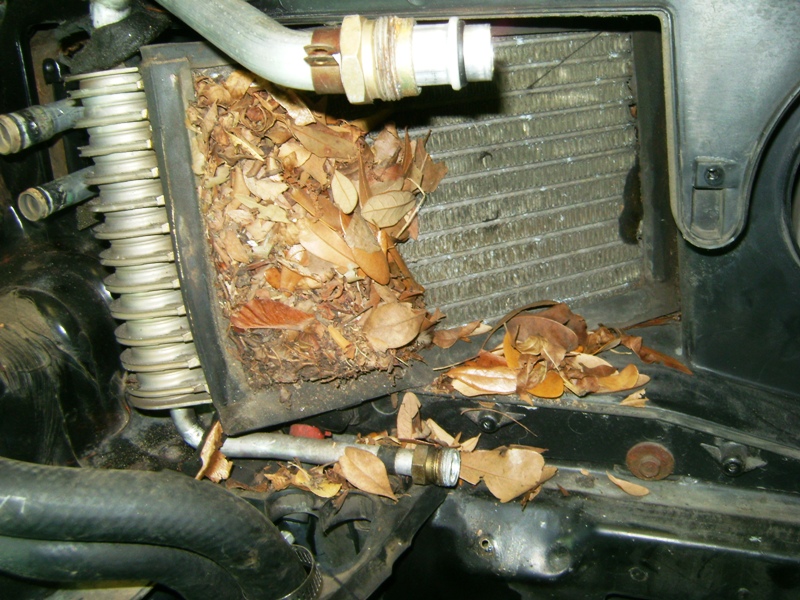 Nice and clean: 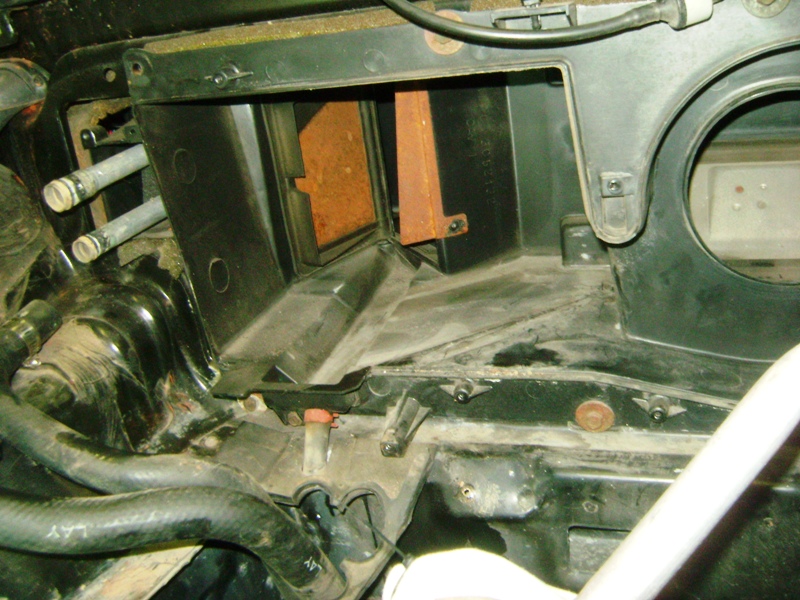 TXGOOD posted his photo: 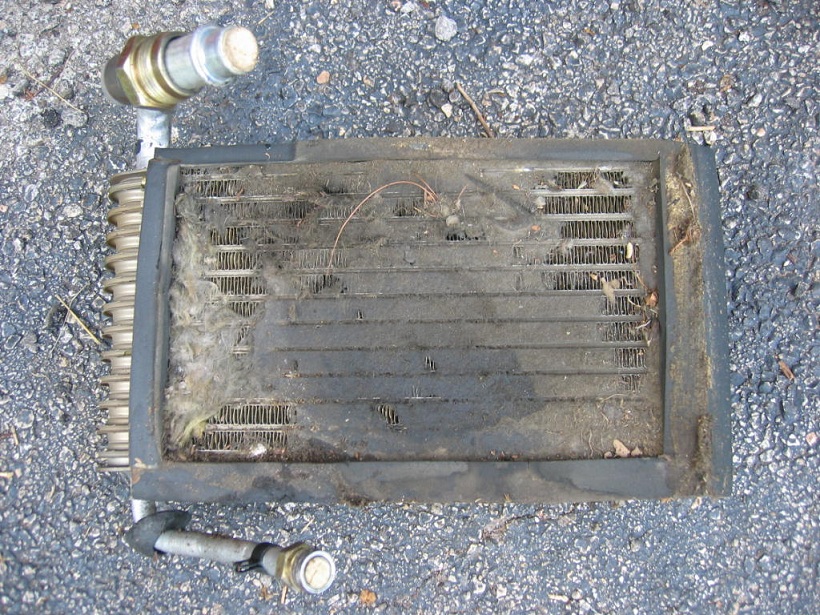 Mine back in the car: 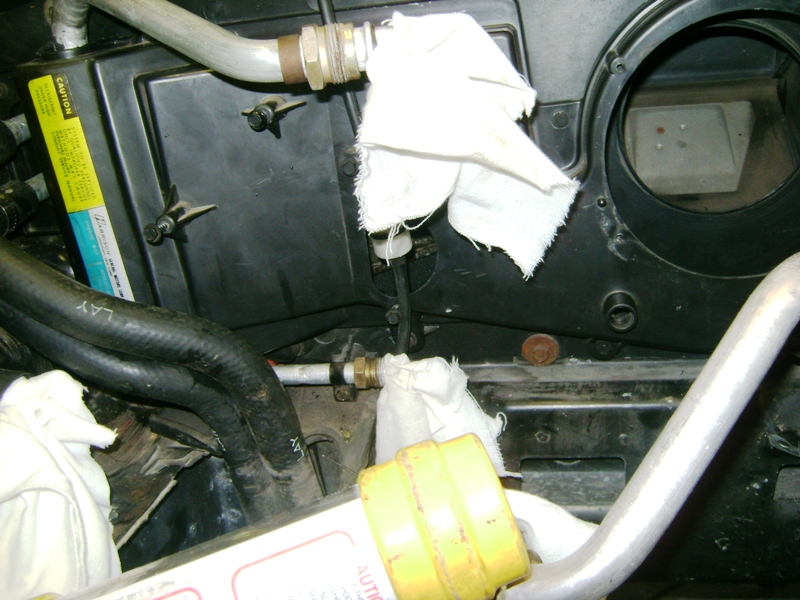 My car has always been parked in my garage since it came to Texas in 2009. A PO must have favored a shady parking spot somewhere. If you are planning on getting your AC up and working, consider removing the evaporator before you get the new refrigerant in the system. It only took me around 20 minuets to remove teh cover as I already had the spare tire tub out of my car. [This message has been edited by josef644 (edited 08-18-2012).]


|
01:13 PM
|
|
|
PFF
System Bot
|
|
|
|
deceler8
Member Posts: 2139
From: Sioux City, Iowa USA
Registered: Sep 1999
|
Might that explain the poor airflow in A/C mode that many complain about ? Can the evap core be cleaned without actually removing it from the car ? ------------------


|
01:17 PM
|
|
josef644
Member Posts: 6939
From: Dickinson, Texas USA
Registered: Nov 2006
|
I couldn't even see this huge pile of leaves. But one can remove the blower motor, and fan speed resister, and have a fair shot to the area that my blockage was. Maybe a 5/8 heater hose taped onto the end of a shop vac might be able to get back there? If yours is like TXGOOD's was, removing would be necessary I think. [This message has been edited by josef644 (edited 08-18-2012).]


|
01:28 PM
|
|
benoitmalenfant
Member Posts: 288
From: Chateauguay, QC, Canada
Registered: Sep 2011
|
| | | quote | Originally posted by deceler8:
Might that explain the poor airflow in A/C mode that many complain about ?
Can the evap core be cleaned without actually removing it from the car ?
|
|
I was having air flow issues (A/C on or not) ever since I bought mine last year (barely any air was getting in the passenger compartment even if the blower was on high). My A/C compressor was removed by the PO and I'm not planning on fixing the A/C right now so I didn't want to remove the evaporator just yet. I took a look at the evaporator through the fan speed resistor assembly hole (the thing connected to the heater box right next to the accumulator).... ewww! No leaves or any really big debris like the pictures on top of this thread, but the fins were clogged shut with dust/lint and other very small particules (actually looked a bit worse than TXGOOD's). I was able to get rid of most of it (say 90%) simply by removing the blower, the accumulator and fan relays, then unscrewing the plastic cover that runs from the blower to the evaporator case (about 5-6 bolts to remove) and move it off as far as I could (without removing the heater core hoses) and get the tip of a shop-vac on the evaporator. It's not perfect right now (a new evaporator would most likely allow even more air flow) but at least I've got decent air flow which will be useful in a couple of months when the temperature will start to drop here in Canada  ------------------ --Ben87 GT84 Indy #1863[This message has been edited by benoitmalenfant (edited 08-18-2012).]


|
01:42 PM
|
|
Timpilot
Member Posts: 138
From: Chandler, AZ USA
Registered: Mar 2011
|
My '88 Formula had very little airflow and I thought it wasn't very cold. I took the blower motor out and felt the same oily, dirty mess you have on one side of your evaporator. I cleaned it with an old toothbrush and Oil Eater.
The airflow is now awesome and the air is ice cold. It even gets TOO cold in 112-degree temps in Phoenix and I have to turn the fan down and/or move the temp control away from full cold.
Mine is still R-12 and hasn't been serviced in two years.


|
01:45 PM
|
|
theogre
Member Posts: 32520
From: USA
Registered: Mar 99
|
| | | quote | Originally posted by deceler8:
1. Might that explain the poor airflow in A/C mode that many complain about ?
2. Can the evap core be cleaned without actually removing it from the car ? |
|
1. Yes, Can be an issue. 2. Depend how bad... Loose stuff is better then packed mold, rat crap, etc. Long copper/plastic tube with adapter and shopvac works but watch so you don't overheat the vac motor. Access thru resistor assem. Copper works good because can easily bent... See also https://www.fiero.nl/forum/F.../HTML/123258.html#p8Leaves etc then fix under windshield area. Heat inlet is under right side wiper pivot. Allot of junk can get thru the hood latch. ------------------ Dr. Ian Malcolm: Yeah, but your scientists were so preoccupied with whether or not they could, they didn't stop to think if they should.
(Jurassic Park)The Ogre's Fiero Cave (It's also at the top and bottom of every forum page...) [This message has been edited by theogre (edited 08-18-2012).]


|
04:51 PM
|
|
|
Aug 19th, 2012
|
benoitmalenfant
Member Posts: 288
From: Chateauguay, QC, Canada
Registered: Sep 2011
|
Thought I'd post a few pictures to show how you can get a shop-vac to clean your A/C Evaporator without completely removing it. Might be overkill, but I had a camera handy when I did it so I decided to take pictures anyway: Here's a picture of the plastic case that will get pulled part-way to access the evaporator: 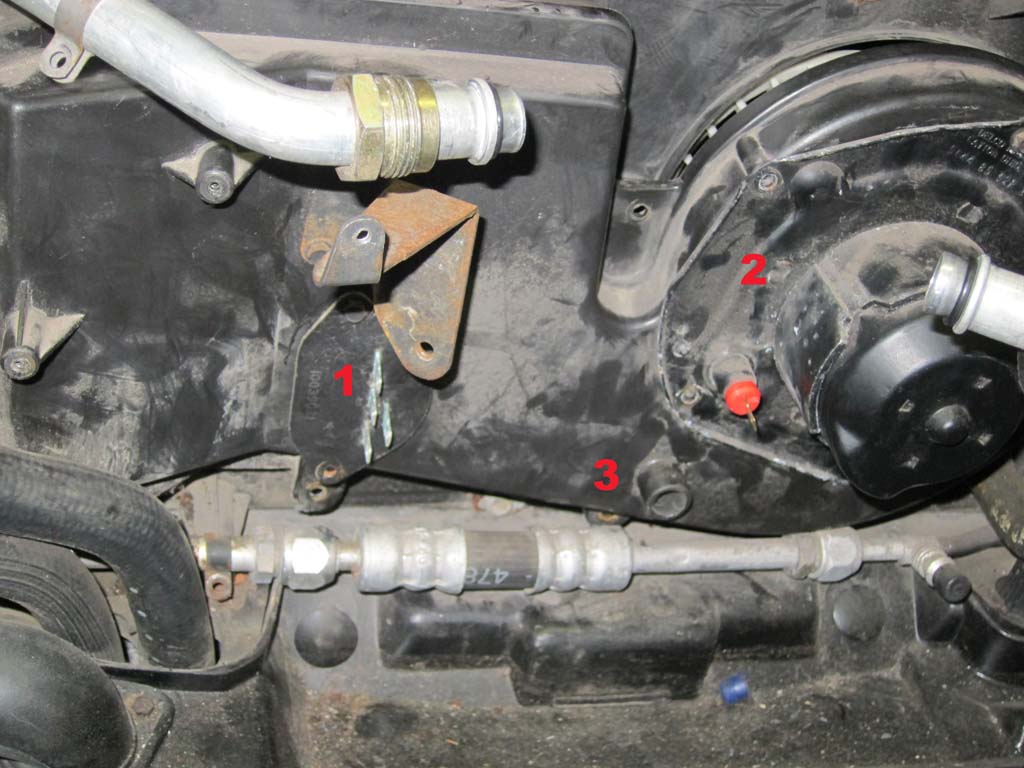 1- 1- This is the fan/blower resistor (used when you are selecting LOW, MEDIUM-LOW or MEDIUM-HIGH on the HVAC controller inside the car). Unscrewing this resistor will allow for a sneak peak of how your evaporator looks inside. Use a flashlight and you'll be able to see how heavily clogged your evaporator might be. 2- Fan/Blower. You can remove it to make the heater/blower plastic case removal easier, but you don't have to. 3- This 7mm bolt will be the hardest to remove while keeping the evaporator's inlet tube connected (hard to use a socket, since the inlet tube is in the way, I used a small 7mm wrench to make sure I wasn't playing with the inlet tube too much.) Here is what the case looks like when all screws are removed and the case is moved as far as the heater core inlet/oulet hoses (all the way to the passenger side, next to the yellow sticker) will let you move it : 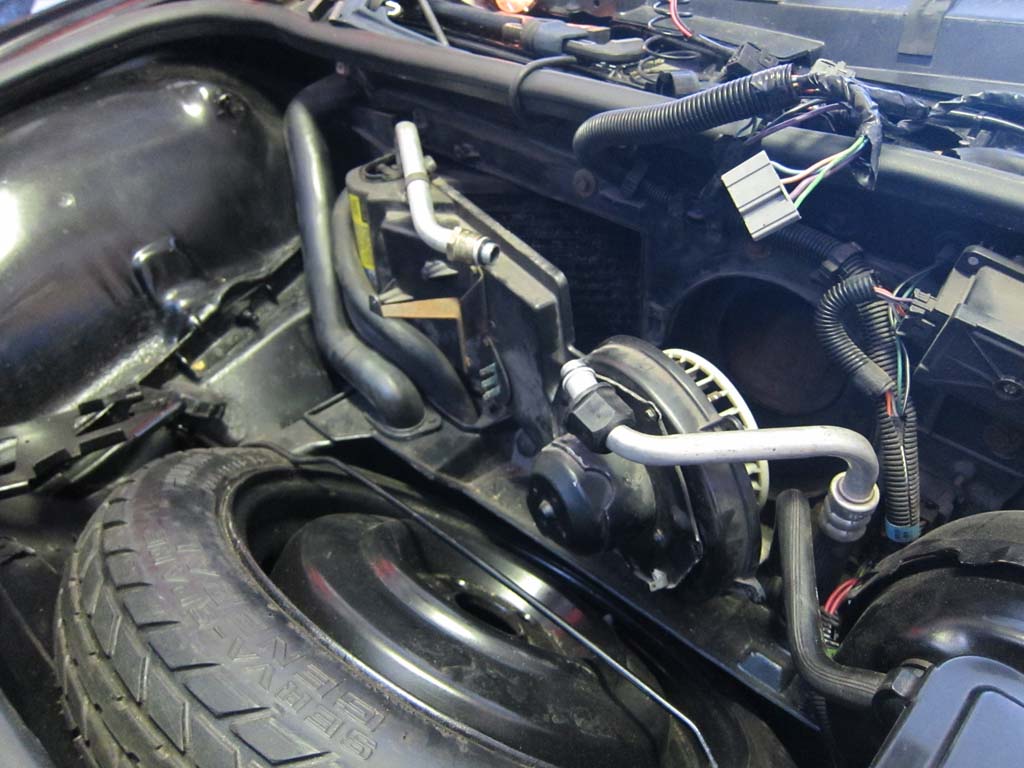 Here is what my evaporator looks like after using the shop-vac to remove as much crud as I could. Not perfect but clean enough to let a decent amount of air through and restore decent air flow in the cabin: 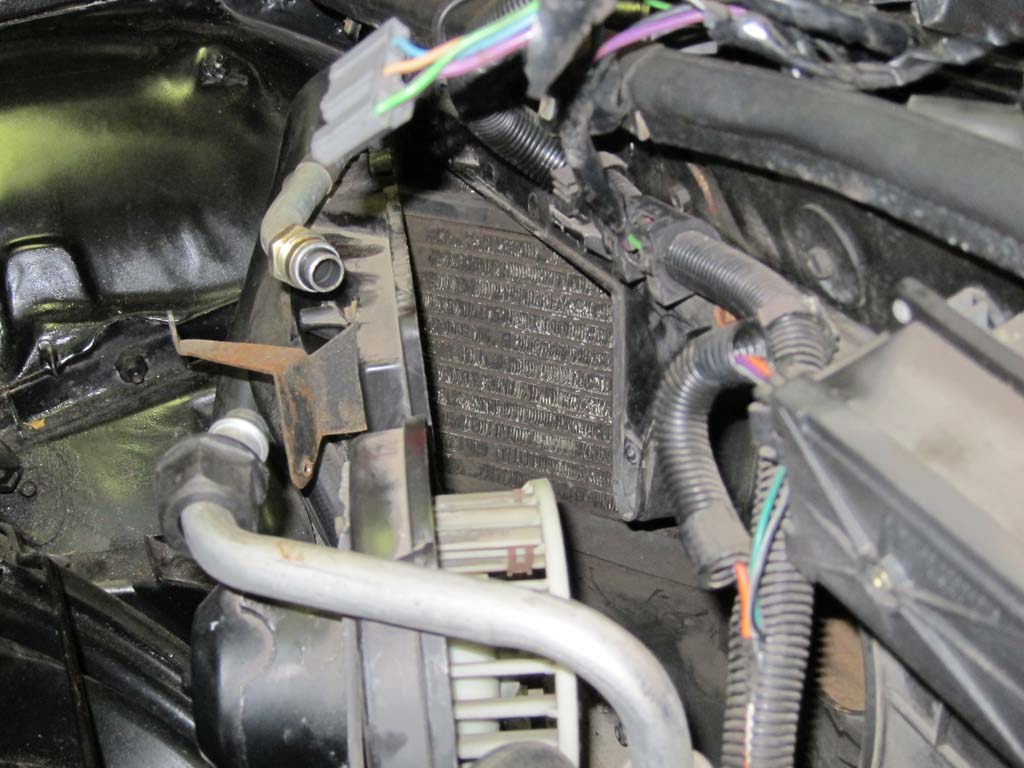 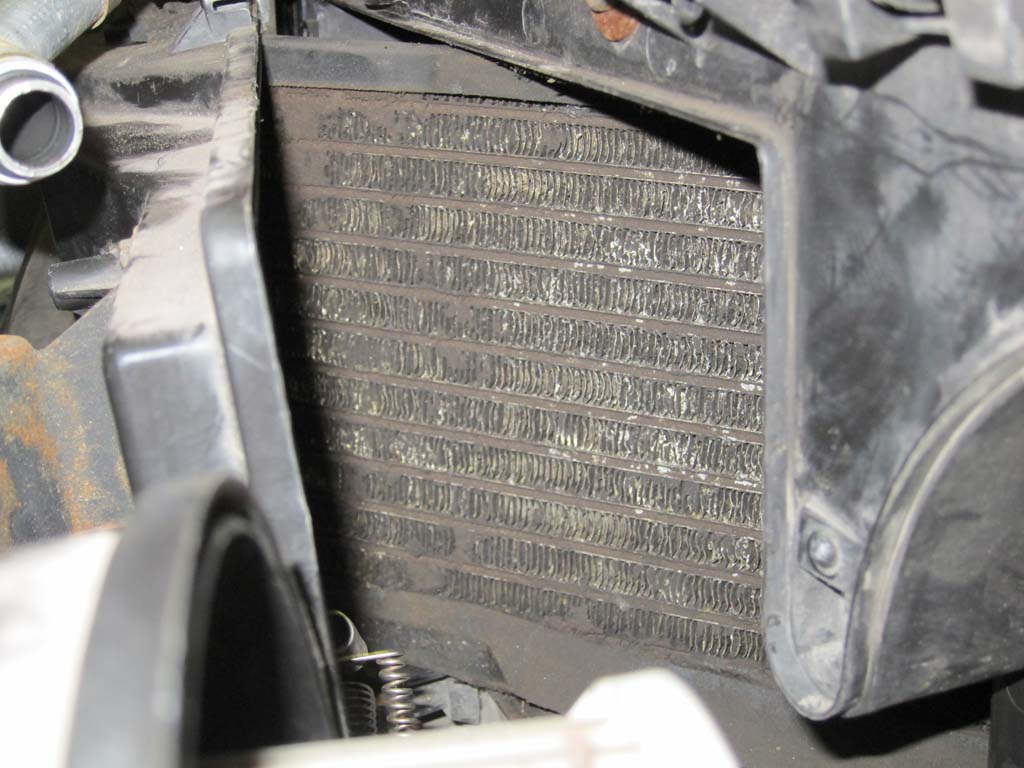 Remember, my A/C is not working and I was simply trying to clean the evaporator to restore air flow in the cabin. I know I'll have to change this evaporator when I decide to re-install an A/C compressor. ------------------ --Ben87 GT84 Indy #1863[This message has been edited by benoitmalenfant (edited 08-19-2012).]


|
12:49 AM
|
|
deceler8
Member Posts: 2139
From: Sioux City, Iowa USA
Registered: Sep 1999
|
I guess what I'm asking is...is there any way to do this with an intact A/C system...refrigerant getting kinda expensive. ------------------


|
10:57 AM
|
|
benoitmalenfant
Member Posts: 288
From: Chateauguay, QC, Canada
Registered: Sep 2011
|
| | | quote | Originally posted by deceler8:
I guess what I'm asking is...is there any way to do this with an intact A/C system...refrigerant getting kinda expensive.
|
|
The only way to do it without unplugging the accumulator would be to unscrew the fan resistor (-1- in the first picture in my post above) and then get some kind of smaller tube attached to the end of your shop-vac and do the best you can to clean it out from there.


|
11:15 AM
|
|
theogre
Member Posts: 32520
From: USA
Registered: Mar 99
|
| | | quote | Originally posted by deceler8:
I guess what I'm asking is...is there any way to do this with an intact A/C system...refrigerant getting kinda expensive. |
|
See my post above... Loose stuff is easy. tube w/ shop vac... pack crud is much harder. You can try to remove cover w/o emptying A/C or cut a hole to clean then carefully plug/patch the hole. maybe cut cover in two peaces... how? not sure.


|
11:46 AM
|
|
E.Furgal
Member Posts: 11708
From: LAND OF CONFUSION
Registered: Mar 2012
|
Total ratings: 278
User Banned
|
|
| | | quote | Originally posted by deceler8:
I guess what I'm asking is...is there any way to do this with an intact A/C system...refrigerant getting kinda expensive.
|
|
r134 is 5 bucks a can


|
07:23 PM
|
|
|
PFF
System Bot
|
|
josef644
Member Posts: 6939
From: Dickinson, Texas USA
Registered: Nov 2006
|
| | | quote | Originally posted by E.Furgal:
r134 is 5 bucks a can |
|
I was in Walmart yesterday, it was $8.00.


|
07:33 PM
|
|
|
Aug 20th, 2012
|
TXGOOD
Member Posts: 5410
From: Austin, Texas
Registered: Feb 2006
|
The cheapest R134 I have found is 11.00 a can but that is in an auto parts store.
I guess I need to check Walmart next time.
The gas isn`t expensive, but if you have to get it done it can quickly add up.
In my experience it seems there are two tiers to shop repaired AC systems.
It`s either going to be 500.00 if they don`t replace any parts or 1000.00 if they have to replace parts.
To me it`s worth it to get the gauges, a vacuum pump and the knowledge to work on it yourself.
There are enough people on here that can give you the knowledge to save you a lot of money.


|
08:44 AM
|
|
Boostdreamer
Member Posts: 7175
From: Kingsport, Tennessee USA
Registered: Jun 2007
|
Thanks for posting this. I only recently saw that this area had a panel that looked like it could be removable. I thought about opening it up to check for a mouse nest but I had decided against it. Looks like I decided wrong again! I didn't even know that little radiator-looking thing was in there. So what do you call the big radiator-looking thing in front of the actual radiator? ------------------
Jonathan
23K mile '85 notchie w/ 88 cradle, '87 2.8/Getrag, Air, PW, PDL, PM - Still under construction
https://www.fiero.nl/forum/Forum2/HTML/121056.html
I'm not a mechanic but I play one in my garage - me
Power tends to corrupt, and absolute power corrupts absolutely - Lord Acton
Those who hammer their guns into plows will plow for those who do not - Thomas Jefferson
The tree of liberty must be refreshed from time to time, with the blood of patriots and tyrants - Thomas Jefferson


|
09:59 AM
|
|
TXGOOD
Member Posts: 5410
From: Austin, Texas
Registered: Feb 2006
|
The one in front of the radiator is the condensor. And you are right Joe, my evaporator had to be removed as the stuff was so caked on I used grease remover and had to spray water in from the other side to get all of the goop out. [This message has been edited by TXGOOD (edited 08-20-2012).]


|
10:04 AM
|
|
Boostdreamer
Member Posts: 7175
From: Kingsport, Tennessee USA
Registered: Jun 2007
|
Here's what I found in mine. This is an original 23K mile car that spent most of its life in a garage. .jpg) If this car has it, your car has it! Now, how do we stop it from happening again? Stuff foam around the front trunk latch? Jonathan


|
01:38 PM
|
|
theogre
Member Posts: 32520
From: USA
Registered: Mar 99
|
| | | quote | Originally posted by Boostdreamer:
Now, how do we stop it from happening again? Stuff foam around the front trunk latch? |
|
GM though so... This is OE in 87... .JPG)


|
03:57 PM
|
|
|
Aug 21st, 2012
|
Boostdreamer
Member Posts: 7175
From: Kingsport, Tennessee USA
Registered: Jun 2007
|
The area around the latch is just one way for the debris to get into the cowl area. After that it has to jump a little wall and fall through the hole that sits rearward of the latch. The latch does not sit over the hole to the air inlet. I'm thinking of adding something over the actual hole. Would a sceen or some kind of very low density foam be better to cover the inlet hole? Maybe a combination of both?
Jonathan


|
10:46 AM
|
|
TXGOOD
Member Posts: 5410
From: Austin, Texas
Registered: Feb 2006
|
I think it all depends on where you park your car a lot.
I figure mine took 24 years for the stuff that was in there to accumulate and now that I have moved, my car is always under a carport.
Plus, wherever I drive it, to work and most places, I don`t park under any trees.
I think if you periodically check it and maybe vacuum out through the resistor hole before it has a chance to get caked on, it will be ok.


|
10:58 AM
|
|
theogre
Member Posts: 32520
From: USA
Registered: Mar 99
|
| | | quote | Originally posted by Boostdreamer:
The area around the latch is just one way for the debris to get into the cowl area. After that it has to jump a little wall and fall through the hole that sits rearward of the latch. The latch does not sit over the hole to the air inlet. I'm thinking of adding something over the actual hole. Would a sceen or some kind of very low density foam be better to cover the inlet hole? Maybe a combination of both?
|
|
Watch wiper pivot when that is on... pivot assm and the link moves plenty. Careful... wiper trans can cause damage to anything get pinches. Latch casket will help. (Assuming all other parts are good too). Any trash/leaves/etc falls in the latch, can work into heater inlet. Whole leaves above means need a gasket or trim under windshield has issues. | | | quote | Originally posted by TXGOOD:
I think it all depends on where you park your car a lot.
... I think if you periodically check it and maybe vacuum out through the resistor hole before it has a chance to get caked on, it will be ok. |
|
Yes, I've clean mine once last month any not much really found... And old house had Maple next to driveway. See https://www.fiero.nl/forum/F...HTML/123258.html#p10Just look into heater resistor opening... A mirror will help. A piece of bent wire will move the junk and vacuum can suck it up.


|
12:29 PM
|
|
Lou6t4gto
Member Posts: 8436
From: sarasota
Registered: May 2008
|
Where would all the Debrit tend to accumulate First ? The Heater Core, OR, the Evaporator ? Got to be coming In Through the Vents in front of the windshield, right ?


|
02:24 PM
|
|
|
PFF
System Bot
|
|
|
|
RWDPLZ
Member Posts: 15079
From:
Registered: May 2002
|
| | | quote | Originally posted by Lou6t4gto:
Where would all the Debris tend to accumulate First ? The Heater Core, OR, the Evaporator ? Got to be coming In Through the Vents in front of the windshield, right ? |
|
The evaporator, as you're looking at it from the front compartment, on the lower left side in that corner. Here's what mine looked like when I pulled it, keep in mind I clean it every year: 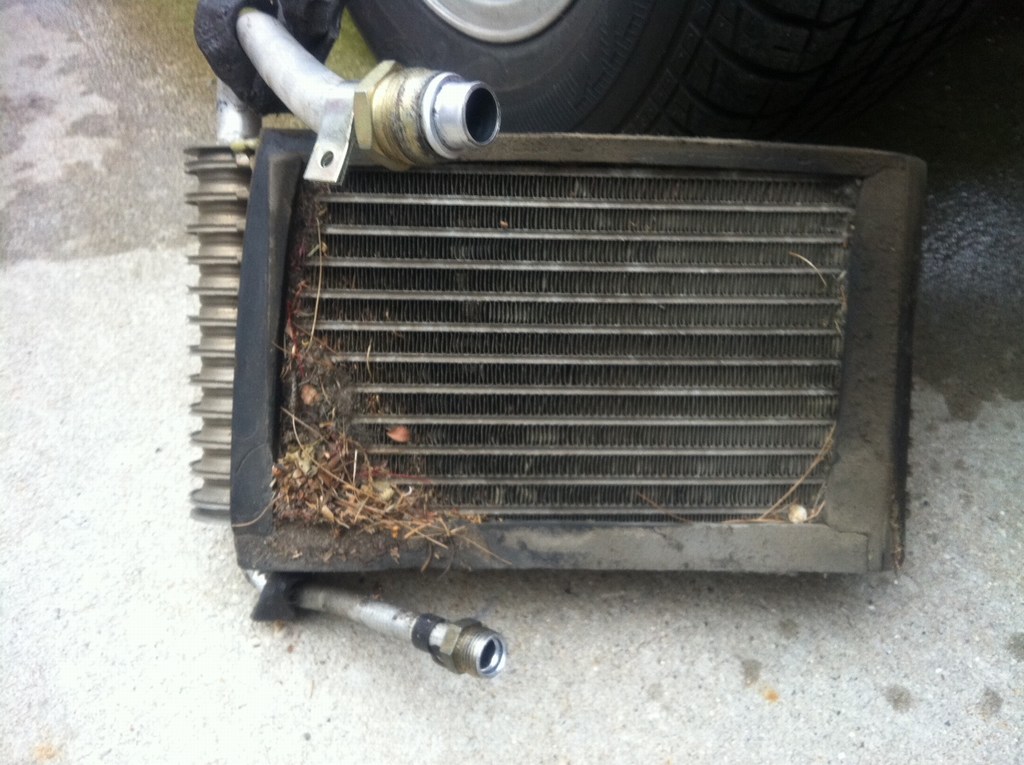


|
05:19 PM
|
|
josef644
Member Posts: 6939
From: Dickinson, Texas USA
Registered: Nov 2006
|
In this photo I posted above, the debris is thicker and denser in the lower left side as RWDPLZ said above.  [This message has been edited by josef644 (edited 08-21-2012).]


|
05:27 PM
|
|
Lou6t4gto
Member Posts: 8436
From: sarasota
Registered: May 2008
|
THANK YOU FOR STARTING THIS POST ! I decided to take mine apart just because. ( the car was sitting under a tree for 10 years before I bought it)I Found Leaves, shredded up paper towels, all sorts of crap ! It Has To make the Cabin" Smell better" ! now that I think of it, I probably should have put one of those "New Car Smell" air fresheners into the duct . :-) LOL


|
05:32 PM
|
|
josef644
Member Posts: 6939
From: Dickinson, Texas USA
Registered: Nov 2006
|
| | | quote | Originally posted by Lou6t4gto:
THANK YOU FOR STARTING THIS POST ! I decided to take mine apart just because. ( the car was sitting under a tree for 10 years before I bought it)I Found Leaves, shredded up paper towels, all sorts of crap ! It Has To make the Cabin" Smell better" ! now that I think of it, I probably should have put one of those "New Car Smell" air fresheners into the duct . :-) LOL |
|
Lou, I hate those new car smell ones, but the peach and vanilla ones are pretty good. I have even purchased the Pine green ones before. -Joe


|
05:58 PM
|
|
Boostdreamer
Member Posts: 7175
From: Kingsport, Tennessee USA
Registered: Jun 2007
|
| | | quote | Originally posted by Lou6t4gto:
Where would all the Debrit tend to accumulate First ? The Heater Core, OR, the Evaporator ? Got to be coming In Through the Vents in front of the windshield, right ? |
|
It would obviously pass through the blower motor first but being a blower, it usually won't sit there. It will get blown down the line until it hits the first stop. With AC cars, that will be the evaporator. I guess the heater core on non-AC cars. On non-AC cars, is the heater core in the position that would be used for the evaporator in an AC car? Jonathan


|
06:24 PM
|
|
deceler8
Member Posts: 2139
From: Sioux City, Iowa USA
Registered: Sep 1999
|
Was at the local Advance Auto tonight...R134 is now 19.99 a can. Propane anyone ? ------------------


|
09:12 PM
|
|
ltlfrari
Member Posts: 5356
From: Wake Forest,NC,USA
Registered: Jan 2002
|
This was mine yesterday:  ------------------
Anything I might say is probably worth what you paid for it, so treat it accordingly!
Dave
www.ltlfrari.com


|
10:00 PM
|
|
solotwo
Member Posts: 5374
From: Grand Rapids, MI. USA
Registered: Jun 2002
|
Any one tried the heater motor resistor opening only to get the junk out?


|
10:51 PM
|
|
RWDPLZ
Member Posts: 15079
From:
Registered: May 2002
|
It's too small, you can barely get a couple fingers in there.


|
11:03 PM
|
|
avengador1
Member Posts: 35468
From: Orlando, Florida
Registered: Oct 2001
|
Another reason to clean that area out is because those resitor coils can get hot enough to ignite that material when the fan is used.


|
11:35 PM
|
|
|
PFF
System Bot
|
|
|
Aug 22nd, 2012
|
Boostdreamer
Member Posts: 7175
From: Kingsport, Tennessee USA
Registered: Jun 2007
|
| | | quote | Originally posted by avengador1:
Another reason to clean that area out is because those resitor coils can get hot enough to ignite that material when the fan is used. |
|
That is exactly what happened to CrazyDragn! While he was driving! Scary stuff. I would suggest a complete tear down to clean it the first time. You may get by with a flexable vacuum hose through the coil port as a maintenance procedure later. The problem with that is that the debris builds up from the passenger side of the evaporator. You won't be able to see what's there and will have a hard time reaching what might be there. The bottom line is you just won't be sure unless you open it up. I was thinking of stuffing a foam block under the cowl to keep debris from falling in there in the first place but that is directly under the passenger side wiper stud. The movement of the wiper mechanism will not allow that. You'll notice that the passenger side wiper mount was covered in waterproof goop to keep water out of the interior versus the driver's side wiper's mounting bolts are completely visible. Now I'm leaning toward a close fitting screen to cover the hole. Jonathan


|
10:14 AM
|
|
ltlfrari
Member Posts: 5356
From: Wake Forest,NC,USA
Registered: Jan 2002
|
| | | quote | Originally posted by solotwo:
Any one tried the heater motor resistor opening only to get the junk out? |
|
Just remove the fan, you can get a lot of it out that way. ------------------
Anything I might say is probably worth what you paid for it, so treat it accordingly!
Dave
www.ltlfrari.com


|
03:55 PM
|
|
solotwo
Member Posts: 5374
From: Grand Rapids, MI. USA
Registered: Jun 2002
|
Thanks for the info!


|
04:27 PM
|
|
|
Aug 23rd, 2012
|
theogre
Member Posts: 32520
From: USA
Registered: Mar 99
|
| | | quote | Originally posted by solotwo:
Any one tried the heater motor resistor opening only to get the junk out? |
|
Again Yes... see https://www.fiero.nl/forum/F...HTML/123258.html#p10I did just a normal 1.25" vacuum hose and a bent piece of wire to move stuff. You just need to move it around and airflow will do the rest. Work well to remove loose thrash leaves etc. Not so much on corrosion mold etc problems. Just avoid hitting the evap itself. You can see the condition evap thru resistor hole using a mirror or camera and maybe a small light. (Phone camera w/ flash may work.) More light? remove the blower. It will tell you fast if you have crap packed in, have mice, etc. If you have mice... remove the blower and clean thru there. Only need to remove AC cover if you have packed junk, mice house caused to corrosion etc. Good vac w/ attachments if your friend... If you have mice problem then use good filters, HEPA is best, and do it outside. Mice may left but what is there you don't want to breath...


|
01:31 AM
|
|
randye
Member Posts: 14175
From: Florida
Registered: Mar 2006
|
I strongly suggest not screwing around trying to vacuum debris out with tiny rubber tubes, bent wire coat hangers or other "Rube Goldberg" schemes. Just take the dang thing out and clean it properly. 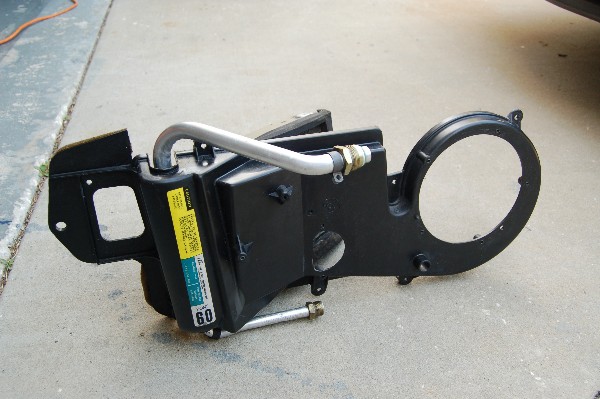 Once you have the entire evaporator out, PLUG OR TAPE CLOSED THE REFRIGERANT TUBES, and spray a LOT of brake cleaner into the fins from BOTH sides, let it sit 5-10 minutes and flush it out with water, then high pressure air, Repeat at least a couple of times. You will be getting 20+ years of tar, nicotine, oil, wax, dirt, mold, fungus and other crud that is stuck like glue on the surface of the fins and has degraded the thermal transfer capability of the heat exchanger, (which is technically what an evaporator is...) All that stuff on the evaporator fins also makes the air coming through it STINK !!A cleaned 1987 Fiero evaporator: 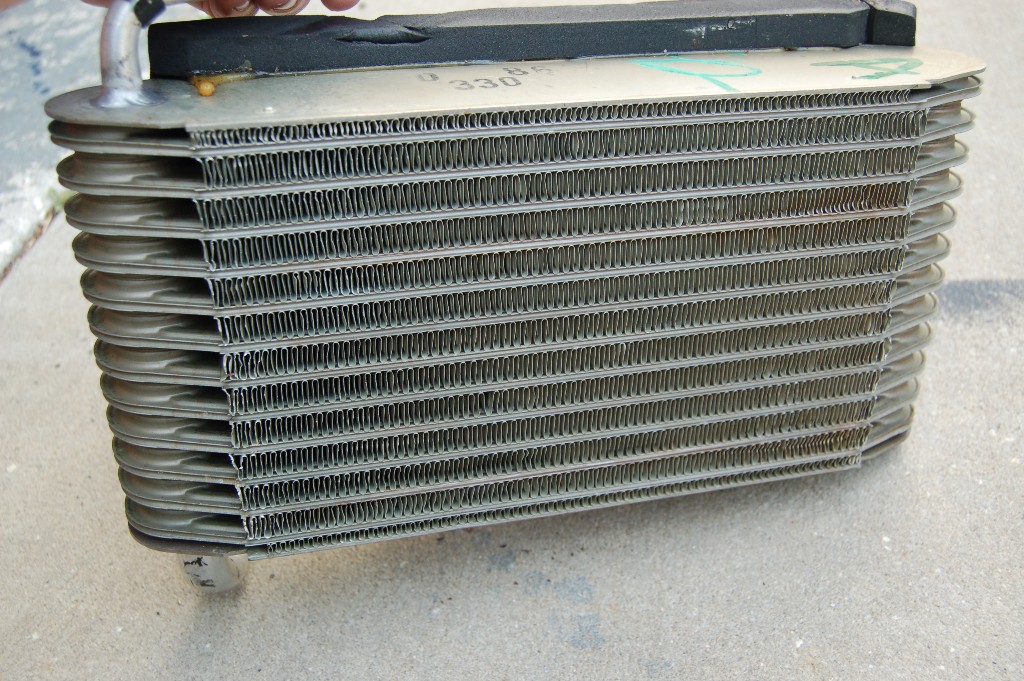 Once the unit is dry and free of brake cleaner smell, reinstall it. When your A/C system is reassembled and recharged the air will be as close to that "new car A/C smell" as you are likely to get in a Fiero. NOTE: On "downstream" airflow side of the evaporator you will find a "water separator screen" glued to the face of the evaporator. Supposedly this screen is to prevent condensation water from being blown thru the ducts and into the car. I chose to remove this screen and have had absolutely no problems with any water condensate either IN the ductwork or coming out of the vents. 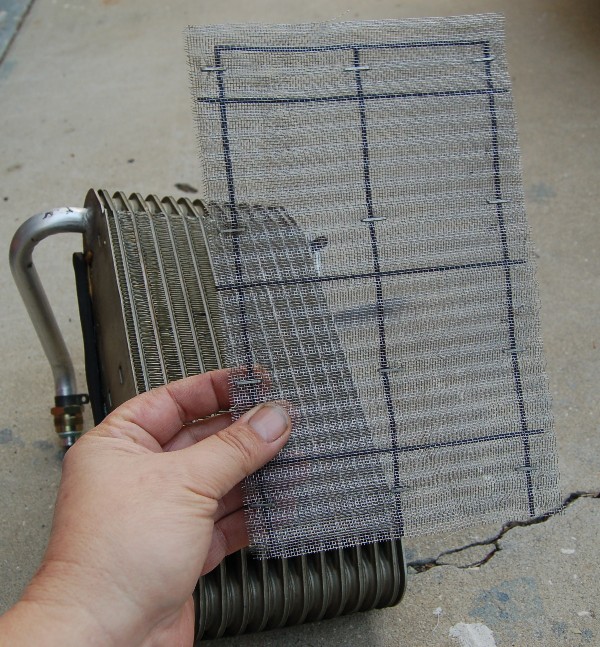 ------------------  [This message has been edited by randye (edited 08-23-2012).]


|
06:45 PM
|
|
josef644
Member Posts: 6939
From: Dickinson, Texas USA
Registered: Nov 2006
|
I wish I had used the brake cleaner on mine. I didn't think about it. I took mine in the kitchen and cleaned it in the kitchen sink with a tooothbrush. My wife was not home at the time. The one you did looks almost new. [This message has been edited by josef644 (edited 08-23-2012).]


|
06:57 PM
|
|
deceler8
Member Posts: 2139
From: Sioux City, Iowa USA
Registered: Sep 1999
|
Well, there's the definitive answer I was looking for. Thank God it's almost Fall. ------------------


|
07:42 PM
|
|
randye
Member Posts: 14175
From: Florida
Registered: Mar 2006
|
| | | quote | Originally posted by josef644:
I wish I had used the brake cleaner on mine. I didn't think about it. I took mine in the kitchen and cleaned it in the kitchen sink with a tooothbrush. My wife was not home at the time. The one you did looks almost new.
|
|
You can win over the wife to your car parts cleaning in the house VERY EASY once you show her how automotive spray brake cleaner instantly removes grease stains, gravy stains, oil and damn near ANY other stain on clothes and fabrics. I have some friends that run a catering business specializing in wedding receptions and they buy automotive brake cleaner by the CASE as they use it on their tablecloths and chair covers after an event. [This message has been edited by randye (edited 08-23-2012).]


|
07:47 PM
|
|
josef644
Member Posts: 6939
From: Dickinson, Texas USA
Registered: Nov 2006
|
What the heck is this black tar type of stuff put around the evaporator to keep the cold air from getting out of the air box cover. Mine is all hard and has lost all of its 'stickiness' 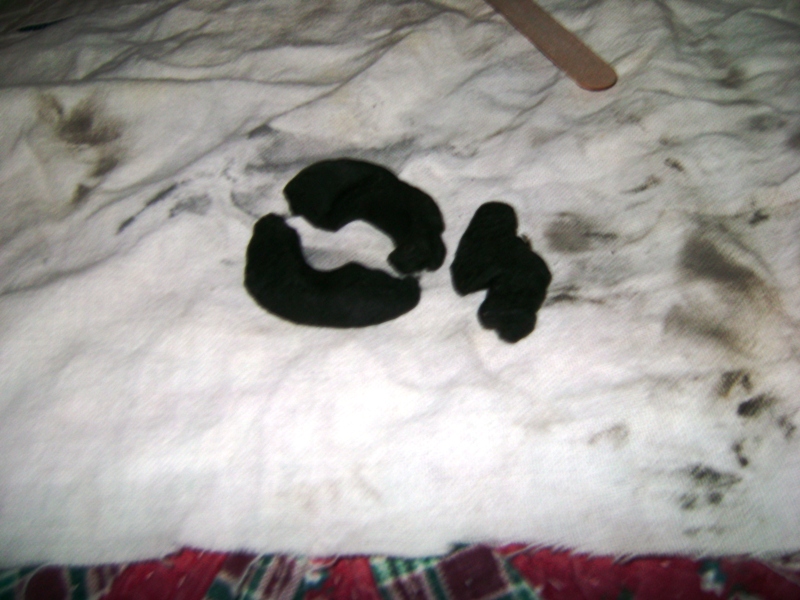


|
09:12 PM
|
|


.jpg)
.JPG)


