I have been reading and following tons of posts on here for years and now I am jumping in a doing a LS4 swap into my 88 Fiero GT.
Guess the best way to start is just a little background about my car Ariel. I bought her for a guy from Arizona with 144k miles on her and the body and interior were in very good shape. Got her home and did a tune up and ended up replacing just about everything up top on the engine and a new fuel pump. She has been running really well until about 5 months ago, she starts and runs fine until you come to a stop and then it just stops running. I know this is a pretty easy fix but the car now as 186k and the engine is starting to show its age.
With going to the Round Ups down here in Texas I got to see a lot of other Fieros and all of the swaps. You name it someone had that swap in one of the Fieros. I really took a liking to this one dudes car that had a LS4 in it. Just looked like the engine was designed for that car so I started to read anything and everything I could about the LS4 swap into a Fiero. So many people on this forum have done such wonderful jobs of showing the swaps (FieroGuru and FieroKing) I have looked and studied yalls swaps the most and will be using tips and tricks both of yall have come up with. So I started the search for a LS4, not fast just looking around and I posted in our local groups facebook page about if anyone knew someone that had a LS4 and engine for sale. Right away one of the guys said that someone on Pennocks has a LS4 that is half way through a swap and is selling it. I got online and went to The Mall and sure enough there is a post from katatak selling his LS4 and widebody kit. I sent him a PM and next thing you know I got his engine and all of the goodies he already collected for the swap. He gave me a very good deal and the wife and I had a good time driving up from Texas to Nebraska and back in 48 hours.
Now that brings us to the last week. I have pulled the 2.8 out of the car and started to strip everything out of the engine bay getting it ready for a real good cleaning and nice fresh paint. I am going to be doing FieroGuru's deck hinge mod so I have the extra room for the LS4. Some of the things I got from katatak include the FieroKing motor and transmission mounts for the LS4. These currently are mounted on a 87 cradle, and I have a 88 so I am in the process of measuring where the mounts are located and about to cut and then weld everything up on the 99 cradle. One thing that I am going to change is the overall height of the engine, right now it is setting up and above the cradle by the oil pan, so following FieroGuru I am going to notch the cradle in that area and lower all of the mounts by 1 inch. Going to be some rework on the mounts but I have been practicing welding, cutting and bending steel in these last 6 months or so I think I can do this stuff. Also looking at the work of all of the people on this forum has helped alot. Going to stop here, as I have more to do this week and I am excited about taking this project on.
Once I figure out how to attack images I will get a bunch of them posted.
[This message has been edited by Steelsoul (edited 05-24-2016).]
For images, use Pennock's Image Poster (PIP), link at the bottom of every page. Just follow the instructions to install/setup. Dead easy. There is a max size to images but pics are easy to resize with something as simple as MS paint. ------------------ Anything I might say is probably worth what you paid for it, so treat it accordingly!
Ok now that I have the image things figured out over the weekend I am going to start posting the pics and the build. Have done a whole bunch of stuff with very little to show so far HEHEHE.
[This message has been edited by Steelsoul (edited 05-20-2016).]
I have been wanting to do an LS1 in my 87, at the moment I am just collecting the parts to do it. Time and money is all it takes... in which case time I have... money... well lets just say thats a work in progress . Ill be interested to here where all you get all of the components for the swap. I have tried to get in contact with V8Archie however they seem to have an issue with responding to emails and answering the phone....
Well I have been pretty busy these last few weeks working on the car and doing chores around the house, something I have found out working on the car more. Have to spend some time with the wife to make sure she stays happy
Anyway I will just jump into this from where I left off about getting things ready. The engine compartment is cleaned out and waiting to get washed and painted. I will be doing both of these once I get done doing my test fits with the LS4.
Now I am to the point of removing the LS4 from the 87 cradle. This took me a number of hours and lots of cutting disc's. Found out the hard way go slow and try to keep the dang thing nice and level. I got all of the engine mounts cut out of the cradle and cleaned them up. This is the side mount, pretty fun to cut out and clean all the welds that Pat did, let me tell you guys he can weld !! The hole left in the old cradle The mount by the front of the engine.
After cleaning all the mounts up I bolted them on and started my first test fit to the cradle. A couple of cuts to clear the pump on the transmission and a cut by the transmission mount the engine just sat in there perfect. Got the level out and made sure nice and level and tack weld in the mounts
Fits perfect up under the old transmission mount location
The engine side mount
The other engine side mount just lined up with the holes in the cradle perfectly
Last mount
Tomorrow I plan on doing he first test fit and make sure I have enough room for everything. Once I am done with that then I am going to jump into the engine and start doing things to make the car go zoomer!!
I do have one question, when I was taking everything a part I noticed that one of the sleeves that I made for my coil overs is rubbing on the threads, I dont know why this would happen other then didn't weld the center ring in right??? Let me know what yall think
[This message has been edited by Steelsoul (edited 05-24-2016).]
Had a good weekend. Test fit went perfect and the engine fits like a glove. Good work FieroKing you make awesome mounts. Pulled the engine back out and welded up all the mounts and finished welding in the cut out for the transmission and the oil filter. Now to pull the engine from the transmission and start the rebuild. I will upload some images tonight when I get home from work.
Over the last few weeks I have been able to work on the car pretty much 2 or 3 nights a week and a good 5 or 6 hours on the weekend. Progress has been good and I am about to pull the heads and start on the porting job.
I used my enging hoist to lift the back of the car up thinking I could get my engine placed good enough to mount it for the test fit, but the legs got in the way so I ended up using jack stands and lots of 4 X 4's
Jacked up for the first try
I used some T - Fence post for the support
No matter which why I moved the engine hoist or the dolly I could not get the back mounts to line up.
After getting it on the 4X4's I was able to get the thing mounted in 15 minutes
Really easy to move this around
It is a fast fix and didnt have the right square stock to raise it enough to level the car
This engine just looks like it was built to fit into our cars.
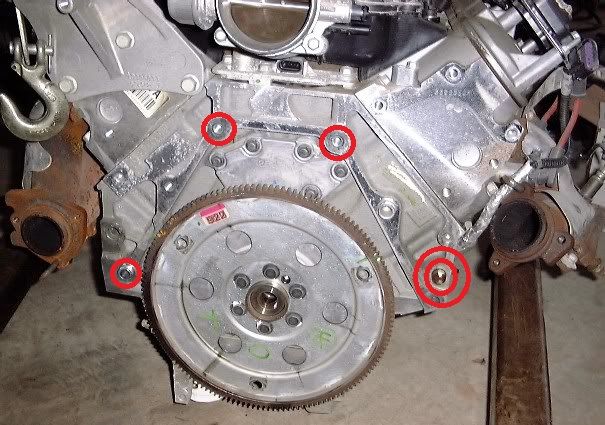
Now I am to a point that has me scratching my head... I am trying to mount the engine to my engine stand and I am a tad freaked out because there are only 3 bolts that will line up on the block. Other then that there are 2 holes that are used as pegs to mate the transmission and block together, neither of these holes have threads.
I will take some pics when I get home and show you what I am talking about.
Originally posted by Steelsoul: Now I am to a point that has me scratching my head... I am trying to mount the engine to my engine stand and I am a tad freaked out because there are only 3 bolts that will line up on the block. Other then that there are 2 holes that are used as pegs to mate the transmission and block together, neither of these holes have threads.
The top two circled bolt locations, I thread a bolt right into the block. For the lower hole with the double circles, I knock out the dowel pin (it is a RWD/SBC position and not needed), then pass a longer bolt through and put a washer and nut on the other side. For the lower hole with a single circle, you can thread a bolt into it, but remove the FWD/Metric dowel pin first. You can also knock out the other RWD/SBC dowel pin and use a longer bolt and nut on the backside.
[This message has been edited by fieroguru (edited 06-03-2016).]
So I got he block on the engine stand and started to take it the rest the way apart. I am going to leave in the crank and pistons and let the machine shop replace the bearing for the crank and cam.
Over the last few weeks I have been cleaning on the block and then just got all of the valves pulled from the heads. Next week is going to be starting on the porting job.
I have a old school 2 cylinder compressor with a 25 gallons tank, then I also have a 13 gallon tank that I picked up some where. That should give me enough air to be able to work and not listen to the compressor all the time.
Spent some good money on some burrs and also set up a small oiler setup for the tools.
Crap... I should have looked at your location before going on the HRPT - we went through Austin, TX on Monday of last week. I would have loved to stop by and check out your LS4 swap and you could have checked out mine and Tom Slick's.
Oh that would of been so kick butt. If I ever get up your way I will sure stop buy and talk shop and drink beer
Update on the heads. Have them all cleaned and valves removed. Tonight I start on porting. I have some aluminium bar stock I am going to do some practice on first then start the port job. really looking forward to this. While I am doing the porting also going to finish the hood relocation mounts that FieroGuru did and also start pulling the interior apart to run all the wires and take care of some basic upgrades.
After weeks of work I got the exhaust on both headers ported, all that is left on that is to polish it up pretty good. Last night I was doing the intake and was working on the long part and well my bit kinda grabbed and jumped to the side and it went right threw the wall into the water jacket. Talked to a number of dudes around Austin and this guy fixes this issue. Taking it to him tomorrow so he can see if it can be saved. If not then going to bone yard to get another head, if he fix it he is going to add aluminum to that side and I get to start over and try not to go threw the wall.
So moral of the story, dont attack the intake as hard as you do the exhaust.
Hey Wow it is just amazing how life can end up getting in the way of working on projects.. Lets see I have been looking for some new heads at the bone yards and no luck so far, but while I have been doing that I totaled my Firebird Formula 3 weeks ago when I drove thru a puddle and sucked water up into the engine, blowing cylinder #1.. I loved that car but insurance said its a flood damage car and its dead, So I took the money and ran... Bought a 1985 GMC Sierra and spent the rest on parts for the car. I have ordered and starting to get the following. Corvette Exhaust manifold Exhaust Flange Gasket set ANS Fuel Pressure Regulator 3/4 inch fuel rail Billet Cup style fuel filter High pressure fuel pump 42 lb injectors New main bearings and cam bearings Silver valley cover Electric power steering motor and control module from a 07 Saturn View Electric Power Steering controller Scoggin Dickens Cam 221/226 2 packages of Dynamat Complete stereo from a car from the bone yard with 3 Rockford Amps., full speakers by Infinity Kappa Race Style Comfort seats - From Ebay but super comfortable and bolts right in.
This weekend going to the bone yard in Belton to check out 3 Tahoe's hoping they still have the heads. I am still stuck on the water manifold, they engine I bought didn't have one, So I am looking into electric water pumps but don't want to spend 600 bucks on one. Other then that I am taking the block to the machine shop for the shop work and then going to hook up the wiring and start mocking up the exhaust. I am going to try and have this thing close to done by October but I know I am smoking crack LOL
With the fine tooth count of these burrs, they will clogup with aluminum very quickly. For aluminum you should have a much courser tooth count.And for ports a longer shank is super helpful. I use one of these for aluminum grinding: https://www.amazon.com/TEMO...+shank+aluminum+burr


 . Ill be interested to here where all you get all of the components for the swap. I have tried to get in contact with V8Archie however they seem to have an issue with responding to emails and answering the phone....