I'm working on the wiring of my N* swap I've been looking around for the wiring of stock fiero as I can't find what Are the wires in the center console and wear do they come from
The top pic is of the c203 connector you will need those , the 2nd pic go to taillights etc should not be any connections there pertaining to your swap.
------------------ 3800sc plug and play harnesses for sale.
Do you have access to a factory service manual for the Fiero? You should be able.to use the existing chassis-side Fiero connectors (C500, C203) to interface with the N* harness. To achieve this, you will also need the c500 and c203 engine side connectors and mate them to the N* wiring harness.
The first picture with the 2 small black connectors is the C203 connector. The wires for the speedo, oil pressure gauge, fuel pump relay, TCC, A/C, and power for ecm and injectors go through these connectors. Each wire location is labeled A-R
C203 A - for the upshift lamp on the dash which your Fiero may not have (grounding it with the key on would turn on the upshift lamp if your Fiero is wired for this)
B - this is the 12v + power supply from the F.Pump fuse in the IP (instrument panel) fuse box to the Fuel pump relay and oil pressure switch. I rewire the fuel pump circuit in all the swaps I do and don't use this wire to power the fuel pump.
C - the ECM grounds this wire to turn on the check engine lamp
D - A/C request - 12 volts comes in on this wire when A/C is requested (by the climate control panel AND A/C pressure cycling switch, if installed) to tell the ECM / A/C relay you want A/C turned on
E - oil pressure gauge feed. The oil pressure sending unit supplies this wire with a varying resistance signal to ground display the proper reading on the oil pressure gauge. DO NOT connect this wire to anything other than an OE Fiero oil pressure sending unit (or other GM 80 psi oil pressure sending unit).
F - 12v key on power comes from the ECM fuse in the IP fusebox on this wire - this is what you will need to hook up to the ECM (and share with the MAF sensor, if your engine uses one). This is a circuit seperate from C500 E3.
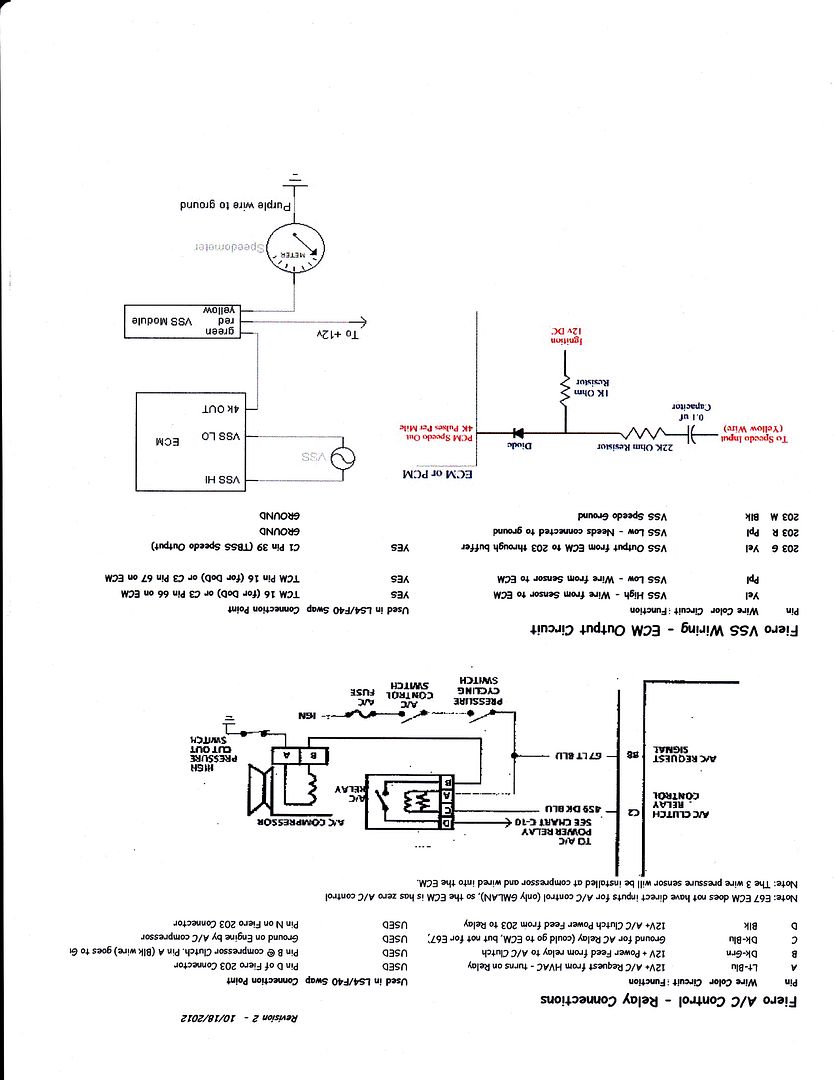
G - VSS high from sending unit to the speedometer. The speed sensor (or ECM) will provide a pulse on this wire to run the speedometer, 4000 pulses per mile. If you are using a newer GM ECM/PCM to supply the VSS signal to the speedo, then you will need to build and install this VSS interface circuit: http://www.gmtuners.com/fiero/speedo2.gif
H - 2000ppm VSS signal from speedo to factory Fiero ECM. You won't use this wire if you are using a newer than stock Fiero ECM that requires a 4000ppm or higher ppm VSS signal.
J - 12v key on power from INJ1 fuse. 12v + power (hot) with key in run and crank. I connect this to power all the injectors on the engine.
K - 12v key on power from INJ2 fuse. 12v + power (hot) with key in run and crank. I connect this to power other devices on the engine or electronic trans, such as the EVAP solenoid, EGR valve (if needed), Heated O2 sensor, etc.
L - this is the relay switched power supply from the fuel pump relay to the fuel pump. If you are doing the Fuel Pump Hot-Wire mod (http://www.gmtuners.com/fiero/hot_wire.htm) you are going to re-task this wire for use to power up the new fuel pump relay you will be installing using the HOT WIRE mod. If you are leaving the stock Fiero fuel pump relay wired up in your swap and not changing that wiring at all, then you won't change this tan/wht wire.
M - this is a ground supply to the speedometer unit in the cluster. Must be connected to engine block or a very good chassis ground.
N - this is a 12v + power supply from the climate control panel to the original Fiero A/C relay. This is the actual 12v + power that drives the A/C clutch. Hot with key on and ANY control (other than OFF) selected on the HVAC panel.
P - brake switch 12v + power feed to the TCC (torque converter clutch) circuit in the trans. If you have a manual transmission application, then this circuit probably doesn't exist in your Fiero.
R - this is the ground supply from the Fiero speedo to the speed sensor mounted on the trans. If you are running your Fiero speedo off the PCM in your swap, then you don't need to hook this wire up to anything at all.
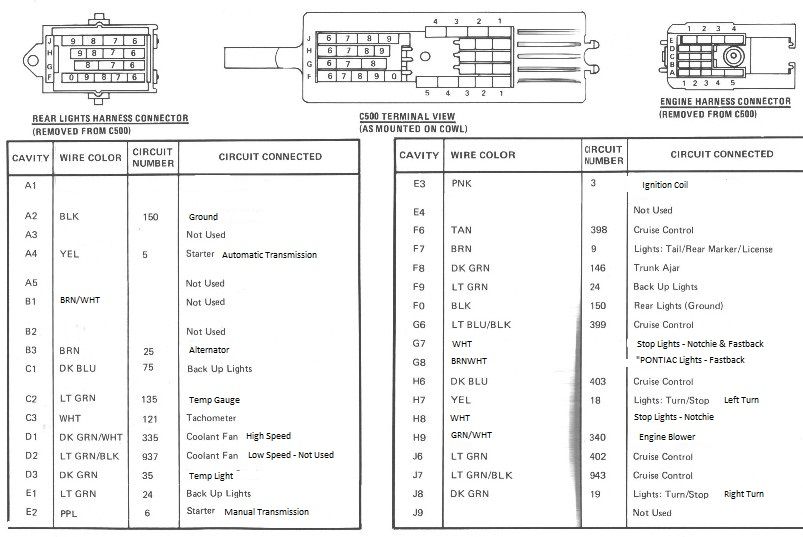
The second picture is the chassis harness that passes into the engine bay. This harness has tail lights, cruise, trunk light, engine bay cooling fan, etc, as well as several engine harness wires (starter, alternator, coil, backup lights, temp gauge and tach). The engine wires and chassis wires are seperated at the C500 connector that is located by the passenger strut tower in the engine bay. The wire locations are identified with a letter and number grid similar to the game battleship. Here is a C500 layout drawing that I have modified to included details from 85-88 with some additional descriptions. Not all wires are used in all years.
[This message has been edited by fieroguru (edited 02-26-2017).]
I have this two wires coming from under the intake manifold one one light blue and the other one is purple the purple is thicker than the blue one is that from the knock sensor
There's is a purple wire that comes out if the starter besides the red one that goes to the battery the purple should be the one that sends the signal to the starter do I need to install a relay for it or wear can I plug it to...this is for my northstar swap on a 88gt
There's is a purple wire that comes out if the starter besides the red one that goes to the battery the purple should be the one that sends the signal to the starter do I need to install a relay for it or wear can I plug it to...this is for my northstar swap on a 88gt
Pin E2 on the c500 connector is the purple starter wire for a manual tranmission fiero. There is no need for a relay. If your Fiero originally had an automatic the wire color is yellow and the pin location is A4 ( see the wiring chart I posted above).
[This message has been edited by fieroguru (edited 03-05-2017).]
That is the C500 connector, but it is missing the stock fiero engine harness section that plugs into it. That is the piece you need to hook up the starter wire (and alternator, coil power, tach, temp gauge and cooling fan). Here is what it looks like when removed from the C500 connector base (however this picture has it rotated 180 degrees from how it installs in the fiero and this is the automatic transmission version)
The top portion of this picture shows all 3 parts for the C500 connector (the connector base, tail light harness, engine harness), what their general shapes are, and how they are labeled.
This is my a/c compressor only 2 wires I'm running a ls1 computer with a Shelby program from sinister
I can't see the picture (firewall issue), but if you only have 2 wires, then those are for the AC clutch (my LS4 AC compressor is similar and only had 2 wires). When you get a custom AC hose made, you will want to install the 3 wire pressure switch in the high pressure side. This will allow the PCM to monitor the pressure and turn the clutch on/off. Additionally, you will need to get a pin out for the PCM that you are using to figure out what pins on the PCM need the AC request (PCM needs to know when AC is turned on so it can bump the idle and kick on the fan) as well as the control wire for the relay (this allows the PCM to cycle the AC clutch to avoid over pressure on the high side and to turn off AC for WOT).
You can google the PCM number and usually get the pinout diagram. If you can't find it, post the number and I will check my files.
Can I just connect pin n from the c-203 connector to the green wire on the AC compressor that way the AC clutch engages when I turn on the AC
Pin N has power when any portion of the HVAC controls is on (so it will have 12V with the heat on). Pin C likely isn't rated for the current draw for the AC clutch, which is why it triggers a relay vs. activating the clutch directly. The AC compressor will run if you bypass the pressure switch and eliminate ecm control, but it won't cycle on/off and will likely over pressurize the system and blow a hose or fitting. Also, if the ecm doesn't see the AC request signal, you will likely have an issue with the engine stalling when the clutch pedal is pressed as you approach a stop.
Ok guys i hooked up everything accordingly to my diagram but hit a wall the starter won't crank so i cheked the purple wire coming from connector c500 and there is no power getting to it so I went under the steering wheel and also check for power at the clutch switch on the purple wire and the yellow wire neither of them had power all this while the ignition switch was on.... The good thing is that the fuel pump does turn on I connected this to the wire J on connector 203 the bad news is that it wont cut off when I switch the ignition to on I could actually hear the injectors spray gas I think the fuel pump pressure forces out through the injectors There is pretty good power to the car I'm using a brand new battery and it's also grounded very good to the engine
[This message has been edited by rodrigo (edited 03-07-2017).]
I was thinking that maybe the injectors are not getting any power it started getting late so I didn't check for that but do the injectors keep the gas from spraying gas into the cylinder when they have power?
The yellow will have power when the key is turned to START. The purple should run to the starter. Jumper the yellow to the purple and the engine should crank when the key is turned to START.
I think it's the clutch switch that doesn't work because I jumped a cable in between and you can hear the starter solenoid I need to get a direct wire from the starter straight to the battery because I spliced a cable together and I think that's why the starter won't turn and I got ground from a plate on the engine next to a pully is that a good place
There is a orange with black wire that comes from the harness of the injected connector on the side of the injector connector it is black at the connection turns orange with black does anybody have any idea what that wire is
The ep381 is a good choice for many engine swaps and it's a direct fit or can go with an aftermarket pump like dw200,walbro255, etc with slight modification.


.JPG)