So . . . my car is a 1986 2.8 4-speed with 10k miles.
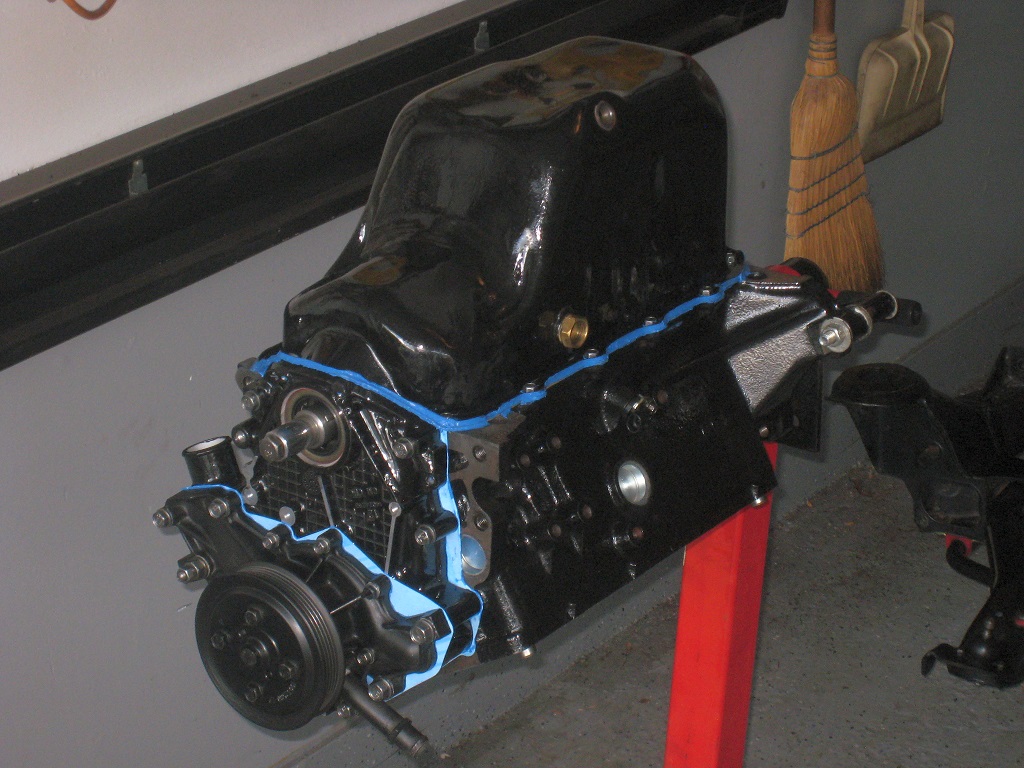
A few weeks before putting my car away for the winter, I tackled the leaky oil pan gasket. For the pre-87s, the two piece cork/rubber Felpro is all that is available. I called Fel-pro several times for installation advice and read endlessly on the best way to handle this. At Fel-pro's direction, I made sure to:
1) Clean both the engine and oil pan mating surfaces. 2) Ensured the oil pan was not bent in any way 3) Used a thin coat of the red, sticky Permatex "high tack" stuff to hold both the rubber and cork gasket pieces in place 4) Used the Permatex Ultra Black Gasket Maker, but only in the "transition points" where the cork met the rubber and small dabs around the bolt holes 5) Tightened all bolts to 1/2 specifications and in an X pattern, then doubled back and did it again within specifications in the X pattern. 6) Retorqued the bolts after 50 or so miles.
Aaaaaannnnnnddddd . . ..
It still leaks. Ironically, this time it is mostly around the small rubber section at the flywheel cover. So, I will tackle again here in a month when the car comes out for spring.
I might start "fresh" with a new oil pan, only cause the $89 is less important to me than making sure I don't have to do this again a third time. Should I try it the old fashion way with only the Permatex gasket maker around the whole thing and forgo using the Felpro gasket?
Man, I hate that there is not an all rubber version for the pre-87s . . .
Yeah, those multi-piece oil pan gaskets are junk. I got fed up with them, and decided to just use RTV silicone instead. THAT worked!
But to do the RTV silicone right, you have to be really careful. Put a 1/4" bead of RTV silicone all the way around the oil pan, then very carefully lift it into place. You only want to tighten the oil pan bolts until the RTV just barely starts to squish out. Then stop, and let the RTV harden. Then you can go back and tighten the oil pan bolts to spec.
Yes, the '85-86 V6 has a different oil pan, and a different timing cover. The part of the oil pan that's under the timing cover is angled downward, and the bottom of the timing cover is angled to match.
That said, you could also swap an '87-88 V6 timing cover and oil pan onto an earlier engine and get rid of the gasket issue.
On latter models with flat timing cover I would use the silicone metal ring type gasket. The rubber gasket type just plain suck unless the engine is upside down on a stand. And even then, I don't like them. Find a Victor Reins gasket. 3M yellow emblem/rubber adhesive. Permatex "gray" silicone. 2 cans brake clean. Long wood stem Q tips. Razor blade. First the inside of the engine is going to have to be dry of oil unless you have it out and upside down. Take the first can of brake clean and spray all around the inside of the engine to keep any oil from dripping down the sides of the block anywhere the gasket has to sit. After it has stopped raining down brake clean. with a towel wipe off the bottom of the timing cover and flat sections of the block. Spray brake clean into the channel that the seal part of the gasket sits near the flywheel. Very important that this is clean. With a clean part of the towel. Use a long screwdriver covered by the towel with some brake clean on the towel to clean the seal channel again. The Victor Reins gasket is going to be cork except the rear seal. It wont want to bend and stay there. Use a marker. Lay the cork onto the timing cover area where it meets the block and mark the gasket where it meets the timing cover/block mating point. Take a razor blade and only cut through half the thickness of the cork on the opposite side of where you marked it. Try not to cut through it. That cut line should match the mating line between the timing cover and block. Wipe a light coat of the adhesive on all of the flat surface where the cork is going to be. Let dry. There should be notches on each side of the cork corresponding to the tips of the rubber seal. On the block, put a SMALL dab of Permatex "gray" at the spot where the notches are going to end up. Like just taking your finger and wiping a little there. You have to leave room not to interfere with the rear seal. Then a bead of gray at the timing cover/block mating lines. Apply a coat of yellow adhesive to the side of the cork that mates with the timing cover/block. Then stick the gasket on. Work from the timing cover back. Taking care to make sure the cuts set in the bead of gray and the holes are lined up. Working on to the the back being careful to leave room for the notches. Let dry. At this point the cork should be very stable. Now the tricky part. Using the long Q tip. Saturate the end of the Q tip with yellow adhesive. Saturated so the cotton doesn't stick to the metal. Apply the adhesive into the seal channel. Apply some adhesive to the seal. Only the side that contacts into the channel. The next step is going to have to be done while the adhesive is still wet. Use anything you can to "tuck" the seal into the channel. A small wood dowel works well or even a drum stick. Then you will have to hold both ends of the seal until it is dry enough to stay in place. The next steps depend on if you intend on removing the oil pan later. If you want you can apply a very thin coat of silicone to the gasket, but I find it is not needed and the silicone makes it feel like you haven't tightened enough and makes you want to tighten more only to pinch the gasket. You only really need to apply more gray in 4 places. 2 on the opposite sides of the cuts at the timing cover/block seam. 2 at the notches between the cork and the rear seal. At the rear seal you use the silicone to make a continuous seal across the notches. I would make those about a 1/4 inch bead. You don't need to apply silicone along the length of the seal. Make sure all bolt deformations are flattened out on the oil pan. Make sure the timing cover part of the oil pan is not bent upward. If you want to make it removable later, apply a very thin coat of oil, just wiping, onto the oil pan, to act as a release. Bolt the block part of the oil pan first. You can start the timing cover bolts but don't tighten them until you have finished with the block bolts. Finish by tightening the timing cover bolts.
[This message has been edited by cmechmann (edited 02-02-2018).]
Yeah, those multi-piece oil pan gaskets are junk. I got fed up with them, and decided to just use RTV silicone instead. THAT worked!
But to do the RTV silicone right, you have to be really careful. Put a 1/4" bead of RTV silicone all the way around the oil pan, then very carefully lift it into place. You only want to tighten the oil pan bolts until the RTV just barely starts to squish out. Then stop, and let the RTV harden. Then you can go back and tighten the oil pan bolts to spec.
+1 on this method. I use this all the time on oil and trans pans. People complain about the extra work in scraping if you every have to remove. But I figured it's equal or less then removing and replacing the pan with different seals/cleaning methods/straightening because it keeps leaking.
Yes, the '85-86 V6 has a different oil pan, and a different timing cover. The part of the oil pan that's under the timing cover is angled downward, and the bottom of the timing cover is angled to match.
That said, you could also swap an '87-88 V6 timing cover and oil pan onto an earlier engine and get rid of the gasket issue.
What’s involved - is it as simple as ordering a new pan and then finding a timing cover at a junkyard?
I've heard (and read on some RTV packages) about letting RTV set prior to torquing bolts... kind of makes sense I guess to possibly get a better seal, though if you wait too long, I imagine that you would have to torque the bolts excessively to draw the pan into position, which may distort the lip around the pan.
At my work we use RTV for sealing all kinds of electronics enclosures; case torquing is done in a single step. A two-step case torquing would be too time-consuming and cost-prohibitive, I suppose (unthinkable, really). Would two-step torquing be any better, I'm not sure, but the single-step torquing works for us in production.
I did my engine with the 2-piece rubber/cork gaskets, but I went to town with RTV on both sides of each gasket, and in the corners, and everywhere... It doesn't run though, so I have no idea if it will leak or not.
I did the final cleaning of the pan and block with a wax and grease remover solvent intended for paint prep (BASF Limco 203).
What’s involved - is it as simple as ordering a new pan and then finding a timing cover at a junkyard?
New pan, timing cover, and a gasket.
Timing cover can be found from a junkyard, but is available new if you want to save yourself the hassle of finding one and then cleaning it.
Needless to say, the water pump needs to be undone to replace the timing chain cover, and if your timing chain cover doesn't come from an 87-88 Fiero, you'll need to transfer over (and then time) the graduated timing scale from your Fiero to the new timing cover.
Thanks. Probably not the way I want to go - don’t not want to get into water pump removal. I guess I’m back to possibly using RTV and no gasket ...
[This message has been edited by USMUCL (edited 02-03-2018).]
Originally posted by pmbrunelle: I've heard (and read on some RTV packages) about letting RTV set prior to torquing bolts... kind of makes sense I guess to possibly get a better seal, though if you wait too long, I imagine that you would have to torque the bolts excessively to draw the pan into position, which may distort the lip around the pan.
There is approximately 1/4" gap between the oil pump pickup and the floor of the oil pan. If you draw the oil pan up, that gap narrows. And you could possibly have oil starvation issues. To preserve that gap, you want to make your "RTV gasket" approximately the same thickness as the stock one.
One aspect I hated about replacing it .... you have to lift the engine up by the pan. Not a problem with the old gasket in. But, it can’t be good for the new gasket to put that much pressure on it .... even if you wait for any sealants to cure.
[This message has been edited by USMUCL (edited 02-03-2018).]
Originally posted by Blacktree:To preserve that gap, you want to make your "RTV gasket" approximately the same thickness as the stock one.
I considered using only RTV, but I figured that painting the cork gasket with RTV would seal the same and it would be easier to maintain a consistent gap.
On the bearing cap groove area, it seems like there would be too much gap to fill with RTV alone. Did you use the rubber piece there?
quote
Originally posted by USMUCL:
One aspect I hated about replacing it .... you have to lift the engine up by the pan. Not a problem with the old gasket in. But, it can’t be good for the new gasket to put that much pressure on it .... even if you wait for any sealants to cure.
I seem to remember seeing a tool for this job... more or less a steel beam (could be wood though) which spans the strut towers, and then you hang the engine from it during the procedure. Or maybe with the decklid removed, it may be possible to lift the front of the engine using a cherry picker.
OP leaks are often really bad Crank or OP drain bolts seal(s). Clean all and watch them.
Torque to spec have problems... For one Torque data is for Clean Dry Threads. If you have oil in the threads then you often way over torque and destroy the gaskets.
Most RTV etc needs 12 to 48 hr to set fully. (Weather temp and moisture affects set times.) So Do Not run the engine until has time to set.
------------------ Dr. Ian Malcolm: Yeah, but your scientists were so preoccupied with whether or not they could, they didn't stop to think if they should. (Jurassic Park)
Okay, thanks, guys. Makes sense about accidentally over-torqueing because of dirty bolt holes . . . when I had torqued closer to the maximum of specifications, it indeed split the gasket a little in a couple places. So, maybe it was overtorqued. However, those places are not where the gasket leaked.
And I do have access to a lift. If I went RTV only, I would probably take the advice offered earlier in this thread and just barely torque it down and then wait 24 hours. Then torque to minimum specs with the RTV set. From there, I am thinking the challenge would be getting the car back together without having to lift the engine by the pan so as the mitigate the chances that would ruin the seal.
I don't even bother with the "Gaskets" anymore. use the Gasket maker, on BOTH the block and the pan, put them togeter, tighten bolts While WET so they adhere to each other. It will not leak.
After much thought and research, I went with this product. This crap was likely nothing I had ever used before. Sprays on like cheese whiz, but it is a very thick, almost a sticky rubber consistency. It states the car can be put back into service immediately, though I gave it 24 hours to be safe. It also says that you don't have to re-torque the bolts, which I believe after using it.
I did NOT use any gasket. Instead, I put a 1/4" bead across all areas of the block where the pan would touch, completely surrounding each bolt hole. I filled up the groove by the flywheel with it rather than use the rubber part of the two piece cork/rubber gasket. I then put a 1/4" bead on the pan, but only the small part that would come in contact with that groove and the RTV I used to fill it. That way, I ensured I got enough to completely fill the space. Once in place and torqued, you can see the stuff start to ooze out the sides between the pan and the block, as well as from around the bolts, which I think is about ideal.
The hardest part is that you are supposed to get everything reassembled within 5 minutes after applying it. By the time I carefully got the pan negotiated into place and the bolts torqued in an X pattern, it was probably closer to 15 minutes. I suspect it didn't matter too much.
I hate to jinx it, but after 35ish miles and a bunch of idling, I so far have zero leaks -- dry as a bone. I was also pleased (after I got the pan down) to see that my rear main seal appears dry.
Just in case you are curious I purchased a new timing cover from RockAuto. It is a very nice unit. So if you wanted to make the switch to the newer style pan and timing cover you can get both from RockAuto. That is if you ever need to pull the pan again.
"The Right Stuff" is crazy for sure - it's borderline a cure-all for anything RTV related. While reading the top of this thread I was ready to jump in with "screw black RTV, use the right stuff!" but I see you found it on your own.
If you ever need to get it off, Permatex sells a remover product specifically designed to remove this sealant... follow the directions and it works very well.
is probably better than The Right Stuff, but less common and doesn't come in the ez cheeze dispenser. It works with everything, from engine oil to ATF and once it's on it doesn't go anywhere. Ever. There is also a specialized remover for it, which you definitely need.
Thought I would close this out in case anyone needs it in the future. After several hundred miles and a bunch of idle time, the oil pan is dry as a bone. I wasn't confident when I used it originally, but I now highly recommend the "Right Stuff" with no gasket to anyone doing this in the future to an 84-86 (with the old style pan). Obviously, with the 87-88 style, use the one-piece rubber gasket.
[This message has been edited by USMUCL (edited 05-29-2018).]
Well, figured I'd check back in for the next guy doing this. The Right Stuff didn't hold . . . entirely.
It is great everywhere but that one spot with the groove where the rubber part of the gasket would have went. I guess asking the RTV to fill in that gap AND seal the pan was a bridge too far.
It's a pretty slow seep though -- I can see it on the pan, but it hasn't gotten to a drip yet. So I'll wait until next spring and give it another shot. I think the answer is going to be using the Right Stuff in combination with only the rubber piece out of the cork/rubber two-piece gasket. I didn't use that piece last time because I was concerned that the 'transition' from the rubber onto the rest of the pan was only another spot for potential failure.
Will probably replace the pan next time also since it's cheap. I tried to last time, but I ended up being sent the wrong configuration pan. Can anyone confirm a part number for an oil pan for the 85-86 V6s?