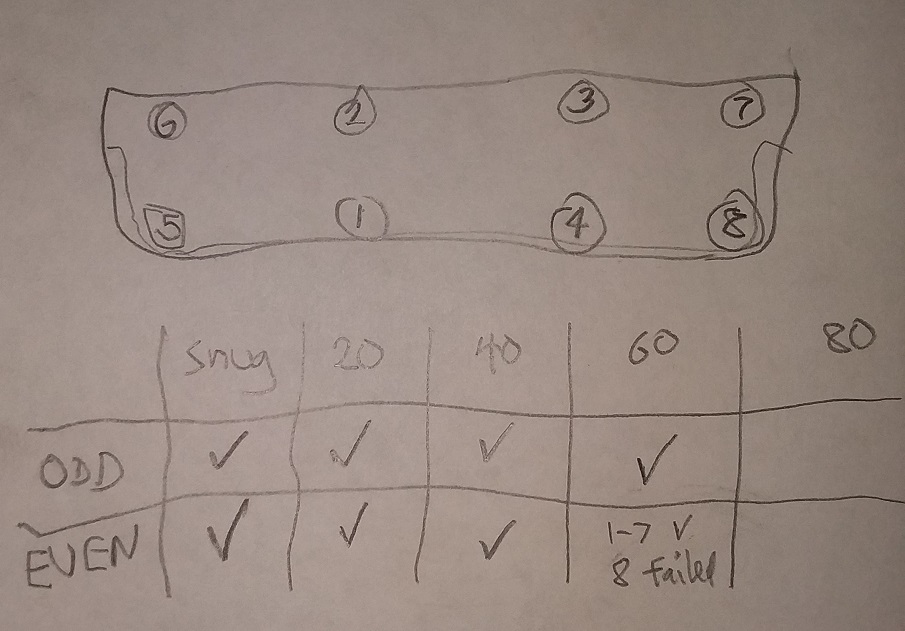
I fear I am in deep do-do here. Looking for some torque specs for my 2.8 I pulled this Table from the Forum. Given the huge range of 65-90 ft-lbs I elected to tighten my new bolts to 80, going in steps around the head from snug, to 20, 40, 60, then finally 80.
Here is the sheet I was using to manage the tightening sequence.
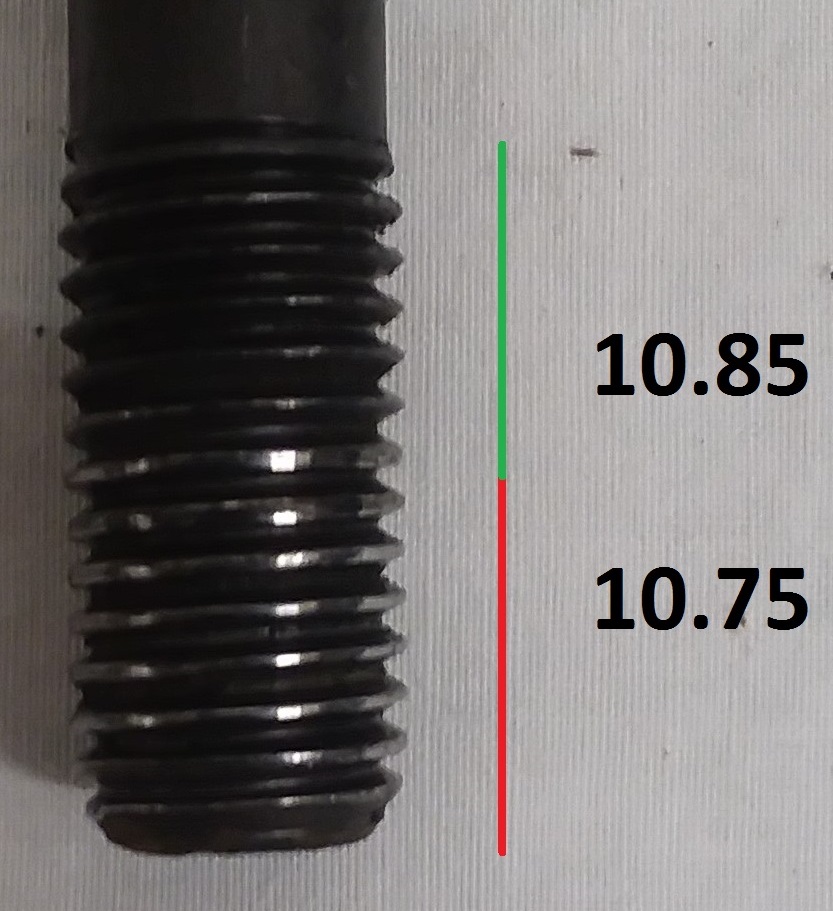
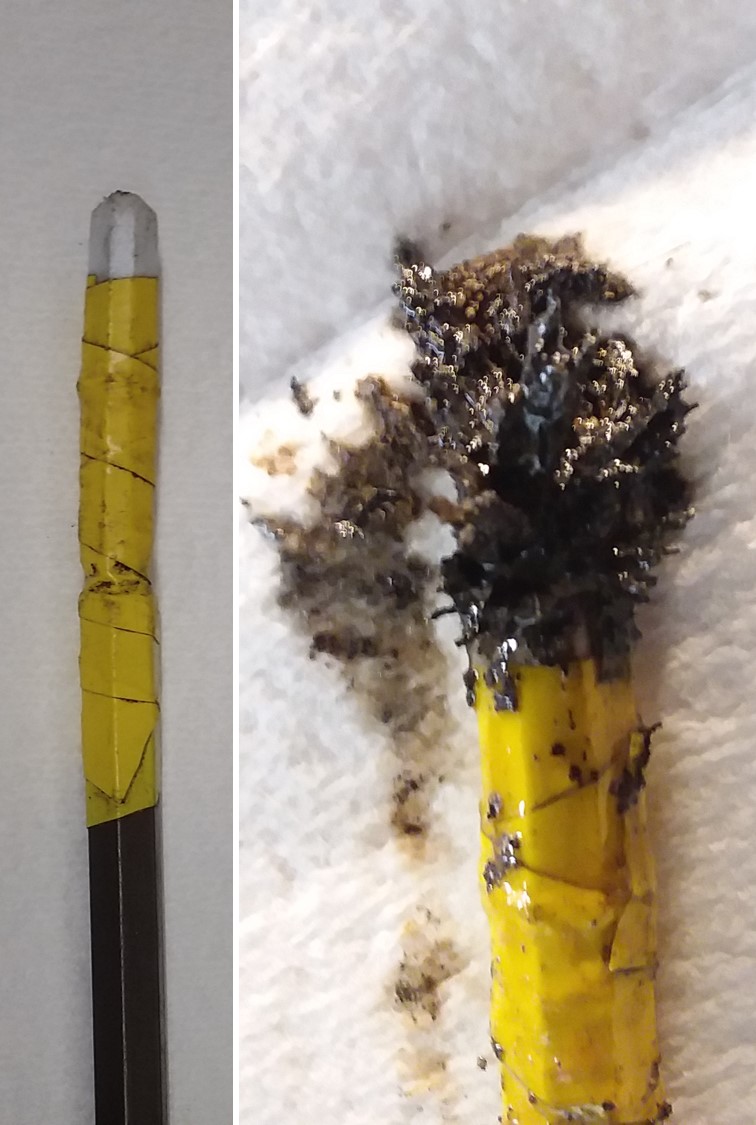
I had the Odd bank up to 60 and was finishing the Even bank when the last bolt, #8, suddenly gave way during tightening. I unscrewed it from the head and immediately saw that some of the threads had been sheared off, or rounded over. This picture shows that the 'polished' looking end threads now have a smaller diameter than the upper threads.
I have another new bolt spare that I could try but I am loath to do anything that might make the situation worse. All these bolts are M11 x 1.5.
Any suggestions?
[This message has been edited by Notorio (edited 12-21-2019).]
You need to check the threads in the block for damage. It sounds to me like the bolts have bottomed out and then the threads got damaged on the last twist. I always buy ARP studs and bolts for cylinder heads and connecting rods. Comes with lubricant and specific torque values for the engine you are working on. Expensive but worth it.
------------------ 86 GT built 2.2 ecotec turbo rear SLA suspension QA1 coilovers on tube arms
I have the 85 manual and it says (In the same format) that the torque spec is "65-75".......(On my 460 Ford in my jetboat they go to 140!) Did you chase the threads with a tap before?
If you can wait until Monday I can ask my Engine builder friend what he recommends....He builds absolutely everything- even sleeving blocks for numbers-matching builds. Has built drag race engines, etc...
By the way, your pic of the bolt did not show up....
Doh! Picture should now be there ...
I'll keep the stud idea in mind. Turns out that this is a through-hole into the water jacket, so no 'bottom' per se. All the threads were chased. Yikes, the heli-coil kits expensive ($50-60) for just the one M11 x 1.5 size but looks like an option even for a through-hole.
New data ... the original Pontiac bolt was a bit bigger (10.95) so I tried that to see what would happen. Same story, tightens nicely to about 40 ft-#s but above that starts spinning. Whatever the repair method will be I'd better order another head gasket and pull the head to examine the threads.
'Wait til Monday...' if we don't hit on a good solution over the weekend I shall certainly be thankful to hear what your engine builder friend has to say
IIRC, the head bolts on the 2.8L are Torque to yield. This requires replacing them with the same bolt. Also when replacing head bolts you should chase the threads in the block with a tap and then clean them out.
[This message has been edited by Dennis LaGrua (edited 12-21-2019).]
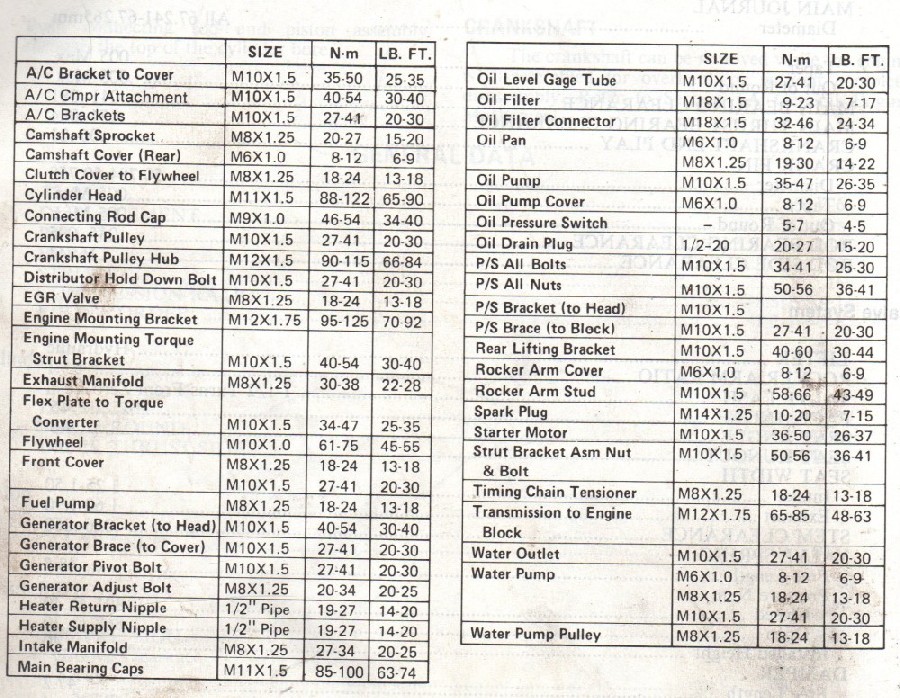
I just checked my manuals; I have an 88 and an 85- both say in the actual 66 Lb Ft in the assembly instructions.....The Haynes manual says the "65-75" for 85-87 and "65-90" for 88 Fieros.....This is very confusing and also, >65< to >90< is a very wide spread.
90 N.m = 66 Lb Ft which may be the root of the confusion......
When rebuilding my 2.8 last year I broke a head bolt, was not very happy about it, just torquing it down. I would err on the side caution and use the lower end of the torque scale.
[This message has been edited by Spadesluck (edited 12-21-2019).]
If I would / will be doing a rebuild buy new bolts for piece of mind. Its not expensive.
You don't wanna worry about head bolt failure. If you have 2500$ in a rebuilt engine, I don't think 150$ of head bolts will bother your wallet. May not be torque to yield bolts, just buy new ones...go with Fel-pro, ARP or GM.
There's one bolt that has a stud end to it.
Go with the FSM torque spec. Its always better to get an exact spec than a wide variation torque spec (example 65-90ft/lbs).
I just checked my manuals; I have an 88 and an 85- both say in the actual 66 Lb Ft in the assembly instructions.....The Haynes manual says the "65-75" for 85-87 and "65-90" for 88 Fieros.....This is very confusing and also, >65< to >90< is a very wide spread.
90 N.m = 66 Lb Ft which may be the root of the confusion......
That "65-90" FT-LBS is not a choice of either or. It's a 2 or three step process. In this case the 1st go around would be 65 ft lb. and the second would be the final torque of 65 ft lb. To remove any doubt I clipped the following from a web site.
[COLOR=#3333FF]PASS 1: Torque to a maximum of 30% of the final torque value in accordance with the torque sequence. Check that gasket is getting compressed uniformly. PASS 2: Torque to a maximum of 60% of the final torque value. PASS 3: Torque to the final torque value (100%). [/COLOR]
------------------ "Kilgore Trout once wrote a short story which was a dialogue between two pieces of yeast. They were discussing the possible purposes of life as they ate sugar and suffocated in their own excrement. Because of their limited intelligence, they never came close to guessing that they were making champagne." - Kurt Vonnegut
[This message has been edited by Spoon (edited 12-21-2019).]
If I would / will be doing a rebuild buy new bolts for piece of mind. Its not expensive.
The bolt set is new already.
quote
Originally posted by cvxjet:
I just checked my manuals; I have an 88 and an 85- both say in the actual 66 Lb Ft in the assembly instructions.....The Haynes manual says the "65-75" for 85-87 and "65-90" for 88 Fieros.....This is very confusing and also, >65< to >90< is a very wide spread.
90 N.m = 66 Lb Ft which may be the root of the confusion......
That is a very good explanation. I'm convinced. When I finish the heads I'll go to 65 for the final torque value.
BTW, I went ahead and got a Heli-coil kit, plus proper drill bit, plus another head gasket. Tomorrow I'll pull the head and make the repair. With it being a through-hole I'm wondering how I will get all of the cast iron shavings from the drill and the tap out of the bottom of the water jacket.
Perhaps I can lower a magnet down there to capture them. Then there will be the 'tab' that I have to break off the Heli-coil once it is in place.
[This message has been edited by Notorio (edited 12-21-2019).]
To vacuum up things in small areas, I use some vinyl tubing that fits just inside the crevice tool, then use some tape to seal it. If you have a large crevice tool, you can use a couple of sizes to step up........
When doing the head bolt thread repair I would strongly suggest a way of making sure the drilling/ tapping goes perfectly straight.. I know the head bolt hole in the cylinder head is larger than the bolt so there is some “wiggle” room if it’s not perfect. I would use a drill and a tap guide to ensure it goes well. I might be a little paranoid or to cautious but as a car mechanic I see stuff towed to my shop to repair someone else’s attempted repair. * also, don’t forget to use proper lubricant when drilling/ tapping.
-Crasian
[This message has been edited by Crasian (edited 12-22-2019).]
New bolt won't help because already wreck the hole. May seem to work but new bolt can fail and likely soon.
"Standard" Helicoil types often won't help either. Need a repair for the job here.
If one hole have over torque Likely all has and may need fixing too. Rebuilding shops maybe have right head bolt thread repairs.
Torque spec is for Clean Dry Threads unless FSM say otherwise like is some engine a bolt needs thread sealer because goes thru metal and gets coolant exposure. That bolt often has a different torque then others.
------------------ Dr. Ian Malcolm: Yeah, but your scientists were so preoccupied with whether or not they could, they didn't stop to think if they should. (Jurassic Park)
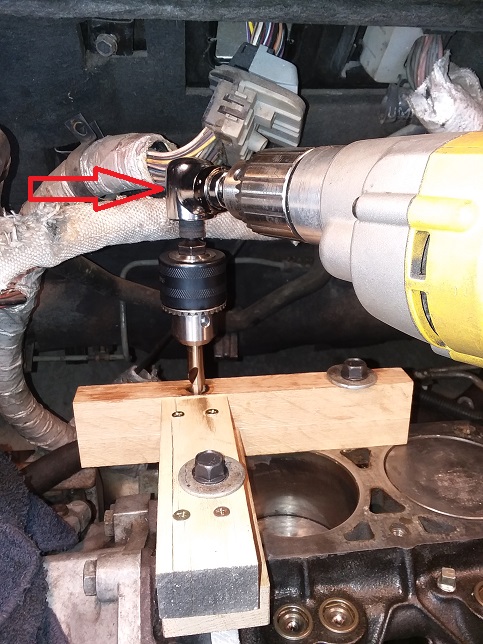
So here is the happy outcome, except one tool bit the dust. With the block in the car you can't get a drill straight into the stripped holes next to the firewall. The heli-coil for M11 takes a 29/64 drill bit which is quite long and of course about a 1/2" shank, thus a 1/2" chuck is a must. After removing the computer and one of the pin blocks I could just barely get my angle drive adapter in place. I made a jig to keep the drill straight using a head gasket as a template. Wood, not the best, but it actually got the job done.
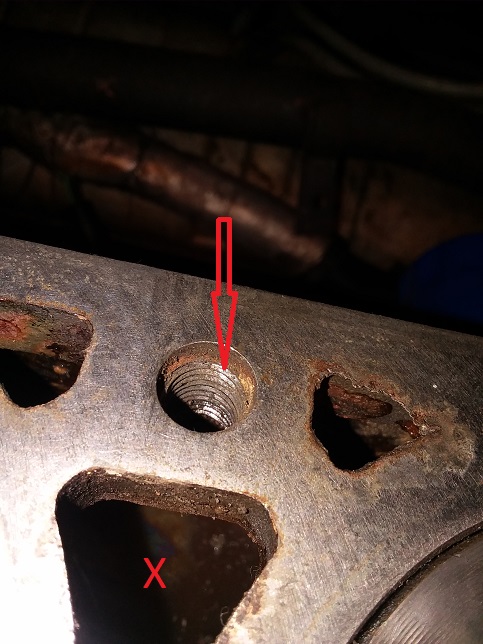
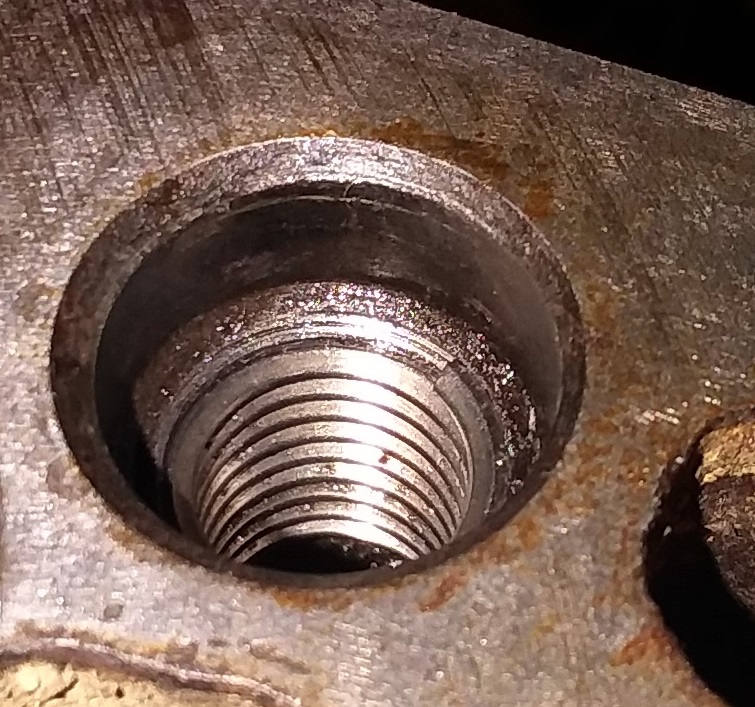
After closer examination of all eight of the threaded holes I discovered a second one that looked pretty bad so I repaired two instead of just the one that failed at 60 ft-#. You can sort of see it in this picture but to the eye it is very, very trashed. The 'X' marks the water jacket hole where I inserted a magnet to collect the iron debris. BTW, 6 of the holes are through holes and 2 of them are blind ...
Here is the magnetic tool, just a stir bar taped onto my old oil pump drive shaft. This picture shows Before and After sweeping the bottom of the core, pretty scary. All of that was from the drilling and tapping operation (i.e. I had totally picked up the TON of iron debris I found in the block BEFORE doing my own drilling.) It takes 4-5 cycles of sweep/clean-the-tool to get all the shavings.
Lastly, here is the brand spanking new heli-coil in its new home. I am happy to report the head is now installed and torqued to specs.
And I forgot the most important thing, using a drill (instead of a drill press) the bit wants to bite and gets stuck. I had to work up from a smaller size to get to the 29/64. Here are the bits that I used (which were $5 each at my Ace Hardware.)
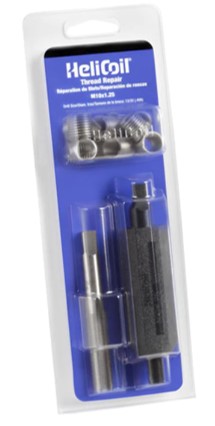
Lastly, here is the expensive heli-coil repair kit. This comes with the coils, the insertion tool, a guide (to keep the tap straight), and the tap itself.
[This message has been edited by Notorio (edited 12-31-2019).]
Did you put any kind of sealant between the helicoil and the engine block?
No, I did not. I thought about it ... my concern was that putting any type of goop on the threads might promote slippage of the coil during threading or tightening of the bolt. Having never used a heli-coil before I was afraid that might create a problem.
I'm thinking about coolant leaking between the helicoil and engine block, then going up alongside the bolt, and then leaking from underneath the bolt head.
I'm assuming that the bolt head isn't perfectly sealed with the cylinder head.
Originally posted by pmbrunelle: I'm thinking about coolant leaking between the helicoil and engine block, then going up alongside the bolt, and then leaking from underneath the bolt head.
I'm assuming that the bolt head isn't perfectly sealed with the cylinder head.
Ye gods, was I supposed to put sealer on the bolt threads? or heads?
Originally posted by fierogt28: The new bolts normally come coated with sealer on them...If you are re-using the stock old bolts, GM sealer is required.
I don't remember if I got my bolt set from TFS, Rodney, O'Reilly's, or Rockauto. If I can figure that out I can see what they say about pre-applied sealer. Recalling what the new bolts looked like, however, I didn't see anything resembling a 'sealer' unless it a clear coating (maybe that swells with exposure to water??)
quote
Originally posted by olejoedad: Why would you need to order new bolts?
My few months old 'new' set of bolts has been stretched to 60ft# Once on the even side and Twice on the odd, striped treads side. Is it really save to remove and torque them again?
Since you can remove the bolts without disturbing the head, I would just remove the head bolts in the torque sequence and put the sealer on the bolts and then retorque them. The gaskets should be fine as long as you have not topped up the antifreeze yet.
Since you did not put the thread sealant on and the service manual calls for it, it is my opinion that you did not torque to the recomended value. Most thread sealants have a bit of lubricating property and that means that 66lbs of applied torque is higher than 66lbs of torque applied to dry threads. So take the bolts out, put the thread sealant on (I would just put a lot of it on the ones that have had the thread repair) and torque to 66lbs and I think you will be fine. Leave it for a week or so before putting fluids in.
The bolts you have should be fine, just check them for damage.
------------------ 86 GT built 2.2 ecotec turbo rear SLA suspension QA1 coilovers on tube arms
Originally posted by Patrick: If worse comes to worse, would a copper washer seal the bolt head?
Maybe, but I think the washer could creep under the pressure from the bolt, similarly to the aluminium flywheel horror stories. If that happens, then the head would become loose, and the head gasket would leak.
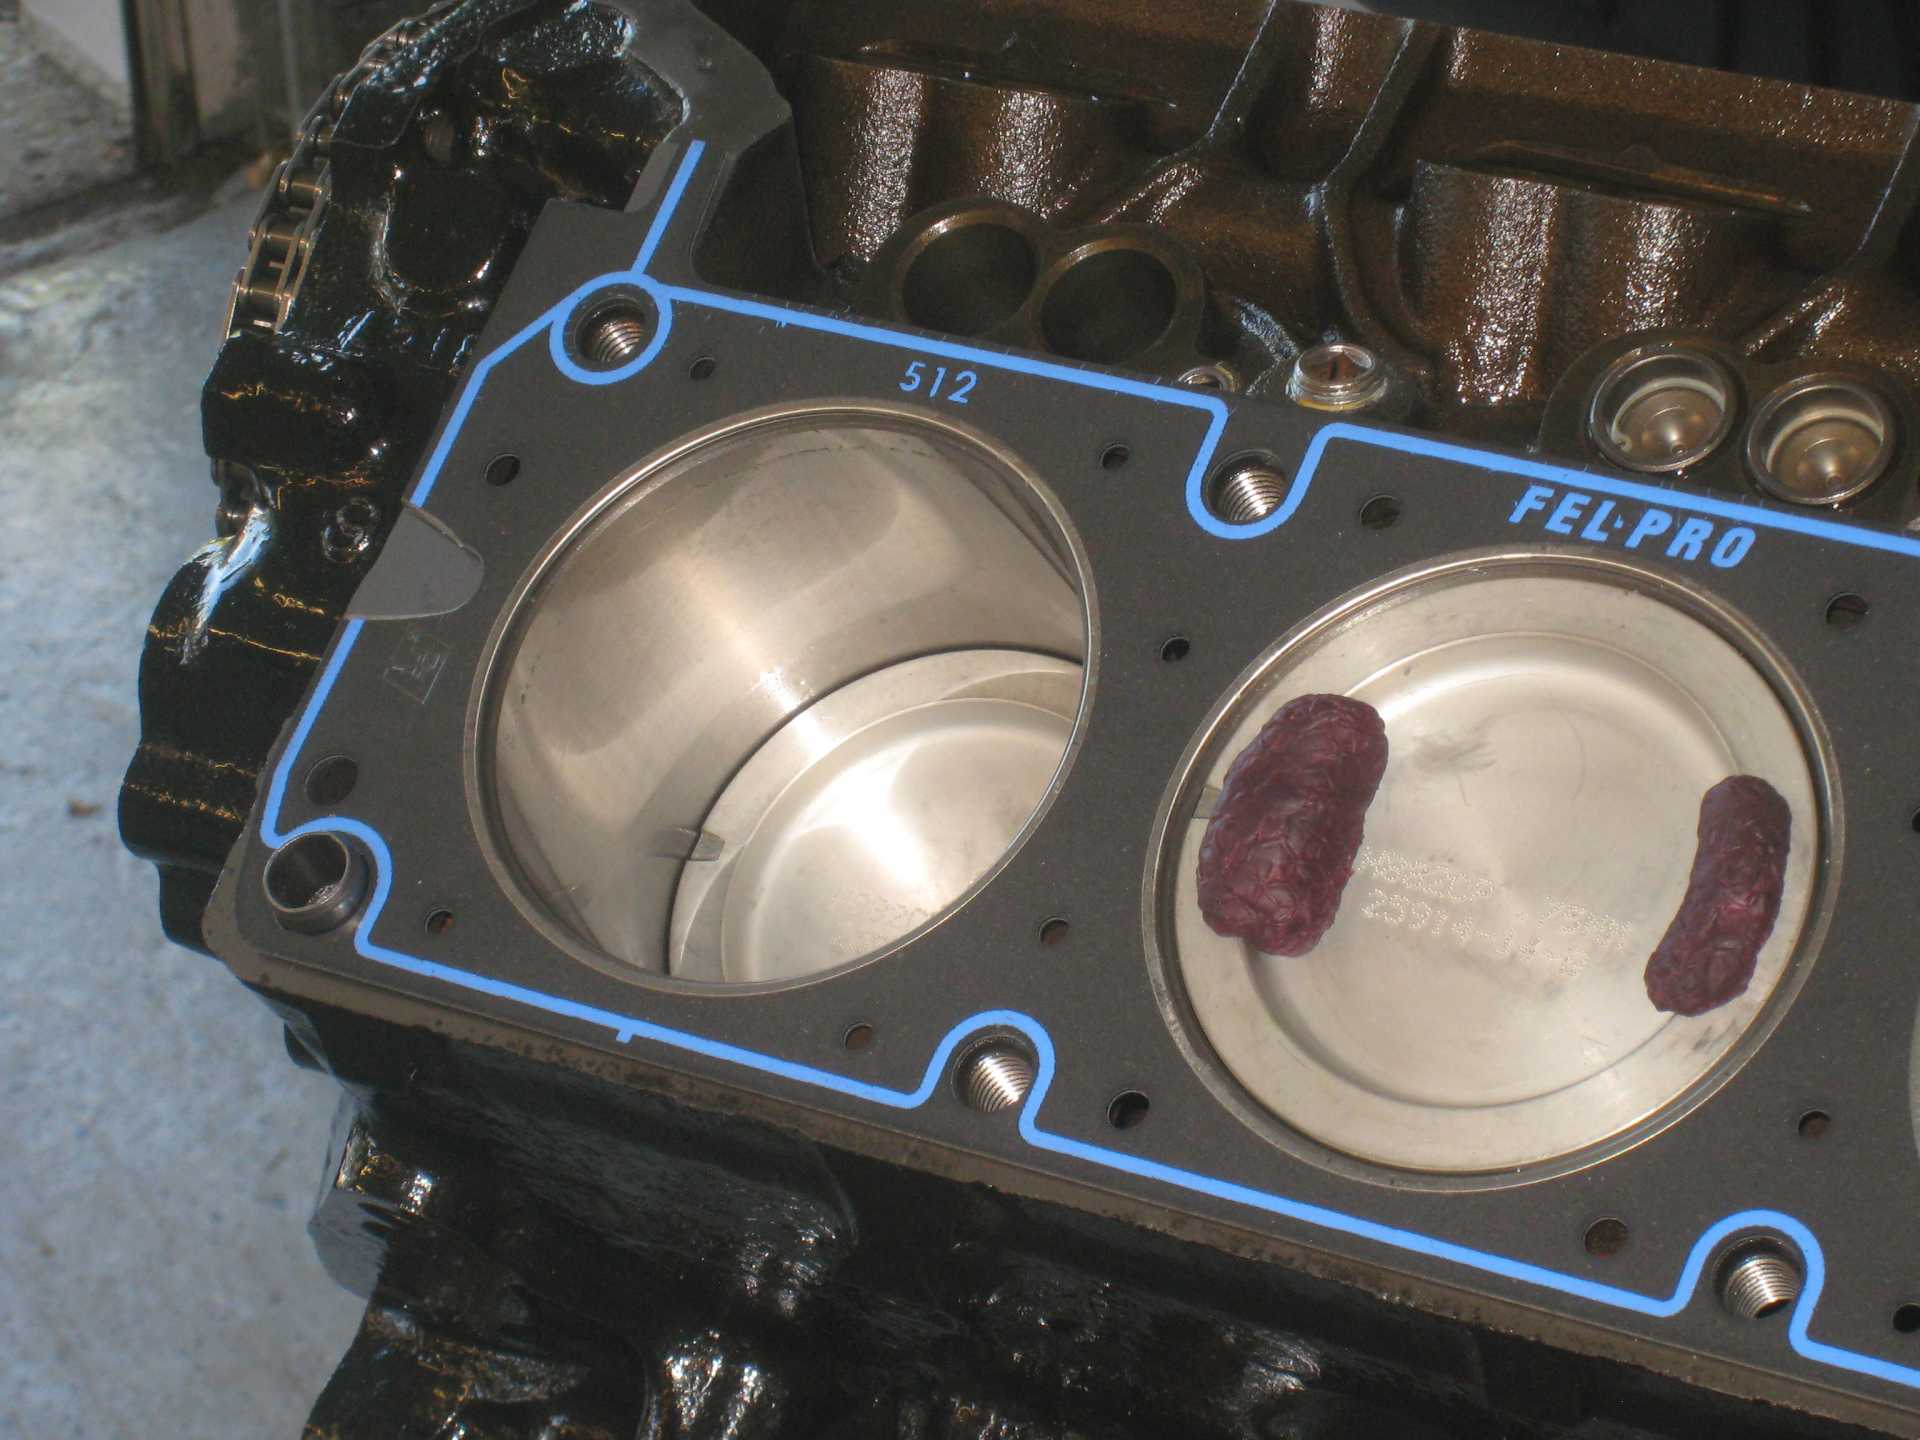
Another possible issue is that the copper washer doesn't resolve the possible leak path at the head gasket. Here is the head gasket of my Fiero's engine:
There is a blue rubbery sealing material... it doesn't do a full circle around some of the head bolts, perhaps because the head gasket designer did not take into account the need to seal coolant around the head bolt holes. I don't know, further investigation would be required. Other head gaskets will differ from this one.
In terms of the lazy-way fixes that require little initial effort, with good chances of problems down the road, I'd probably try radiator stop-leak.
quote
Originally posted by wftb: Since you can remove the bolts without disturbing the head, I would just remove the head bolts in the torque sequence and put the sealer on the bolts and then retorque them. The gaskets should be fine as long as you have not topped up the antifreeze yet.
That procedure does not put sealant between the helicoil and the engine block.
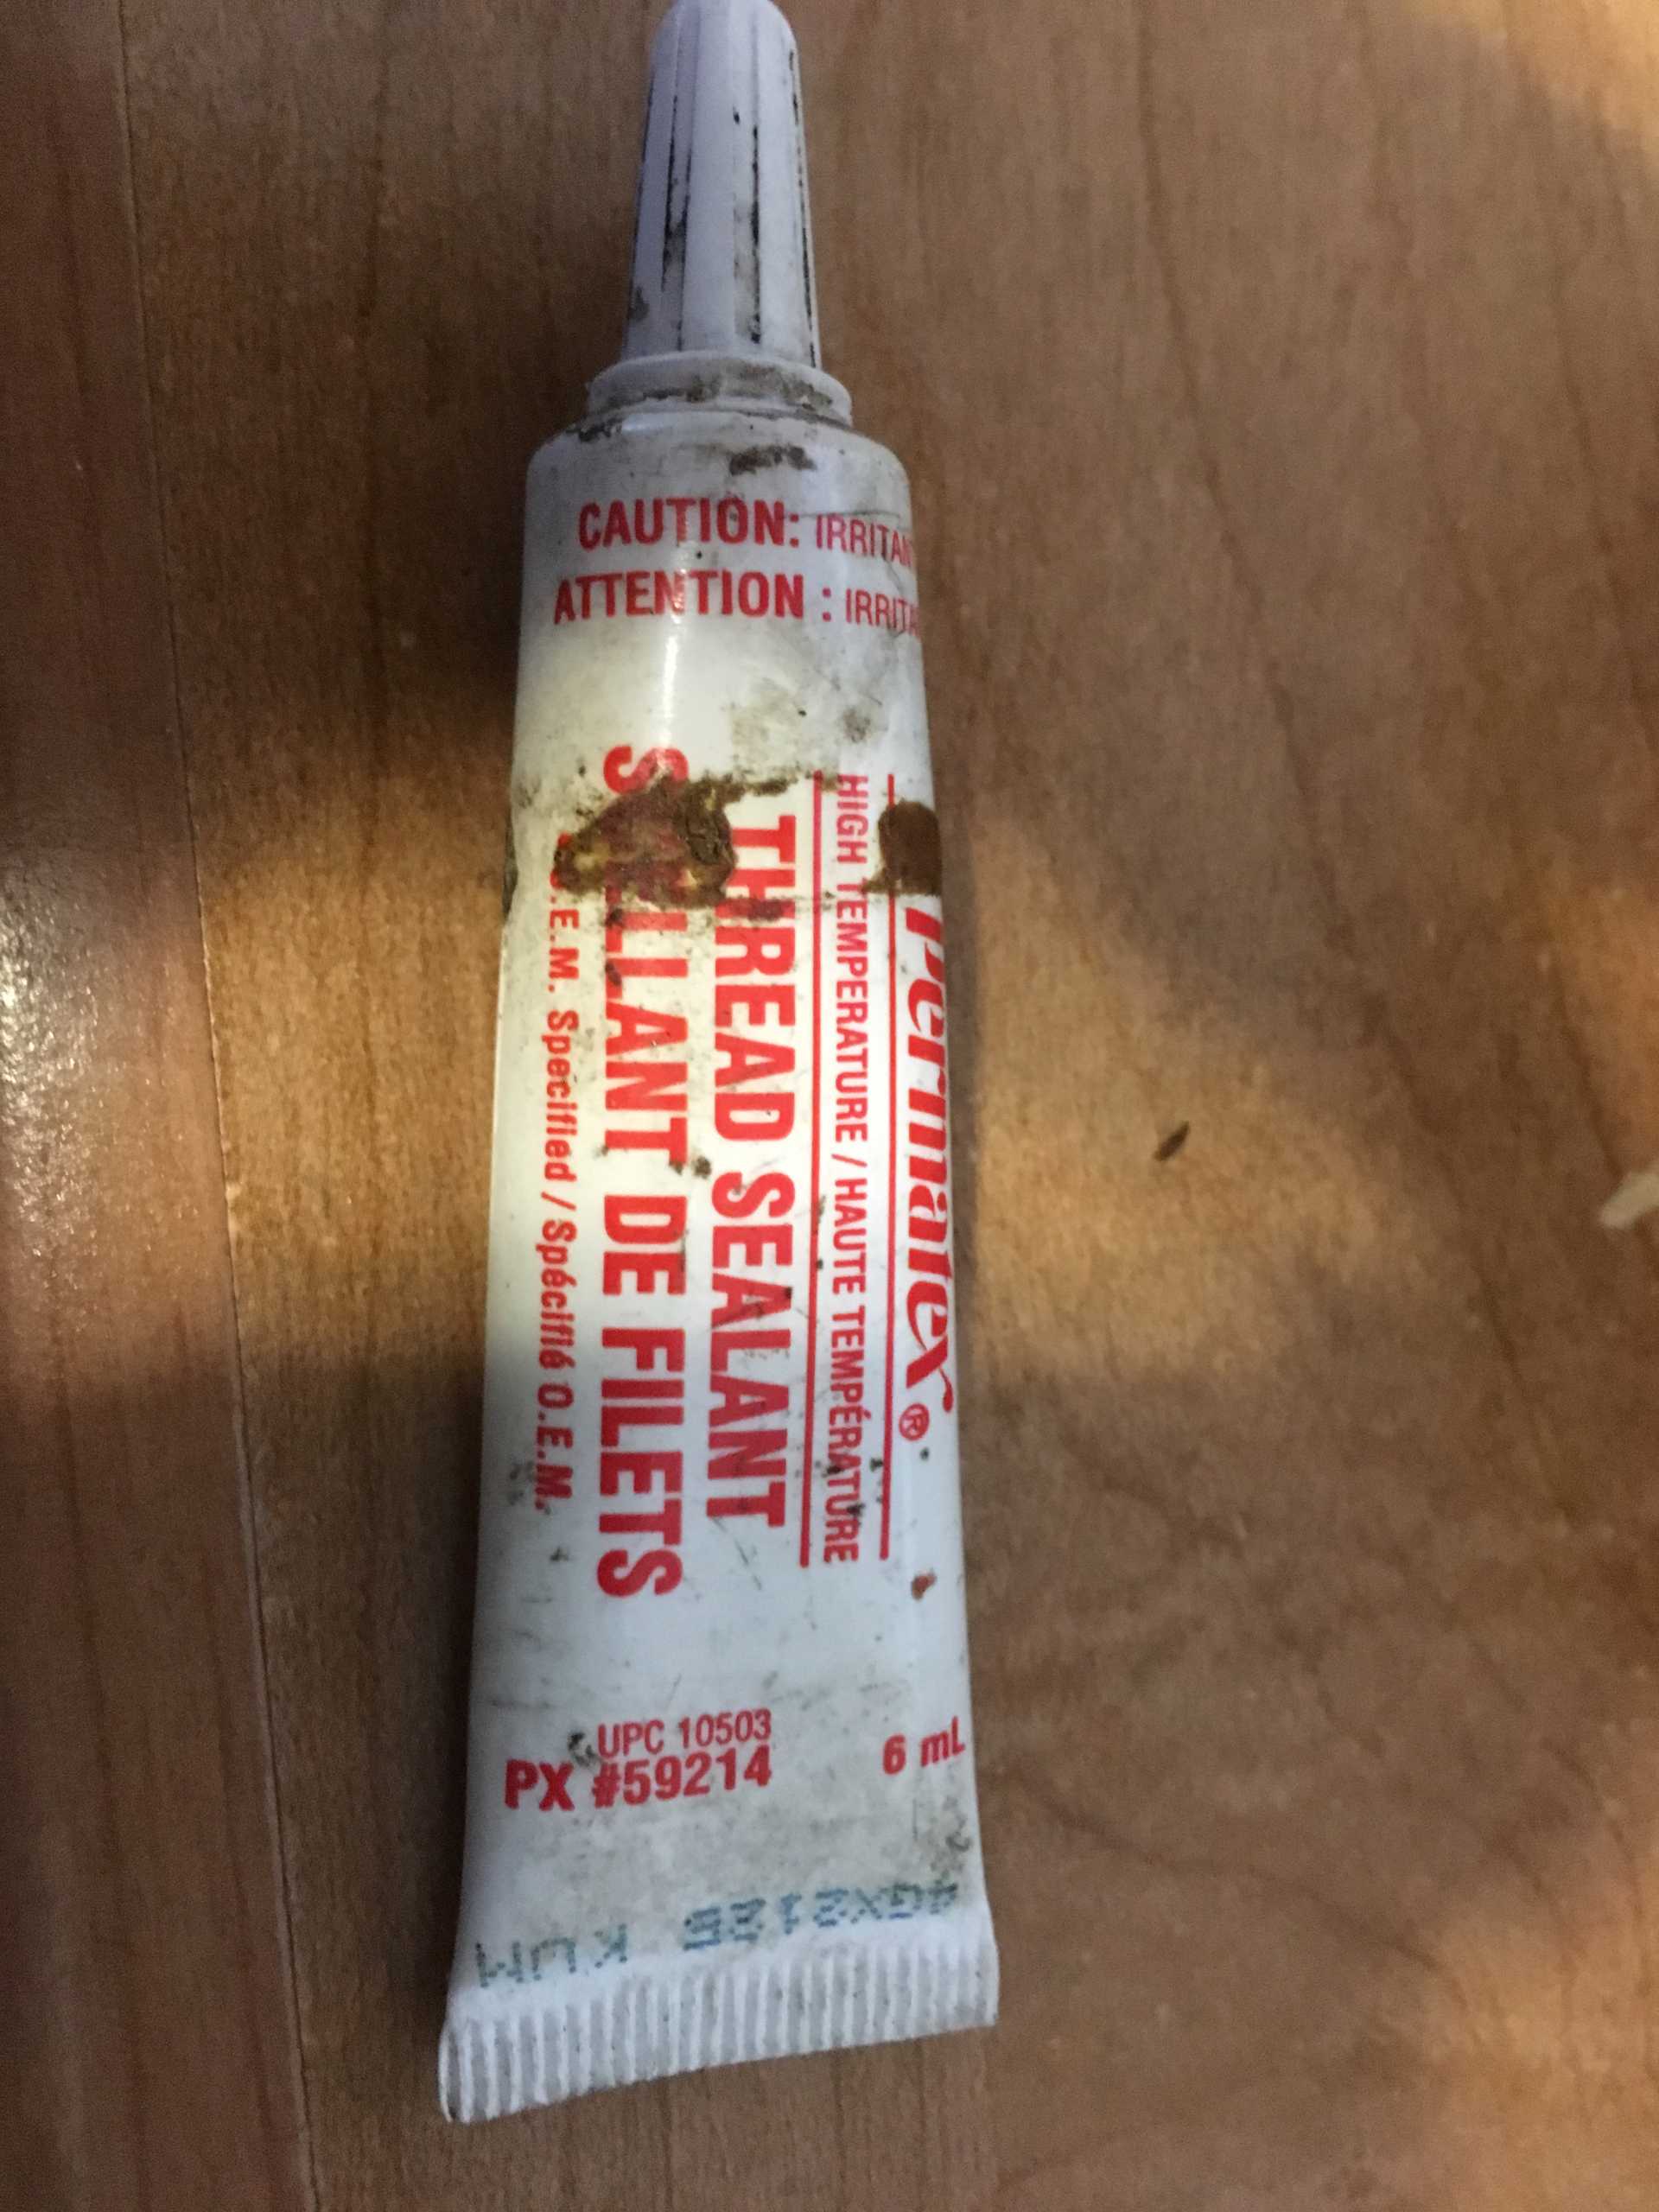
My local NAPA auto parts had a product called Loctite PST. The package said it was good for cylinder head bolts. It is a white paste, with a consistency slightly thinner than that of toothpaste.
[This message has been edited by pmbrunelle (edited 01-01-2020).]
If you look at the pic of the helicoil repaired hole you see a recessed shoulder on top of the threads. Excess sealant will fill that shoulder and should seep in to the helicoil threads. It would take a lot of pressure to get anything past those threads. If it doesnt work then he will have to spring for more gaskets. But I cant see being able to get those helicoils out without doing more damage. Use the runny white Loctite stuff, don't remember the part # offhand.
I also spent some time just now reading up about Helicoils and watching a video. It seems to me that they are not a tube that is threaded on both sides but a machined wire that is formed in to a tube that is threaded on both sides. The thread sealant applied to the bolt should therefore force its way through the helicoil and seal both the helicoil threads and the bolt threads. I admit I could be totally wrong about this, I have never had to use a helicoil so if there is somebody out there with more information feel free to correct me.
[This message has been edited by wftb (edited 01-01-2020).]
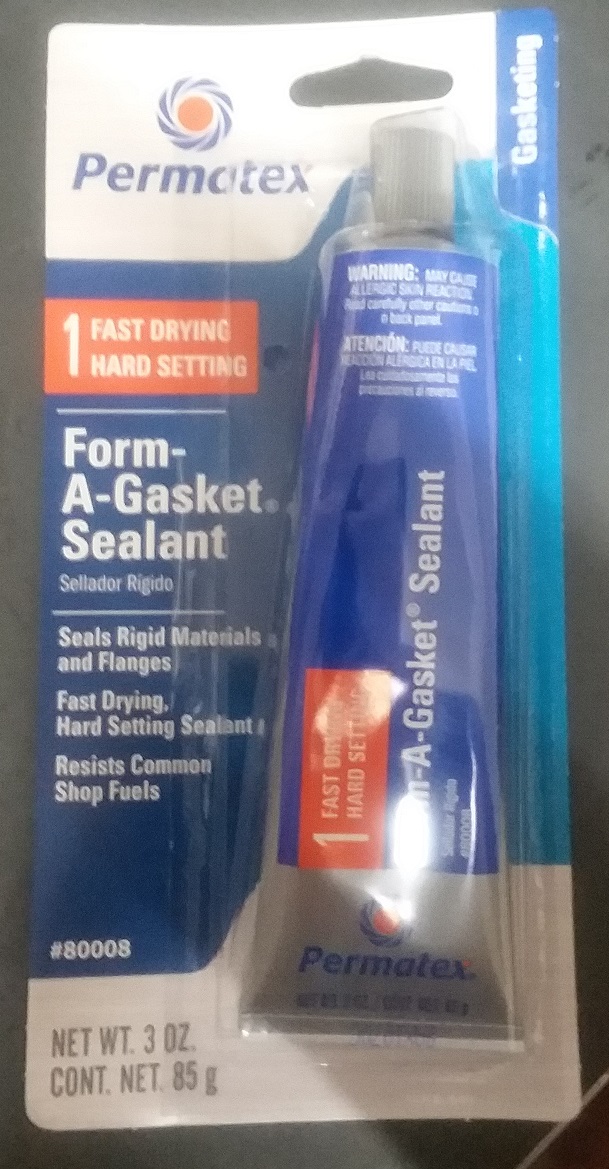
Update -- I decided to play it safe and pull the heads and the heli-coils and use new gaskets and new bolts. As far as I can see on line the procedure to pull the coils is very straightforward. After searching the forum I found a large range of opinion on what type of thread sealer to use. Also, some of the suggested products have been retired or renamed. So I found most favoring a hardening sealer so I got the following Permatex #1 (not #2, which does not harden.) I saw a few posts about coolant leaking at the bolt heads so I want to eliminate that option by sealing the heli-coils and the bolt threads.
[This message has been edited by Notorio (edited 01-06-2020).]
Do Not use Any sealers for Head Gaskets. All head gaskets and many others are Dry install. Many sealers Causes problems w/ most gaskets. What better seal then get Felpro ones. 8699PT2 or 512SD gasket only, or HS8699PT5 head set. Kit is often cheaper then buying head etc each even w/ Stem Seals likely don't need. see also https://www.fme-cat.com/Docs/1425.pdf
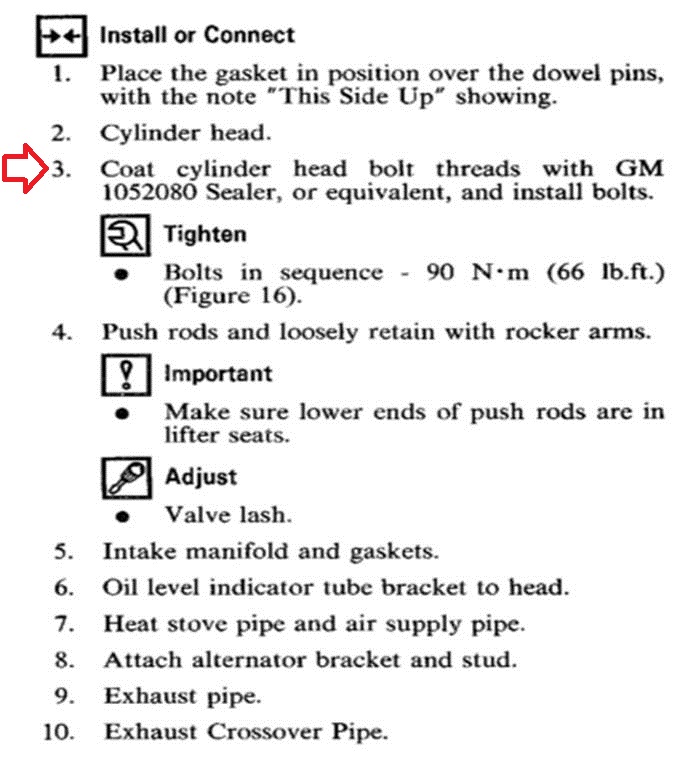
Head Bolts for Fiero V6 calls for Thread Sealer. 86 and 88 Fiero FSM...
quote
Coat cylinder head bolt threads with GM 1052080 Sealer, or equivalent, and install bolts. Tighten Bolts in sequence - 90 N-m (66 lb.ft.)
For many other engines Sealers on threads act like oil/grease and you will over torque the parts using a torque wrench to reach GM specs. Or some use sealers only on some bolts and often torque spec is different for them.
Notorio, to collect the chips when chasing or cutting a new thread, I have filled my tap or drill bit with heavy grease. That should work for you in the areas where you can't get a magnet underneath the hole. This is especially helpful when working with brass or aluminum.
Ogre, thanks for posting that excellent reference on the blizzard of permatex options. Too bad they didn't list their own product numbers as well. Sadly the Form-a-Gasket type 1 or 2 are not even in the table!
quote
Originally posted by fierofool:
Notorio, to collect the chips when chasing or cutting a new thread, I have filled my tap or drill bit with heavy grease. That should work for you in the areas where you can't get a magnet underneath the hole. This is especially helpful when working with brass or aluminum.
Same stuff I use. Didn’t know I still had some. Goes on a little runnier than silicone and hardens to a soft rubber. Never had a problem. Give the tube a good kneading to get it to the right consisistancy. It is a white paste, I just managed to spill some red threadlocker on the tube.
------------------ 86 GT built 2.2 ecotec turbo rear SLA suspension QA1 coilovers on tube arms
[This message has been edited by wftb (edited 01-07-2020).]