Rebuilt GM heads for the 2.8 are relatively cheap. Since Fiero's run so hot I can guarantee you have some hairline cracks in there. I would just save yourself the heartache and drop the cradle, replace the heads, injectors, plugs, wires, cap, rotor and all the gaskets in between..
I started doing a stroker kit 3.1 on mine, while I had it out I pretty much replaced EVERYTHING.. it's too easy and cheap while the cradle is out. I'll have pictures coming of mine soon, just wrapping up the last tedious stuff.
Good luck with the spinning plug.. Your heart had to have skipped a beat when you felt that haha
#s 2 and 6 are in the same shape as the ones in the front
Just for clarification... cylinders 2, 4 and 6 are in the front. Cylinders 1, 3 and 5 are in the rear (closest to the trunk).
quote
Originally posted by ArthurPeale:
Let me guess...time to remove the head?
When I worked in a shop a hundred years ago on air-cooled engines, we were able to keep the affected cylinder pressurized with air while we drilled out the stripped spark plug threads and installed a Heli-Coil. I wouldn't be surprised if there's a similar procedure for automotive applications.
[This message has been edited by Patrick (edited 07-11-2021).]
Just for clarification... cylinders 2, 4 and 6 are in the front. Cylinders 1, 3 and 5 are in the rear (closest to the trunk).
Curses; yes, of course. Brain did the thing where when you're facing it, that's then the front.
quote
Originally posted by Patrick:
When I worked in a shop a hundred years ago on air-cooled engines, we were able to keep the affected cylinder pressurized with air while we drilled out the stripped spark plug threads and installed a Heli-Coil. I wouldn't be surprised if there's a similar procedure for automotive applications.
That would be ideal; I don't really have a place to drop the engine, here, at my apartment. I've been lucky to do the work that I've been doing here, because I can keep it self contained. I couldn't do that with the engine out.
did some more reading; I'm wondering if maybe I got lucky and the threads are intact, but the body of the plug is the part that's spinning; the hex, separate from the rest of the plug
That would be ideal.
[This message has been edited by ArthurPeale (edited 07-11-2021).]
Most spark plug sockets have a rubber sleeve in them to grasp the porcelain insulator on the plug. Occasionally, when changing the plug on one of my bikes it will feel like the socket is spinning freely. (This sounds like what you are describing.) For me it's because the screw-on terminal on the plug extends into the area where the socket extension head is, This holds the socket just high enough for the shoulders on the plug not to engage the shoulders in the socket. Pulling the extension out of the drive hole a bit to where it isn't fully seated in the socket works sometime as does pulling off the screw-on terminal.
If you can seat the socket firmly on the shoulders of the sparkplug you should be able to tell if the hole is stripped by trying to turn the plug and socket with your hand. If it turns easily in either direction chances are the hole is stripped and you'll need a heli-coil or equivalent.
[This message has been edited by Mike in Sydney (edited 07-12-2021).]
This is definitely NOT a case of not being able to slip the socket over the spark plug hex.
quote
Originally posted by ArthurPeale:
I'm wondering if maybe I got lucky and the threads are intact, but the body of the plug is the part that's spinning; the hex, separate from the rest of the plug
I don't know about anyone else. but you've certainly got me confused.
Originally posted by Patrick: I don't know about anyone else. but you've certainly got me confused.
Yup Because spinning plugs shells are very rare to impossible. Shells are most of the metal part w/ threads. Go and look at plug design at many plug maker sites. Example: https://www.autolite.com/do...r-core-attibutes.pdf IOW shell broke mean the ceramic etc pulls out.
In Cast Iron heads, Most times... the plugs break and leave the threads and ground arm. Plug threads strip and plug the thread in the head.
most times the cast head is good but may need thread chaser after plug is gone. Problem here is many standard threads tools won't fit plug holes on many GM heads.
Spinning and won't move is much harder to guess exact problem til plug is removed. Compress Air on intake side may help keeping crap out when you wreck the plug etc. But be careful because plug crap staying in the engine can quickly destroy it. A bore scope is good here to check for left over garbage.
"They" do make plug thread repairs for heads but much harder to install in cast iron heads. Most strip plug threads are in Aluminum heads. These are made for this job and not just simple "helicoils." More You need right length and type for tapered plug.
------------------ Dr. Ian Malcolm: Yeah, but your scientists were so preoccupied with whether or not they could, they didn't stop to think if they should. (Jurassic Park)
I don't know about anyone else. but you've certainly got me confused.
I'll try to do better at explaining - certainly easier with visuals.
Most times with the front plugs, people complain about not being able to remove them because debris and rust make it very difficult to slip a socket over the hex.
In this particular instance, I can confirm that the socket has slipped over the hex.
what I thought - what I hoped - was that the hex part of the assembly was spinning separate from the threaded part of the assembly, but the gist I'm getting is that it's all one piece, is that accurate? I know on some spark plugs they can be separate.
If you put a finger on the top of the plug, it will wiggle, just a little.
"They" do make plug thread repairs for heads but much harder to install in cast iron heads. Most strip plug threads are in Aluminum heads. These are made for this job and not just simple "helicoils." More You need right length and type for tapered plug.
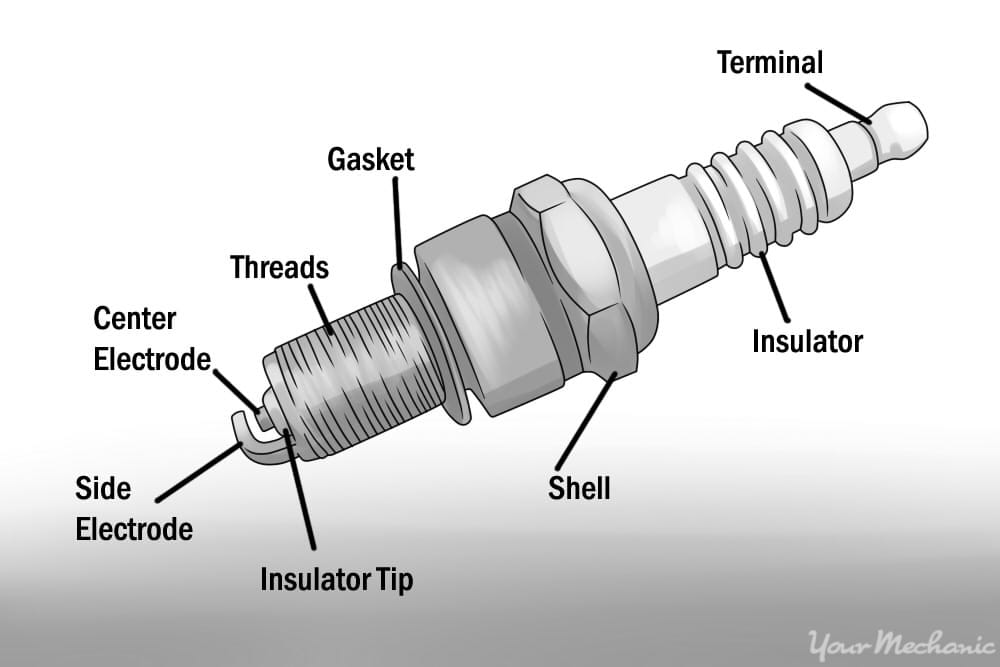
Sounds like your porcelain tower is cracked (common due to improper install or removal).
First things first, use a light and a mirror to get a good look at what is moving and what is not.
To remove the spark plugs...
- remove all 3 spark plug wire boots from all 3 spark plugs below the rear window - use an air can or air gun to blow debris out from around spark plug base - use a pick to scrape/dig around all 3 spark plugs to remove any remaining debris - again use an air can or air gun to blow debris out from around spark plug base - spray some PB Blaster around all 3 spark plugs and let that soak over night
- NOW you are ready to attempt to remove the spark plugs, using a spark plug socket that has rubber gasket inside the keep it centered around porcelain tower, making sure the socket is fully seated on the spark plug base, with a ratchet and short extension, firmly and swiftly you want to crack the spark plug loose, then ratchet it out.
Disclaimer: In very rare cases depending how rusty it is or how long the spark plugs have been in there, the spark plugs can break off in the head when trying to remove them, but again that's very rare, and that's why its wise to follow the instructions above to minimize that risk.
I changed approximately 23,400 spark plugs on all makes and models, many old and rusty, for 60 hours a week over 3 years time... and NEVER had one break off.
[This message has been edited by Skybax (edited 07-12-2021).]
what I thought - what I hoped - was that the hex part of the assembly was spinning separate from the threaded part of the assembly, but the gist I'm getting is that it's all one piece, is that accurate? I know on some spark plugs they can be separate.
If you put a finger on the top of the plug, it will wiggle, just a little.
The shell (where the socket wrench grabs), threaded portion and side electrode are all basically one metal piece. The insulator, insulator tip (and center electrode) are "glued" to the outer metal parts. If the shell ever somehow broke off from the threaded portion, I suspect the shell and insulator would just pull away from the head rather easily.
[This message has been edited by Patrick (edited 07-12-2021).]
Sounds like your porcelain tower is cracked (common due to improper install or removal).
First thing first...
- remove all 3 spark plug wire boots from all 3 spark plugs at the firewall - use an air can or air gun to blow debris out from around spark plug base - use a pick to scrape/dig around all 3 spark plugs to remove any remaining debris - again use an air can or air gun to blow debris out from around spark plug base - spray some PB Blaster around all 3 spark plugs and let that soak over night
Now you are ready to attempt to remove the spark plugs, using a spark plug socket that has rubber gasket inside the keep it centered around porcelain tower, making sure the socket is fully seated on the spark plug base, with a ratchet and short extension, firmly and swiftly you want to crack the spark plug loose, then ratchet it out.
Disclaimer: In very rare cases depending how rusty it is in there or how long the spark plugs have been it there, the spark plugs can break off in the head when trying to remove them, but again that's very rare, and that's why its wise to follow the instructions above to minimize that risk.
So I see. Just looked. IDK why I thought it was aluminum.
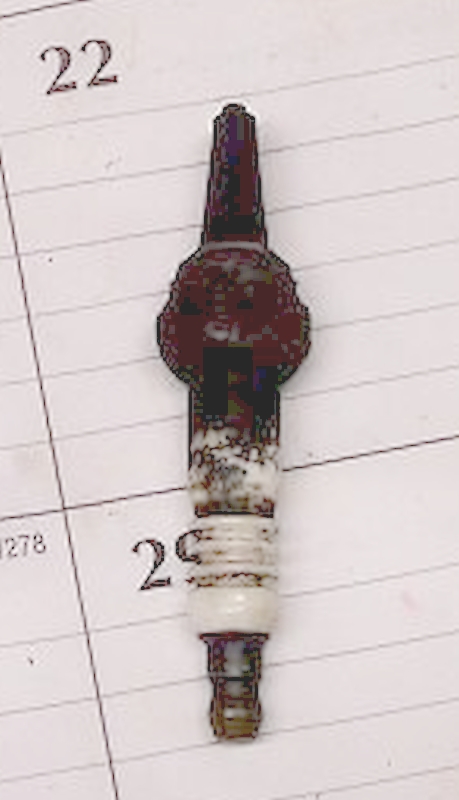
I appreciate the tips. This is not my first Fiero for which I've removed the rear plugs, so I had a little bit of experience doing this. The PO seems to have replaced at least five of the six plugs in the recent past, because all of the plugs I've checked have been fairly clean. When I was going through the trunk after taking ownership, I found two very crusty plugs (likely from the back). One was intact, the other was broken in two. There wasn't a third. I'm thinking the PO had issues removing #4 and just stopped.
If it was like the situation in the thread you referenced, wouldn't the porcelain and hex come out, leaving the threaded part? I thought that's what happened there.
The gap on that specific plug was .075! and, the rest varied wildly.
Why bother with a side electrode?
quote
Originally posted by Will:
Are you saying you just used a deep socket?
I suspect the "Irwin deep socket extractor" that the OP referred to is what was used in the following video. I can certainly understand the need for one of these extractor tools if the metal base of the spark plug has badly corroded, but I'm rather surprised that the guy in the video couldn't have simply used a (correct size) deep socket.
[This message has been edited by Patrick (edited 08-04-2021).]
I would try extracting the broken plug with an e-out or remover socket. Once out I would use a spark plug hole thread chaser. It may do the job and save a head replacement that is quite a bit of work to do..
1. Use a plug w/ nickle coated or other rust resistant shells. Not basic cheap from ACdelco or others. Is why I use "Double Platinum" AC or Autolite w/ my DIS L4. V6 and older L4 only need single platinum and cost less.
2. Do Not over torque them to install. Cone seal plugs only need a tiny fraction of a turn after cone touches the seat.
rust and/or over torque will cause same and worse problems again. More so if you live in states w/ high road salt use, near ocean, etc.
I would try extracting the broken plug with an e-out or remover socket. Once out I would use a spark plug hole thread chaser. It may do the job and save a head replacement that is quite a bit of work to do..
It's out. The hex on that particular spark plug had been completely rounded over. There was nothing on which to grip!
The Irwin deep socket extractor worked like a charm. I had my doubts - but, the $30 for the kit was far cheaper than taking it to a shop.
I suspect the "Irwin deep socket extractor" that the OP referred to is what was used in the following video. I can certainly understand the need for one of these extractor tools if the metal base of the spark plug has badly corroded, but I'm rather surprised that the guy in the video couldn't have simply used a (correct size) deep socket.
I got a set of non-deep rounded off head sockets from harbor frieght. I was trying to remove a junkyard steering rack to steering column bolt. The column was locked and the bolt was not at a good place to get a wrench on and the bolt rounded off during my first visit. Picked up the rounded off head sockets and went back to the yard and the bolt came out easily.
The set was pricey and I've only used it that one time, but it allowed me to get the rack out and I have a spare 88 rack now.