Pennock's Fiero Forum
  Technical Discussion & Questions
  Review and Installation of Chris Cook GT Windows

Post New Topic  Post A Reply
Email This Page to Someone! | Printable Version


next newest topic | next oldest topic
Review and Installation of Chris Cook GT Windows by V8Steve
Started on: 08-04-2021 08:20 AM
Replies: 7 (859 views)
Last post by: reinhart on 08-06-2021 03:45 AM
V8Steve
Member
Posts: 307
From: MA
Registered: Jun 2003


Feedback score: N/A
Leave feedback

Rate this member

Report this Post08-04-2021 08:20 AM Click Here to See the Profile for V8SteveClick Here to visit V8Steve's HomePageSend a Private Message to V8SteveEdit/Delete MessageReply w/QuoteDirect Link to This Post
I installed the expensive Fiero Store windows a year ago but lost one on the highway last month so I ended up buying a pair from Chris Cook at roughly half the price. Having installed a pair from FS and a pair from Chris, I’m posting my experience with both products.

To save you time, I’d buy the windows again from Chris in a heartbeat. They are high quality, equal to or better than the FS offering, and roughly half the price. In addition, I think you can buy them one at a time in case you lose one.

Dealing with Chris was simple and fast. Once I had the ebay link, it was a breeze. Ebay Link

The windows arrived quickly and the packaging was very well done. The quality of the windows was first class and they were lighter and a bit thinner than the FS windows. I still had one of the FS windows in the shop.

Instructions – The windows from Chris came with no instructions while the FS windows have extensive detailed instructions with photographs. That’s the only downside but this thread might clear that up.

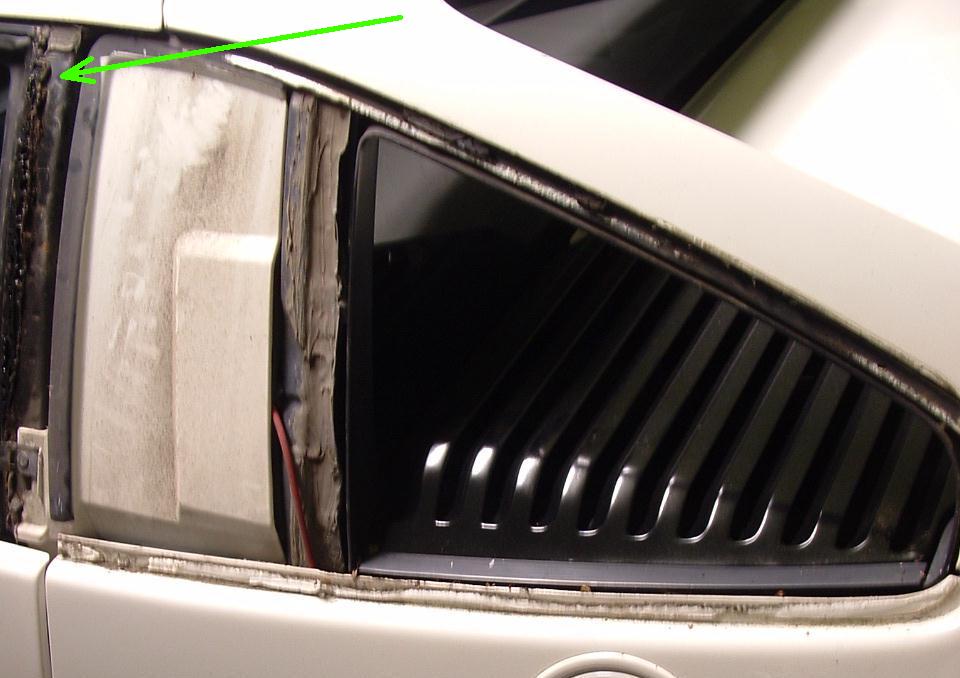
Removal of Old Tape and Surface Prep – Having done this twice now, I still haven’t found the perfect solution. Before removing all the old tape, it’s a good idea to apply tape and mask off all around the perimeter of each window. This will prevent any scuffing from wandering of wire wheels and other tools. I’ve used a combination of cordless drill wire brushes, Dremel wire brushes, box cutter blades, razor sharp wood chisel, and an “eraser wheel” to remove as much of the tape as possible. It’s pretty much a 1st pass to remove old tape without damage to the base of the car itself. My experience is that solvents like acetone and 3M Adhesive Remover (PN 03618) are not very helpful at this point. The 3M product seemed to be the best at a later point for removing the adhesive. Another product I used was “Whizzy Wheel Car Decal and Sticker Remover with Drill Adapter Kit” for $20 on Amazon. It’s bulky but it does a decent job at removing the tape and old adhesive. The spindle adaptor kept unthreading itself until I used Loctite Red on the threads. Finally, when all the tape and residue is gone, I cleaned with the 3M solvent and sanded with something like 150 and 220 grit until the surface was completely prepped.

INSTALLATION – Here’s the tricky part because you only get one shot at putting them on. Since I still had the FS written instructions and no other experience, that became the starting point. It led to some difficulty with the installation of the 1st window. With help and tips from Archie, the 2nd window from Chris fit PERFECTLY and was simple to install.

Before trial fitting any window, be sure you FIRST have the double-sided tape already attached to the car. If you place the window against the opening without the tape installed, you run the risk of scuffing the black ink off the back side. So, make sure the tape is on before anything else. Try to do it in one piece. In my car, near the door, I found the bottom horizontal surface was not in the same plane as the vertical piece. There was a substantial gap so I used another 3M (PN 03614) tape product to fill in the gap by adding first a single layer and then a shorter 2nd layer to make up the difference. I also did a dry run of adding the thinner 3M tape at the forward edge to secure that leading edge to the body. It worked and is invisible without interfering with the compression of all the other tape.

The FS instructions are very well done but didn’t work well for the Cook windows. You dry fit the window in place and then use multiple strips of painter tape to hold it there. Apply tape in two places on the top, two on the bottom, and one or two on each end. Then mark an alignment line on the tape right across the tape. You also tape cardboard shims on the bottom to get the vertical spacing just right. So that’s what I did. The idea is to slice the tape with a razor, remove the window, remove the tape cover, and reinstall the window according to the painter tape alignment marks. It’s a good idea to make some practice runs to build confidence. The window is first placed on the bottom shims, remove adhesive tape cover, and then swing the top of the window into place. It’s not hard to do. For me, it worked well with the FS window but not with Chris Cook windows.

When I tried to swing the top of the Cook window in place it did not tuck neatly into that little recess on the small end. In order to swing it into place, it seemed I had to move it roughly ¼” toward the front of the car in the upper corner of the door opening. Then it wouldn’t fit correctly near the upper corner of the door opening. To avoid that problem, I decided to remove some material from the smaller end of the window. I did this carefully with sandpaper and a block. Step by step, I marked it with a Sharpie, maybe a 1/16 at a time and crept up to the line, followed by a test fit, and so on. It took a lot of time and was all unnecessary. Finally, after trimming the window I was able to set it in place on the bottom and swing the top inward. It fit very well. BUT, it’s not the best way to do it. See BELOW.

The FS method, was totally the wrong method to install my set of Chris Cook windows. This is where Archie helped me by assuring me that these windows will fit well when you attach them first at the top, and then swing in the bottom. It all makes sense until, if you’re like me, you get worried about the tape sticking to the window at the top before you maneuver it into position. Anyway, I set up the 2nd window with painter tape, alignment marks, etc. and practiced swinging in the bottom edge last. It was PERFECT and the small end of the window tucked right into the recess near the rear of the car with no issues. The final key is to plan how the two-sided tape cover will be removed with one hand, or a helper, while the upper edge of the window is held in place, aligned, but not touching the tape. Remove the tape cover and swing the window down into place for a perfect fit.

Again, windows from Chris Cook are 1st class and fit perfectly.

------------------
88GT 355 CI Sequential Holley HP Multiport EFI, AFR milled 180, Dyno'd at 427 HP, 360 WHP, F40 6-Spd
anderson@gdsconsulting.com

IP: Logged
PFF
System Bot
fierosound
Member
Posts: 15182
From: Calgary, Canada
Registered: Nov 1999


Feedback score: N/A
Leave feedback


Total ratings: 286
Rate this member

Report this Post08-04-2021 11:11 AM Click Here to See the Profile for fierosoundClick Here to visit fierosound's HomePageSend a Private Message to fierosoundEdit/Delete MessageReply w/QuoteDirect Link to This Post
 
quote
Originally posted by V8Steve:

I decided to remove some material from the smaller end of the window. I did this carefully with sandpaper and a block. Step by step, I marked it with a Sharpie, maybe a 1/16 at a time and crept up to the line, followed by a test fit, and so on. It took a lot of time and was all unnecessary.


I'm confused. You did this because they didn't fit right. But didn't need to be done?

------------------
My World of Wheels Winners (Click on links below)

3.4L Supercharged 87 GT and Super Duty 4 Indy #163

IP: Logged
V8Steve
Member
Posts: 307
From: MA
Registered: Jun 2003


Feedback score: N/A
Leave feedback

Rate this member

Report this Post08-04-2021 11:17 AM Click Here to See the Profile for V8SteveClick Here to visit V8Steve's HomePageSend a Private Message to V8SteveEdit/Delete MessageReply w/QuoteDirect Link to This Post
When located on the bottom edge and swinging in the top, the small end would not naturally locate in the correct place. I made it fit as noted above. If located on the top edge first and swinging in the bottom, it's perfect.
IP: Logged
skywurz
Member
Posts: 1031
From: CA Usa
Registered: Feb 2006


Feedback score: (2)
Leave feedback

Rate this member

Report this Post08-04-2021 05:54 PM Click Here to See the Profile for skywurzClick Here to visit skywurz's HomePageSend a Private Message to skywurzEdit/Delete MessageReply w/QuoteDirect Link to This Post
I had read somewhere that you really should add a good bit of black silicone to the front edge of the window to prevent air blowing under it and pulling at it.
IP: Logged
Dennis LaGrua
Member
Posts: 15357
From: Hillsborough, NJ U.S.A.
Registered: May 2000


Feedback score:    (13)
Leave feedback


Total ratings: 329
Rate this member

Report this Post08-04-2021 06:28 PM Click Here to See the Profile for Dennis LaGruaSend a Private Message to Dennis LaGruaEdit/Delete MessageReply w/QuoteDirect Link to This Post
 
quote
Originally posted by skywurz:

I had read somewhere that you really should add a good bit of black silicone to the front edge of the window to prevent air blowing under it and pulling at it.


I've installed new premium Quarter windows on my 87GT and with speeds to 100 MPH they are still there. No bead of silicone on the front edge. The mounting surfaces must be completely clean free of any soil and old adhesive before mounting the new. I used 3M adhesive remover and followed it with prepsol and the bond is very strong. As for Cooks windows the fit has been very inconsistent and the contour is nothing like the OEM windows. I'll never buy them again. The fit was actually terrible about 1/4" too short on the top edge and Chris claims they were installed wrong. IMO, a garbage product sold without any warranty as to fit.

------------------
" THE BLACK PARALYZER" -87GT 3800SC Series III engine, custom ZZP /Frozen Boost Intercooler setup, 3.4" Pulley, Northstar TB, LS1 MAF, 3" Spintech/Hedman Exhaust, P-log Manifold, Autolite 104's, MSD wires, Custom CAI, 4T65eHD w. custom axles, Champion Radiator, S10 Brake Booster, HP Tuners VCM Suite.
"THE COLUSSUS"
87GT - ALL OUT 3.4L Turbocharged engine, Garrett Hybrid Turbo, MSD ign., modified TH125H
" ON THE LOOSE WITHOUT THE JUICE "

IP: Logged
IMSA GT
Member
Posts: 10439
From: California
Registered: Aug 2007


Feedback score:    (8)
Leave feedback


Total ratings: 252
Rate this member

Report this Post08-04-2021 07:10 PM Click Here to See the Profile for IMSA GTSend a Private Message to IMSA GTEdit/Delete MessageReply w/QuoteDirect Link to This Post
 
quote
Originally posted by skywurz:

I had read somewhere that you really should add a good bit of black silicone to the front edge of the window to prevent air blowing under it and pulling at it.

 
quote
Originally posted by Dennis LaGrua:


I've installed new premium Quarter windows on my 87GT and with speeds to 100 MPH they are still there. No bead of silicone on the front edge.


My car had the original windows with that lovely fishing line to remove them. I found black silicone under the leading edge of both windows and it was carefully applied all the way to the actual edge of the window. It was so cleanly done that it looked factory. Here is a pic right after I removed the factory window

[This message has been edited by IMSA GT (edited 08-04-2021).]

IP: Logged
V8Steve
Member
Posts: 307
From: MA
Registered: Jun 2003


Feedback score: N/A
Leave feedback

Rate this member

Report this Post08-05-2021 10:43 AM Click Here to See the Profile for V8SteveClick Here to visit V8Steve's HomePageSend a Private Message to V8SteveEdit/Delete MessageReply w/QuoteDirect Link to This Post
I'm aware of the black silicone and might carefully add that to mine. Somewhere there's a thread mentioning the area was masked off with painter tape and then the black sealant/adhesive was carefully applied. In the end it was regarded as looking "factory". Mine have a small gap along the leading edge roughly along the bottom few inches. The FS windows were the same but I ended up with longer gaps. I might just fill in that small gap. With the leading edge sealed and the upper edge locked in under the drip rail, they are pretty secure.

Others have reported issues with these windows but all I say is that mine fit perfectly. I was able to tuck it up under the drip rail and then swing it down into place for a perfect fit!

------------------
88GT 355 CI Sequential Holley HP Multiport EFI, AFR milled 180, Dyno'd at 427 HP, 360 WHP, F40 6-Spd
anderson@gdsconsulting.com

IP: Logged
reinhart
Member
Posts: 1103
From: Orange County, CA
Registered: Mar 2002


Feedback score: (1)
Leave feedback

Rate this member

Report this Post08-06-2021 03:45 AM Click Here to See the Profile for reinhartSend a Private Message to reinhartEdit/Delete MessageReply w/QuoteDirect Link to This Post
I believe the Fiero Store sells Chris Cok's windows but of course they have a markup so not surprised they're more. (Two people needing a cut instead of one).

I've removed a couple quarter windows that were original off 88 GTs and none had black silicone. I imagine those that have black silicone were replaced at some point with GM quarter panels before they were discontinued and the installers added the black silicone on the leading edge. Replacement GM windows had the piano wire as well obviously so seeing the piano wire means nothing.
IP: Logged

next newest topic | next oldest topic

All times are ET (US)

Post New Topic  Post A Reply
Hop to:

Contact Us | Back To Main Page

Advertizing on PFF | Fiero Parts Vendors
PFF Merchandise | Fiero Gallery
Real-Time Chat | Fiero Related Auctions on eBay


Copyright (c) 1999, C. Pennock