*answered. 1: So I recently upgraded to the 105 amp cs130 alternator from the 65 amp si alternator on my 85 gt, the si had a small rounded/indented heat shield with insulation underneath bolted between the alternator and the exhaust manifold. Do I need that on the cs130, as the hole for the bolt is about 2 inches off, so I would need a second hole in the heat shield, and it doesn't look great anyhow, so if I don't need it, I won't use it. *Answered.
2: how is the por15 stuff, is their high temp paint good for Fiero exhaust manifolds, engine enamel good for intake/valve covers? I had just done my exhaust in vht ceramic stuff, and it's not "sticking" to the metal, almost like a dusty coating after 3 months, my intake I did with duplicolor, and it looks good, but will be really easy to chip and there are some imperfections. I would use the aluminum color for the exhaust, as close a red as I can find for the intake/valve cover (either the engine enamel or a top coat paint) with the top coat clear coat on top of that (sealing the bare aluminum) would I be able to just put the por exhaust stuff right over the not so great ceramic stuff, maybe they'll mix and be ceramic por15, or it'll all just peel off later?
3: are there any "numbers" on Rodney's and others power pulleys, actual hp gained, actual responsiveness gained from lower rotating mass, etc.
*Answered. 4: What amount of timing advance can be had running low octane normal pump gas, 10* stock, I've been running 12* last summer, probably going to advance it a bit more tomorrow, maybe 13-15* what is considered safe maximum? *Answered.
*Tested and works well. 5: does Maguire's ultimate liquid wax work to gloss tires up? I know it works on basically everything, I have it on all my interior surfaces, rims, intake, valve cover, light lenses, weatherstrips, and it should be safe on rubber, just wondering if anyone's tried it, and whether it works as well as the more damaging tire sprays, and maybe lasts longer.
*Answered. 6: in the fuse box, there are numbers printed by each fuse that seem to roughly correlate to what should be in there, are those numbers the actual fuses that should be in there (specific to that car with the options that it has) or seemingly random, with the real fuses being the 1 size fits all that an internet search brings up. My fuses are mostly different, but all close to the number (15 instead of 20, vise versa). *Answered.
I think that's all I have, of you have an answer to one, all, or none, no problem, didn't want to clutter the list with 6 seperate topics that are only useful for a little while. Thanks!
[This message has been edited by 1985 Fiero GT (edited 05-01-2024).]
So I recently upgraded to the 105 amp cs130 alternator from the 65 amp si alternator on my 85 gt, the si had a small rounded/indented heat shield with insulation underneath bolted between the alternator and the exhaust manifold. Do I need that on the cs130, as the hole for the bolt is about 2 inches off, so I would need a second hole in the heat shield, and it doesn't look great anyhow, so if I don't need it, I won't use it.
Yes, you need a heat shield... but you want one like is used on the '88 V6 Fieros. Unfortunately, it appears all the images I've previously posted here of this shield have disappeared... along with the other 100,000 lost PFF images.
To answer your No6 question, you shouldn't put a higher rated fuse in a lower consumption circuit. If the circuit has a fault, it's best to "pop" the lower rated fuse and then try to track down the fault. If you just put in a heavier fuse then you are just asking for melted wiring and/or an elecrical fire! I think the numbers do correspond to the fuse rated for that circuit.
------------------ "Turbo Slug" - '87 Fiero GT. 3800 turbo. - The fastest Fiero in France! @turboslugfiero https://youtu.be/hUzOAeyWLfM
What amount of timing advance can be had running low octane normal pump gas, 10* stock, I've been running 12* last summer, probably going to advance it a bit more tomorrow, maybe 13-15* what is considered safe maximum?
Every engine is different. If you advance the ignition timing too far, you'll be sorry.
Yes, you need a heat shield... but you want one like is used on the '88 V6 Fieros. Unfortunately, it appears all the images I've previously posted here of this shield have disappeared... along with the other 100,000 lost PFF images.
To answer your No6 question, you shouldn't put a higher rated fuse in a lower consumption circuit. If the circuit has a fault, it's best to "pop" the lower rated fuse and then try to track down the fault. If you just put in a heavier fuse then you are just asking for melted wiring and/or an elecrical fire! I think the numbers do correspond to the fuse rated for that circuit.
Yeah I know that higher rates fuses are bad, just wondering what the right fuse is as all I have to go off of are the old fuses and the numbers, which aren't exactly the same. I'll adjust my fuses to match the numbers today. Thanks
Ok, thanks, I guess I'll have to wait until my Fiero is back on the road to do the timing, last summer I removed the distributor, original timing was 4* I set it to 12* and it performed noticeably much better. My engine is in very good shape, runs 0-60 a full 2 seconds quicker then my dad's Fiero, and a similar time to the tests done by magazines when the car was new. I also do run high octane usually (ethanol free), but go back to low octane when I'm driving it enough to go through a tank a week I wouldn't be surprised if I could get 14-15*, but I'll have to wait to test that on the road as I turn it up.
Originally posted by 1985 Fiero GT: Ok, thanks, I guess I'll have to wait until my Fiero is back on the road to do the timing, last summer I removed the distributor, original timing was 4* I set it to 12* and it performed noticeably much better. My engine is in very good shape, runs 0-60 a full 2 seconds quicker then my dad's Fiero, and a similar time to the tests done by magazines when the car was new. I also do run high octane usually (ethanol free), but go back to low octane when I'm driving it enough to go through a tank a week I wouldn't be surprised if I could get 14-15*, but I'll have to wait to test that on the road as I turn it up.
Since you have an 85, you might want to install and enable a knock sensor before you start getting aggressive with ignition timing. Aggressive timing, without a knock sensor is just asking for a busted ring land, hole in a piston or spun bearing,
Since you have an 85, you might want to install and enable a knock sensor before you start getting aggressive with ignition timing. Aggressive timing, without a knock sensor is just asking for a busted ring land, hole in a piston or spun bearing,
I'm not looking for super aggressive timing, just wondering what was common and safe, I'll make sure that it runs well with low octane, but I'll usually use high octane anyways.
Regardless, what would be involved in doing that? If it's as simple as bolting something on, that's good, if I need to replace or program the ECM, then that won't be something I'll be able to do.
Originally posted by 1985 Fiero GT: 3: are there any "numbers" on Rodney's and others power pulleys, actual hp gained, actual responsiveness gained from lower rotating mass, etc.
All are "scams" & worse Slows Down everything w/ Under Size Crank Pulley. Example: If you have any problems w/ coolant system now then expect overheating way easier. Even CS Alt will hate running slower results make less power. Even @ highway speeds often have power shortage, worse @ night/weather w/ Headlight & more On too.
------------------ Dr. Ian Malcolm: Yeah, but your scientists were so preoccupied with whether or not they could, they didn't stop to think if they should. (Jurassic Park)
I'm not looking for super aggressive timing, just wondering what was common and safe, I'll make sure that it runs well with low octane, but I'll usually use high octane anyways. ...
I can't answer regarding hooking up a knock sensor. I wasn't even aware that the tune could be changed to accommodate. But then, it's been a while since I looked.
I have always had good luck setting my timing by ear. Advance the timing in small increments, until it pings just a little bit under load, or at part throttle cruising. Then back it off until it doesn't. My 4.9 has been running that way for almost ten years. It's also how I set my 3.4. The cam I had in it really liked a lot of advance. Way more than stock.
[This message has been edited by Raydar (edited 04-07-2024).]
[QUOTE]Originally posted by 1985 Fiero GT: 3: are there any "numbers" on Rodney's and others power pulleys, actual hp gained, actual responsiveness gained from lower rotating mass, etc.
All are "scams" & worse Slows Down everything w/ Under Size Crank Pulley. Example: If you have any problems w/ coolant system now then expect overheating way easier. Even CS Alt will hate running slower results make less power. Even @ highway speeds often have power shortage, worse @ night/weather w/ Headlight & more On too.
Yes, I know the downsides, just curious of any exact numbers, 1 extra, 2 extra, etc. my Fiero came with the 65 amp si alternator, so I'm not worried about my 105 amp cs130 not being able to keep up with my Fiero's meagre demands (no AC, several LEDs that I have tested to use less power and work well in the Fiero) with the power pulley, my cooling system is also perfectly functional, fully flushed/cleaned and refilled with fresh coolant, no kinks in pipes, radiator is in very good shape, and I have Rodney's lower temp fan switch. So I'm not at all worried about the downsides, I know that the alternator will draw as much hp from the engine as it needs to make the electricity, no matter the pulley size, and that the only other thing is the water pump, which likely doesn't draw much power, but I'd want to know any dyno results. One benefit I can see is that it spins everything slower, which will be better for the bearings in the long run if they aren't overloaded otherwise.
I can't answer regarding hooking up a knock sensor. I wasn't even aware that the tune could be changed to accommodate. But then, it's been a while since I looked.
I have always had good luck setting my timing by ear. Advance the timing in small increments, until it pings just a little bit under load, or at part throttle cruising. Then back it off until it doesn't. My 4.9 has been running that way for almost ten years. It's also how I set my 3.4. The cam I had in it really liked a lot of advance. Way more than stock.
Yeah, that's likely what I'll do, I didn't want to get close to that though, just see what others have gotten, do an average of that, set it, and should be good, but because it varies by engine oil need to do that, but benefit is I'll get every last degree of timing that I can!
Originally posted by 1985 Fiero GT: Yes, I know the downsides, just curious of any exact numbers, 1 extra, 2 extra, etc. my Fiero came with the 65 amp si alternator, so I'm not worried about my 105 amp cs130 not being able to keep up with my Fiero's meagre demands (no AC, several LEDs that I have tested to use less power and work well in the Fiero) with the power pulley, my cooling system is also perfectly functional, fully flushed/cleaned and refilled with fresh coolant, no kinks in pipes, radiator is in very good shape, and I have Rodney's lower temp fan switch. So I'm not at all worried about the downsides, I know that the alternator will draw as much hp from the engine as it needs to make the electricity, no matter the pulley size, and that the only other thing is the water pump, which likely doesn't draw much power, but I'd want to know any dyno results. One benefit I can see is that it spins everything slower, which will be better for the bearings in the long run if they aren't overloaded otherwise.
"105Amp" is Peak Amps possible. "Power" pulleys make alts generate way less then Peak Amps often causes problems even can't charge the battery & run the engine @ same time.
Go read Watt Story again.
You already help engine power using CS because SI Eats More Engine Power then CS. Not just Rotor is closer to Field but also wired different too so make more Amps while eating Engine Power.
Little or no dif in bearing life to spin slower. What kill alt & other bearings are people think just put more force on the alt etc when changing a belt.
[This message has been edited by theogre (edited 04-07-2024).]
Originally posted by theogre: "105Amp" is Peak Amps possible. "Power" pulleys make alts generate way less then Peak Amps often causes problems even can't charge the battery & run the engine @ same time.
Go read Watt Story again.
You already help engine power using CS because SI Eats More Engine Power then CS. Not just Rotor is closer to Field but also wired different too so make more Amps while eating Engine Power.
Little or no dif in bearing life to spin slower. What kill alt & other bearings are people think just put more force on the alt etc when changing a belt.
Yes, I do understand the power output, but cs130 will make a higher % of peak power at a lower rpm then si, and I have read watt story. from my rough math, the Rodney power pulley is a 25% under drive, so if factory pulley, 65 amp si alternator is spinning 2000 arpm at idle, like watt story says, and it makes 35 amps, from your chart, the 105 amp cs130, at 1500 arpm (25% under drive) makes... 40 amps! So I am not lacking anything at idle, in fact it is still better then original, if it was good enough for gm to allow from factory, it's good enough for me now.
At 2000 engine rpm (regular cruise rpm), 4000 stock arpm, si makes 60 amps, 3000 arpm cs130 (25% under drive) produces 80 amps. No matter what rpm I'm at with the under drive pulley, I am still making more power then gm equipped factory, which will not be a problem, obviously.
I have looked into the pros and cons, none of the cons effect me when comparing to the factory setup, which was not my question, my question was simply how much of a difference is there in actual hp numbers. I expect very little, but not nothing.
1. Electronic things (and things in general) don't last long with heat; use a heat shield.
2. zkhennings on here tried POR-15 on exhaust manifolding; it didn't last, so he doesn't reccommend it. I think that bare metal exhaust manifolding is best. For valve covers and intake, you should use a two-part urethane paint, either base/clear or single-stage.
3. I don't have any number on hand, but this is probably harder to measure than it is to calculate. If you can estimate the alternator's intertia, and you know the old/new pulley ratio, then you should be able to estimate the effect on the car's acceleration.
4. Maximum timing advance without knock is not necessarily equal to ideal timing advance. Ideal timing advance (MBT) maximizes work performed on the piston. Normally, an engine should be designed so that MBT timing can be attained at full load without knock for the intended fuel.
5. I suspect that wax on a tire might flake off; sounds like a bad idea.
6. The numbers printed indicate the fuse rating that should be used in the associated slot.
Thank you very much, for the wax, I'm not worried about flaking off, the Maguire's stuff is a liquid, and is really good on basically anything, it has his results on weatherstrips, just wondering whether Maguire's wax shine will last as long as specific tire products that aren't as inert as the synthetic wax, and end up shortening the life of the tire
Update, my cs130 alternator charges better then factory with the Rodney power pulley, like the ogre's data shows, old was 12.8 idle, new 14.5 idle, 13.9 consistent with everything on.
The Maguire's wax works great on the tires, keeps the white letters clean and white, as for the black it isn't as glossy as a specific tire shine, more of a deep satin, and it is super easy to clean, just use a hose, and it dries perfect again, and again and again.
I checked my timing, took it up to 15* didn't really feel much difference, same with power pulley (I've gotten less sensitive over the winter haha) but I got 7.0 second 0-60. Before exhaust manifold porting, ignition coil, power pulley, and 3* more timing, best was 7.6 seconds. For reference they did 7.5-8.5 brand new in testing.
3: are there any "numbers" on Rodney's and others power pulleys, actual hp gained, actual responsiveness gained from lower rotating mass, etc.
I definitely don't have any "numbers" for Rodney's Power Pulley set... but I installed the "Steeda" Underdrive Pulleys back in the day... I think it was like 2003 or something. Before I wiped the cam lobe... and I felt a noticeable difference in "around-town" drivability. My car was an automatic at the time, so it might have been a bit more noticeable for me (I know you have a stick), but it really felt like I was getting significantly less "resistance" in the mid-rpm range.
Best way to describe it... have you ever taken a car that you've been driving around forever, and then put in a can of Seafoam, and the car magically drives like it's brand new? That's the kind of difference I got from going with those pulleys.
I know Rodney's improved upon the original set of pulleys that he sold years ago (and the Steeda ones). I ordered his new set just to be sure. It also comes with an idler pulley which made a huge difference for me as well... so overall, I think it's worth the $200 bucks. His new pulley for the alternator also gives you back a little bit more charging than the previous one... which some people complained about at idle. So it fixes that problem.
.
I assume you've done all the other stuff already, right? Higher spark ignition coil, ported exhaust manifolds, port-matched intake runners and stuff...
Originally posted by 82-T/A [At Work]: I definitely don't have any "numbers" for Rodney's Power Pulley set... but I installed the "Steeda" Underdrive Pulleys back in the day... I think it was like 2003 or something. Before I wiped the cam lobe... and I felt a noticeable difference in "around-town" drivability. My car was an automatic at the time, so it might have been a bit more noticeable for me (I know you have a stick), but it really felt like I was getting significantly less "resistance" in the mid-rpm range.
Best way to describe it... have you ever taken a car that you've been driving around forever, and then put in a can of Seafoam, and the car magically drives like it's brand new? That's the kind of difference I got from going with those pulleys.
I know Rodney's improved upon the original set of pulleys that he sold years ago (and the Steeda ones). I ordered his new set just to be sure. It also comes with an idler pulley which made a huge difference for me as well... so overall, I think it's worth the $200 bucks. His new pulley for the alternator also gives you back a little bit more charging than the previous one... which some people complained about at idle. So it fixes that problem.
.
I assume you've done all the other stuff already, right? Higher spark ignition coil, ported exhaust manifolds, port-matched intake runners and stuff...
Yeah, that's part of the problem, I did so much over the winter I can't tell what helped and what didn't haha, I now have the 88 alternator, so didn't need the smaller alternator pulley, but yes the idler pulley is really nice, and I'm sure the power pulley helps some. I did the exhaust, and coil, but haven't touched the intake yet, never found 100% clear instructions for that, and I'm only 18, so I haven't had enough "experience" to have had a car that was neglected enough that seafoam fixed anything haha.
Yeah, that's part of the problem, I did so much over the winter I can't tell what helped and what didn't haha, I now have the 88 alternator, so didn't need the smaller alternator pulley, but yes the idler pulley is really nice, and I'm sure the power pulley helps some. I did the exhaust, and coil, but haven't touched the intake yet, never found 100% clear instructions for that, and I'm only 18, so I haven't had enough "experience" to have had a car that was neglected enough that seafoam fixed anything haha.
Dude, I always forget you're 18. You are so much more mature and responsible at 18 than I was. When I was your age, I was spending all my time trying to illegally buy alcohol from the local "Farm Store," and going to Jazz Clubs (couldn't stand jazz) so I could hit on the "older women" (who were in their early 30s), hahah. I'm so glad my daughter doesn't come onto Pennocks all that often, even though she talks about it.
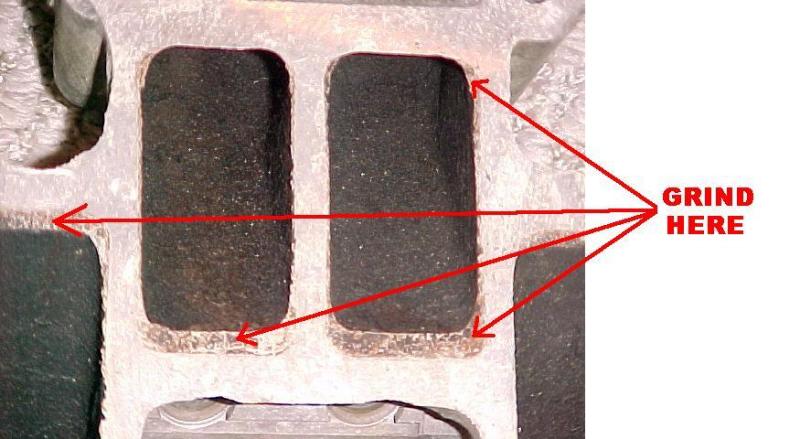
So... yeah... not much instructions really that you need, these pictures will answer everything:
As you can see in the 1999 Sony Movica 640x480 floppy-disk digital camera picture, the fact that our cars have an EGR valve causes "staining" on the imperfections in the intake. Essentially, any part of the intake that is protruding out, and not properly matched to its aligning port, is stained black. This is perfect because THIS is where you need to grind away. You basically ONLY want to grind away where you see the staining... and no where else. You want to do both sides of each of the components, and this will ensure a smother transition. GM did what they could, but the ports don't align perfectly... so you just grind away the excess. You'll want to grind the port openings from the intake plenum to the runners... and then port both sides of the runners (top where it matches the plenum, and bottom where it makes the intake manifold), and then grind away at the stained areas also on the intake manifold ports where they meet the runners, and of course, also grind away at the intake manifold ports where they meet the cyl heads. You obviously don't want to port the cyl head while it's on teh car, so you can just leave that alone.
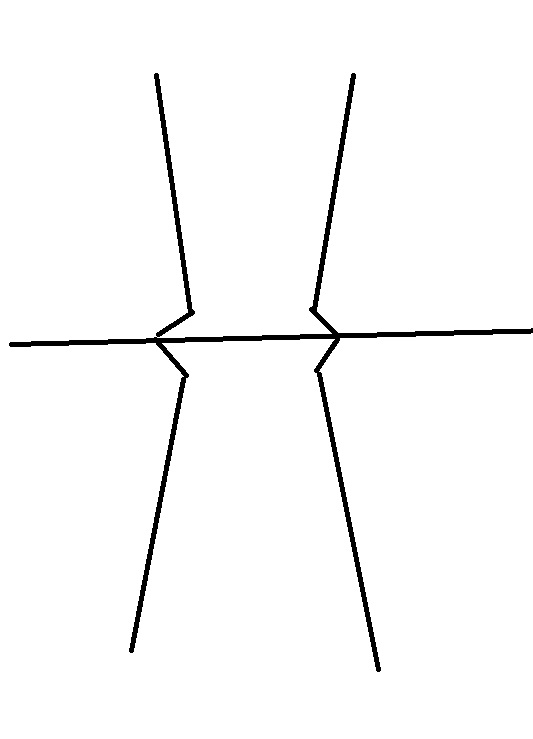
I can't remember what the "total number" is... but you should see something like 6-8 horsepower increase from this. When you grind away... you really want to go as far back (into the intake as possible... what you don't want to do is make it look like this between where the ports line-up:
You want to get it as close to this as possible...
Originally posted by 82-T/A [At Work]: Dude, I always forget you're 18. You are so much more mature and responsible at 18 than I was. When I was your age, I was spending all my time trying to illegally buy alcohol from the local "Farm Store," and going to Jazz Clubs (couldn't stand jazz) so I could hit on the "older women" (who were in their early 30s), hahah. I'm so glad my daughter doesn't come onto Pennocks all that often, even though she talks about it.
So... yeah... not much instructions really that you need, these pictures will answer everything:
As you can see in the 1999 Sony Movica 640x480 floppy-disk digital camera picture, the fact that our cars have an EGR valve causes "staining" on the imperfections in the intake. Essentially, any part of the intake that is protruding out, and not properly matched to its aligning port, is stained black. This is perfect because THIS is where you need to grind away. You basically ONLY want to grind away where you see the staining... and no where else. You want to do both sides of each of the components, and this will ensure a smother transition. GM did what they could, but the ports don't align perfectly... so you just grind away the excess. You'll want to grind the port openings from the intake plenum to the runners... and then port both sides of the runners (top where it matches the plenum, and bottom where it makes the intake manifold), and then grind away at the stained areas also on the intake manifold ports where they meet the runners, and of course, also grind away at the intake manifold ports where they meet the cyl heads. You obviously don't want to port the cyl head while it's on teh car, so you can just leave that alone.
I can't remember what the "total number" is... but you should see something like 6-8 horsepower increase from this. When you grind away... you really want to go as far back (into the intake as possible... what you don't want to do is make it look like this between where the ports line-up:
You want to get it as close to this as possible...
But also, I did this when I was 22... like 24 years ago, and in notepad. So some of it is incorrect, or just less then entirely right.
Lots of people think I'm older then I am haha, I'm dated by what I'm interesting in (Fieros and listening through the lone Ranger radio series, 1930s to 50s), as for the porting, I get that part, but I haven't been to deep into the intake yet so don't know how all the parts connect, names for them, and how to disassemble everything to do that, I've only had the very top part and one valve cover off (plenum? Said Fiero on it) to paint it.
Lots of people think I'm older then I am haha, I'm dated by what I'm interesting in (Fieros and listening through the lone Ranger radio series, 1930s to 50s), as for the porting, I get that part, but I haven't been to deep into the intake yet so don't know how all the parts connect, names for them, and how to disassemble everything to do that, I've only had the very top part and one valve cover off (plenum? Said Fiero on it) to paint it.
I'll give you the trailer park definition, but I'm hoping someone can better explain than I can... but I think what we have is called a "tuned length" intake system, where each of the intake ports have an equal length "runner" from the intake plenum to the cyl head.
There are THREE major components:
- Intake Plenum (the red thing on the top... 1987-1988 versions got an engraved FIERO, 85-86 got a sticker) - Intake Runners (the upside down octopus looking thing) - Intake Manifold (the part that the runners connect to, and the piece that bolts directly to the engine and between the cyl heads)
All of these can be fairly easily removed... but removing the intake manifold requires you to remove the distributor also, and will likely need new gaskets when you put it back. You don't have to really worry about breaking anything when you remove these parts. The ONLY thing I'd be concerned about are the vacuum lines that connect all the things... after ~35 years, they're probably going to start getting brittle... so just be careful when you remove them.
Port-matching the intake pieces will give you a much better mid-range and top-end performance.
Originally posted by 82-T/A [At Work]: I'll give you the trailer park definition, but I'm hoping someone can better explain than I can... but I think what we have is called a "tuned length" intake system, where each of the intake ports have an equal length "runner" from the intake plenum to the cyl head.
There are THREE major components:
- Intake Plenum (the red thing on the top... 1987-1988 versions got an engraved FIERO, 85-86 got a sticker) - Intake Runners (the upside down octopus looking thing) - Intake Manifold (the part that the runners connect to, and the piece that bolts directly to the engine and between the cyl heads)
All of these can be fairly easily removed... but removing the intake manifold requires you to remove the distributor also, and will likely need new gaskets when you put it back. You don't have to really worry about breaking anything when you remove these parts. The ONLY thing I'd be concerned about are the vacuum lines that connect all the things... after ~35 years, they're probably going to start getting brittle... so just be careful when you remove them.
Port-matching the intake pieces will give you a much better mid-range and top-end performance.
I used to live in a trailer park, so that works for me haha, as long as there's no big things to watch out for, like the exhaust manifold bolts, I should be good, I think I was going to do all that, but got stopped by the fuel rail, anything I need to know about removal of that? As for my vacuum lines, they are about as good as they can be haha, my Fiero is in very good overall condition, except for bad paint haha, my dad's Fiero is the opposite of that, not unreliable, but leaks a bit, is slower then an auto Fiero, and just feels "loose and worn out" but has good paint, we make quite the pair at car shows, his all closed so people see the shape, and the paint, mine opened up so people see my nice interior, engine bay and frunk, but don't see the mediocre paint.
If you do the head/lower intake gaskets, DO NOT CUT the gaskets to make the job easier. You MUST loosen the rockers and remove the pushrods to change the gaskets.
I used to live in a trailer park, so that works for me haha, as long as there's no big things to watch out for, like the exhaust manifold bolts, I should be good, I think I was going to do all that, but got stopped by the fuel rail, anything I need to know about removal of that? As for my vacuum lines, they are about as good as they can be haha, my Fiero is in very good overall condition, except for bad paint haha, my dad's Fiero is the opposite of that, not unreliable, but leaks a bit, is slower then an auto Fiero, and just feels "loose and worn out" but has good paint, we make quite the pair at car shows, his all closed so people see the shape, and the paint, mine opened up so people see my nice interior, engine bay and frunk, but don't see the mediocre paint.
No, it's really not a hard job. I'd just say that you'll want to take your time, and not something you want to rush. That's because you want to take your time so you can really get the most out of the port-matching to really improve the flow... rather than rushing it. Expect to take it apart on Friday, do all the port-matching on Saturday, and then do the re-assembly on Sunday.
While you're at it, I would do the following:
- Replace all the intake gaskets (see oldjoedad's comment above, I completely forgot about that) - Torque the bolts down properly, don't tighten them down by hand as hard as you can. You're really going for the correct torque, not too much. - Put a couple of rags in there to catch the fuel when you disconnect the fuel rail (disconnect the battery first). - Take pictures so you remember where everything goes.
AND... if you can spare the coin, you may want to seriously consider getting a set of CompCams 1.6:1 roller rocker arms. This will effectively give you the same power improvement you would see by swapping in a CraneCam H260 camshaft. It increases the lift. It can be ordered as a kit for about $158 bucks. I only mention this because you're going to have to remove the rocker arms anyway (see Old Joe Dad's comment), so you might as well replace the rocker arms with performance ones while you're out there. https://www.summitracing.com/parts/cca-1416-12
Doing both of those things... you can likely pick up ~10hp from those two mods together.
Originally posted by 82-T/A [At Work]: No, it's really not a hard job. I'd just say that you'll want to take your time, and not something you want to rush. That's because you want to take your time so you can really get the most out of the port-matching to really improve the flow... rather than rushing it. Expect to take it apart on Friday, do all the port-matching on Saturday, and then do the re-assembly on Sunday.
While you're at it, I would do the following:
- Replace all the intake gaskets (see oldjoedad's comment above, I completely forgot about that) - Torque the bolts down properly, don't tighten them down by hand as hard as you can. You're really going for the correct torque, not too much. - Put a couple of rags in there to catch the fuel when you disconnect the fuel rail (disconnect the battery first). - Take pictures so you remember where everything goes.
AND... if you can spare the coin, you may want to seriously consider getting a set of CompCams 1.6:1 roller rocker arms. This will effectively give you the same power improvement you would see by swapping in a CraneCam H260 camshaft. It increases the lift. It can be ordered as a kit for about $158 bucks. I only mention this because you're going to have to remove the rocker arms anyway (see Old Joe Dad's comment), so you might as well replace the rocker arms with performance ones while you're out there. https://www.summitracing.com/parts/cca-1416-12
Doing both of those things... you can likely pick up ~10hp from those two mods together.
Ok, I very well might do this. As for the rockers, will that increase wear on the camshaft, or will it basically not matter. I will wait for doing this until I've decided whether to stick with the paint I've currently got on my intake and rear valve cover, or whether to go with the por15 stuff, still looking for more "reviews" on that.
With all that stuff removed from the engine, how much more work is it to remove the heads? I have 4 broken exhaust manifold bolts (evenly spaced, so I could live with it as is) of it is easy, what else would I do while in there, prices, etc.
You guys are finding me more things to do haha, right now I have my seasonal job changing tires, so I do have some money, but I can't spend it all our I'll have no money when summer comes and I'm back at Walmart haha.
Ok, so... a few things:
- Will the rockers increase wear to the camshaft? : Not really... the lifters don't change, only the rocker arms do. They do add a bit more pressure onto the cam, but only slightly. Since your cam is already well broken in, you're not really going to see any wear. I generally wouldn't recommend doing this on a NEW cam that isn't broken in, but on a motor that's already broken in, you won't have any adverse reactions. They also offer 1.52:1 ratio rocker arms, which basically "blueprint" the specs if you will... since the factory rocker arms are a 1.5:1 ratio. One of the other benefits of course is that they're roller-tipped, so they don't create as much wear on the top of the valves, and allow the valves to spin more easily. In theory, this reduces overall friction and reduces temperatures up there, among other things. I had the 1.52:1 roller rockers on my car from back in the day, and I thought they were decent. I was scared away from the 1.6:1s for the same reason as you, but I've never actually seen a single person with the 1.6:1 rocker arms ever complain about anything, except having more horsepower. I'm going with 1.52:1 roller rockers (again) because I'm going to be swapping out the factory cam to an H272 cam, which is effectively the same as going with the H260 cam and 1.6:1 roller rocker arms.
- I don't really know anything about the Por15, other than that this is generally used to seal areas that are heavily prone to rust, or that get exposed to rust... like the entire underside of a Volkswagen Bus. What is it you're using it for again? I painted my valve covers on my Fiero with Ford Engine Red Duplicolor paint. Never had an issue, and it looked almost identical. I painted both valve covers and the intake plenum. Never had an issue, and never flaked. The original paint was flaking off though, which is why I repainted all of it.
- As for the cyl heads... ok. They're not hard to remove... just remember that you'll need to buy NEW cyl head bolts (can't reuse them), AND... you have to be very careful with the torque wrench. Back in the day, when I was maybe a year older than you. I had to take a cyl head off as well because an exhaust bolt broke off. Well.. everything was great and I was putting the cyl head back on, and I ripped the threads right out of the block. I had to have it towed to a local shop where they put a helicoil in it and then put the head back on for me. I only caution this because until you've practiced with a torque wrench, you don't want a cyl head bolt to be the first time you've used it. There's a lot of nuance to the click-type... both in how you set it up, and breaking it in as well. So just be careful... EDIT: You'll also need new head gaskets. If you order a FelPro head gasket set, you'll get all the gaskets you need, top and bottom.
- Also on the cyl head. I stupidly dropped $1,400 bucks on a set of super-nice ported and blended cyl heads from ARI Racing (3.4 heads). They also had the SI Stainless Steel tulip-valves installed on them. So why am I telling you this? Well, you probably also know that I just bought a 3.4 Long Block (DCC9), which was completely rebuilt with a warranty. Well, sure enough, they also come with a set of completely rebuilt cyl heads ... which I won't need. So, you're welcome to them. They are totally magnufluxed, new springs, new retainers, brand new valves, you name it. Of course, you're in Canada... so shipping is going to be insane. But I'm happy to give you them for free, so long as you pay for shipping. You'll have to wait though, I don't expect to even get them off the engine until my daughter frees up an engine stand and puts her engine back in the car... which will probably be the end of summer. But if you want them, I'll save them for you...
[This message has been edited by 82-T/A [At Work] (edited 04-26-2024).]
Originally posted by 82-T/A [At Work]: Ok, so... a few things:
- Will the rockers increase wear to the camshaft? : Not really... the lifters don't change, only the rocker arms do. They do add a bit more pressure onto the cam, but only slightly. Since your cam is already well broken in, you're not really going to see any wear. I generally wouldn't recommend doing this on a NEW cam that isn't broken in, but on a motor that's already broken in, you won't have any adverse reactions. They also offer 1.52:1 ratio rocker arms, which basically "blueprint" the specs if you will... since the factory rocker arms are a 1.5:1 ratio. One of the other benefits of course is that they're roller-tipped, so they don't create as much wear on the top of the valves, and allow the valves to spin more easily. In theory, this reduces overall friction and reduces temperatures up there, among other things. I had the 1.52:1 roller rockers on my car from back in the day, and I thought they were decent. I was scared away from the 1.6:1s for the same reason as you, but I've never actually seen a single person with the 1.6:1 rocker arms ever complain about anything, except having more horsepower. I'm going with 1.52:1 roller rockers (again) because I'm going to be swapping out the factory cam to an H272 cam, which is effectively the same as going with the H260 cam and 1.6:1 roller rocker arms.
- I don't really know anything about the Por15, other than that this is generally used to seal areas that are heavily prone to rust, or that get exposed to rust... like the entire underside of a Volkswagen Bus. What is it you're using it for again? I painted my valve covers on my Fiero with Ford Engine Red Duplicolor paint. Never had an issue, and it looked almost identical. I painted both valve covers and the intake plenum. Never had an issue, and never flaked. The original paint was flaking off though, which is why I repainted all of it.
- As for the cyl heads... ok. They're not hard to remove... just remember that you'll need to buy NEW cyl head bolts (can't reuse them), AND... you have to be very careful with the torque wrench. Back in the day, when I was maybe a year older than you. I had to take a cyl head off as well because an exhaust bolt broke off. Well.. everything was great and I was putting the cyl head back on, and I ripped the threads right out of the block. I had to have it towed to a local shop where they put a helicoil in it and then put the head back on for me. I only caution this because until you've practiced with a torque wrench, you don't want a cyl head bolt to be the first time you've used it. There's a lot of nuance to the click-type... both in how you set it up, and breaking it in as well. So just be careful... EDIT: You'll also need new head gaskets. If you order a FelPro head gasket set, you'll get all the gaskets you need, top and bottom.
- Also on the cyl head. I stupidly dropped $1,400 bucks on a set of super-nice ported and blended cyl heads from ARI Racing (3.4 heads). They also had the SI Stainless Steel tulip-valves installed on them. So why am I telling you this? Well, you probably also know that I just bought a 3.4 Long Block (DCC9), which was completely rebuilt with a warranty. Well, sure enough, they also come with a set of completely rebuilt cyl heads ... which I won't need. So, you're welcome to them. They are totally magnufluxed, new springs, new retainers, brand new valves, you name it. Of course, you're in Canada... so shipping is going to be insane. But I'm happy to give you them for free, so long as you pay for shipping. You'll have to wait though, I don't expect to even get them off the engine until my daughter frees up an engine stand and puts her engine back in the car... which will probably be the end of summer. But if you want them, I'll save them for you...
Ok, por15 has a whole range of products, including some medium temp finishing paints in a spray can, the duplicolor I used is a good color, but the finish didn't come out perfectly, and it seems like it will chip really easily, so if it degrades, I'll pull it all and redo it.
As for the heads, that's very kind of you, I have a USPS box in Maine, so shipping wouldn't be too bad, from my bedroom window I see more of the US then Canada haha, and I go across weekly, the third Fiero owner within 2 hours happens to be a border guard at the crossing nearest me, what a coincidence!
I have a standard torque wrench, like you would use on a wheel, and know generally how to use it (at least on wheels, that's my seasonal job, tire changing), would that be the right kind?
I would buy the 1.6 rockers for your cylinder heads right? Other then that they are about as good as one can get easily performance wise, or is there still stuff to be done to them? For the 1.6, they increase hp, do they do that across the rpm range, or do they decrease the low end torque to do that?
Yeah, I can totally ship them to Canada, it won't be that bad. I'll have to figure out how best to ship them. They are heavy, so it MAY be better for me to ship them individually via USPS Priority (which has a 70 pound limit within a certain size). That's probably the best option.
For the standard torque wrench. Yes and no... it's OK, you just have to make sure you're careful with torquing down the bolts. The bolts are designed to stretch naturally (which is why they cannot be re-used). Don't ask me why they designed them this way, or why that's a good thing, but they do that. So when you are torquing with a flex torque wrench, as the bolt settles and stretches, the "tension" indicator will decrease (because there's literally less torque since the bolts are stretching), so there's a tendency to want to keep torquing down the bolts... and that's how you can end up breaking the threads or snapping the bolts. An alternative to this is to use ARP studs. They're hardened and can be reused several times (and don't stretch).
Well... you could wait until you get my cyl heads, but you can install them on the ones you have now too. The rocker arms come off super easy, and you don't need to remove the cyl heads to install them. It's just a single nut, and then you have to adjust the valve lash... which is as simple as basically taking your two fingers and twisting the pushrod as you torque down the rocker arm. As soon as you can no longer freely spin it, then I think you back off a quarter turn (something like that)... and magically, valve lash set.
So... you could put them on now, and then swap them over to my cyl heads when you get them. They can be reused because they don't really take any wear. Ideally, just remember from where you removed them... that way you can keep the same pushrods (in the same direction) in the same location. Just that much less "re-breaking in" needed with the new heads.
But yeah, you'll notice a big difference with the 1.6:1 rocker arms. It's basically like installing a hotter camshaft.
Like I said though, I'm actually installing a hotter camshaft, so that's why I'm sticking to the 1.52:1 because I don't need even MORE lift. But, I do want the tip and reduced wear/heat.
Originally posted by 82-T/A [At Work]: Yeah, I can totally ship them to Canada, it won't be that bad. I'll have to figure out how best to ship them. They are heavy, so it MAY be better for me to ship them individually via USPS Priority (which has a 70 pound limit within a certain size). That's probably the best option.
For the standard torque wrench. Yes and no... it's OK, you just have to make sure you're careful with torquing down the bolts. The bolts are designed to stretch naturally (which is why they cannot be re-used). Don't ask me why they designed them this way, or why that's a good thing, but they do that. So when you are torquing with a flex torque wrench, as the bolt settles and stretches, the "tension" indicator will decrease (because there's literally less torque since the bolts are stretching), so there's a tendency to want to keep torquing down the bolts... and that's how you can end up breaking the threads or snapping the bolts. An alternative to this is to use ARP studs. They're hardened and can be reused several times (and don't stretch).
Well... you could wait until you get my cyl heads, but you can install them on the ones you have now too. The rocker arms come off super easy, and you don't need to remove the cyl heads to install them. It's just a single nut, and then you have to adjust the valve lash... which is as simple as basically taking your two fingers and twisting the pushrod as you torque down the rocker arm. As soon as you can no longer freely spin it, then I think you back off a quarter turn (something like that)... and magically, valve lash set.
So... you could put them on now, and then swap them over to my cyl heads when you get them. They can be reused because they don't really take any wear. Ideally, just remember from where you removed them... that way you can keep the same pushrods (in the same direction) in the same location. Just that much less "re-breaking in" needed with the new heads.
But yeah, you'll notice a big difference with the 1.6:1 rocker arms. It's basically like installing a hotter camshaft.
Like I said though, I'm actually installing a hotter camshaft, so that's why I'm sticking to the 1.52:1 because I don't need even MORE lift. But, I do want the tip and reduced wear/heat.
Ok, makes sense, and it doesn't detract from the low rpm torque already present? I'll probably wait for your heads, to do that still though, and my USPS box is in Maine, usa, so cheaper and easier then shipping to my physical address in Canada.
Ok, makes sense, and it doesn't detract from the low rpm torque already present? I'll probably wait for your heads, to do that still though, and my USPS box is in Maine, usa, so cheaper and easier then shipping to my physical address in Canada.
No, I think what it affects is the duration... but I am not a mechanical engineer, and I only pretend to be one on Pennocks. So, if I understand it correctly, it basically emphasizes all aspects of the Fiero's stock cam by whatever percentage the 1.6:1 does over the stock stamped 1.5:1 rockers (which can actually be as low as 1.48:1).
And yeah, no problem on the heads. I'll save them for you and let you know when they're ready. You'll know because you'll see the video about it... but I'll know either way I've promised them to you.
Originally posted by 82-T/A [At Work]: No, I think what it affects is the duration... but I am not a mechanical engineer, and I only pretend to be one on Pennocks. So, if I understand it correctly, it basically emphasizes all aspects of the Fiero's stock cam by whatever percentage the 1.6:1 does over the stock stamped 1.5:1 rockers (which can actually be as low as 1.48:1).
And yeah, no problem on the heads. I'll save them for you and let you know when they're ready. You'll know because you'll see the video about it... but I'll know either way I've promised them to you.
Ok, interesting, thanks again, although from what I read here, the videos usually end up about a month behind, I may very well have the heads installed by the time the video comes out haha!
#4 I always did set mine and all my customers timing to 12 degrees, No one has ever shredded an engine, High mileage, fresh rebuilds. A 2.8 will easily take 12 degrees of timing and be happy.
Ok, interesting, thanks again, although from what I read here, the videos usually end up about a month behind, I may very well have the heads installed by the time the video comes out haha!
Hahah... yeah... the engine is already done at this point, and she hasn't even posted the videos. We're just waiting now for the transmission to be finished so she can take it off the stand and put it back on the cradle. She's already totally sanded down, painted, and repaired the cradle, and even gotten the entire suspension cleaned, sanded, painted, and bushings installed. Her last video was her measuring the cyl bores before we took it to the machine shop... hahah.
Originally posted by 82-T/A [At Work]: Hahah... yeah... the engine is already done at this point, and she hasn't even posted the videos. We're just waiting now for the transmission to be finished so she can take it off the stand and put it back on the cradle. She's already totally sanded down, painted, and repaired the cradle, and even gotten the entire suspension cleaned, sanded, painted, and bushings installed. Her last video was her measuring the cyl bores before we took it to the machine shop... hahah.
We're like 2 months behind now.
Yeah, that's fine, is a good day when one of the Fiero YouTubers post a video haha, did you go with oe rubber bushings? Have you gotten that huge wrench I suggested for the last trivia?
Yeah, that's fine, is a good day when one of the Fiero YouTubers post a video haha, did you go with oe rubber bushings? Have you gotten that huge wrench I suggested for the last trivia?
That company won't return my calls, or my e-mails... it's crazy. It's like they have no interest in selling a single wrench. Haha...
Yeah, we went with OE rubber bushings. To that point, we kind of cheated. We got the control arms apart (I had to help her and drill out the wheel studs)... and then we took the control arms to the machine shop and said... "Here..." we got back clean metal with new OEM bushings and sleeves pushed in, with the original ball joints (200k miles) removed (rivets drilled out).
Originally posted by 82-T/A [At Work]: That company won't return my calls, or my e-mails... it's crazy. It's like they have no interest in selling a single wrench. Haha...
Yeah, we went with OE rubber bushings. To that point, we kind of cheated. We got the control arms apart (I had to help her and drill out the wheel studs)... and then we took the control arms to the machine shop and said... "Here..." we got back clean metal with new OEM bushings and sleeves pushed in, with the original ball joints (200k miles) removed (rivets drilled out).
Haha, fun, some companies don't care about providing a service, only about making massive money, I wouldn't want to figure out the rubber bushings either haha.