|
|
|

|
"concept GTR" dash build-up...Fie Ro style! ;) by Fie Ro
| Started on | : 10-30-2004 01:28 PM |
| Replies | : 550 (109921 views) |
| Last post by | : Rickady88GT on 11-27-2018 06:07 PM |
|
|
|
|
Feb 8th, 2005
|
Fie Ro
Member Posts: 3735
From: Soest, The Netherlands
Registered: Sep 2001
|
...some feedback from combining some ideas in photoshop.... this is still fun!  : 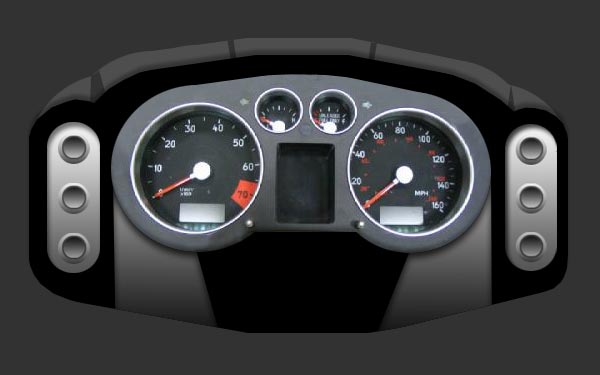 I own page 3/4/5 ! lol...must be posting too much  [This message has been edited by Fie Ro (edited 02-08-2005).]


|
06:15 PM
|
|
|
Feb 9th, 2005
|
David DeVoe
Member Posts: 1358
From: Grand Blanc, MI US
Registered: Jul 2001
|
buump
|
|
07:30 PM
|
|
|
Feb 10th, 2005
|
Fie Ro
Member Posts: 3735
From: Soest, The Netherlands
Registered: Sep 2001
|
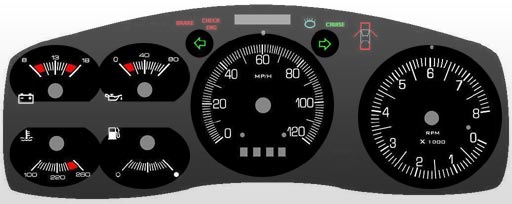
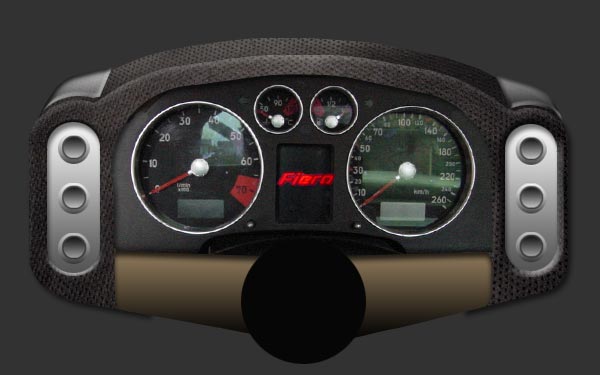
hopefully tomorrow I'll get the cluster in the mail.....! did some more photoshopping: 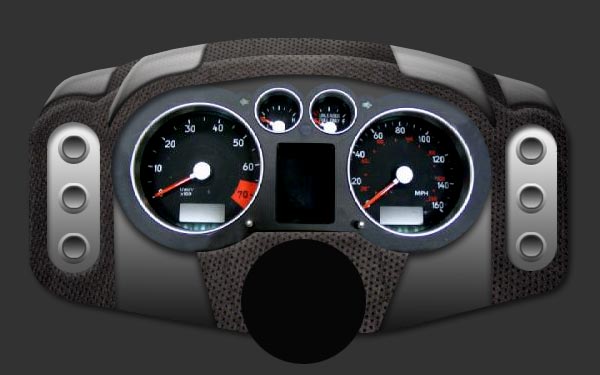 ..got a few other ideas too...
|
|
01:49 PM
|
|
Fie Ro
Member Posts: 3735
From: Soest, The Netherlands
Registered: Sep 2001
|
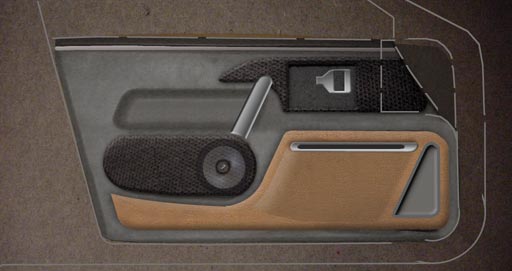
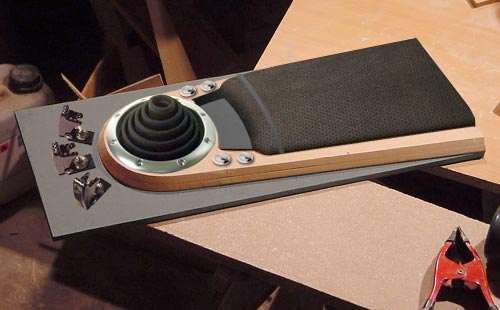
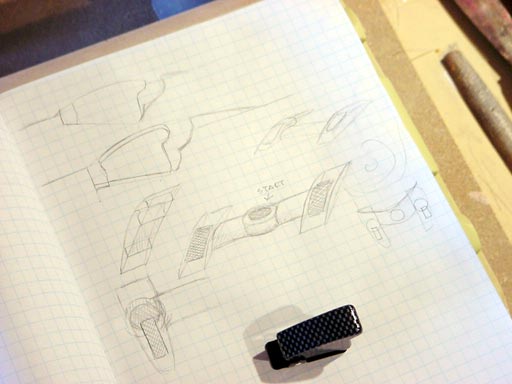
some more sketching on the doorskin 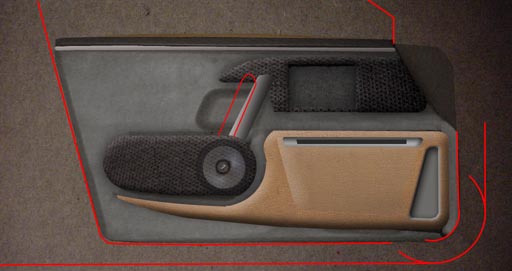
|
|
07:08 PM
|
|
|
Feb 11th, 2005
|
Fie Ro
Member Posts: 3735
From: Soest, The Netherlands
Registered: Sep 2001
|
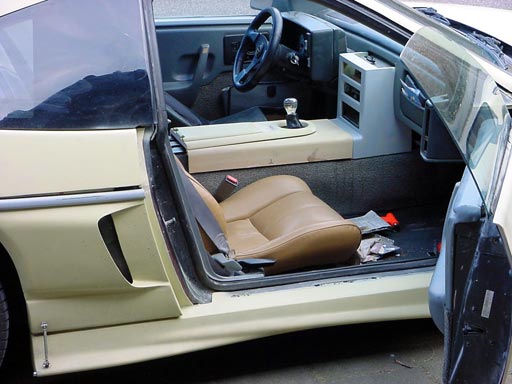
Got some mail and did a comparison mockup: 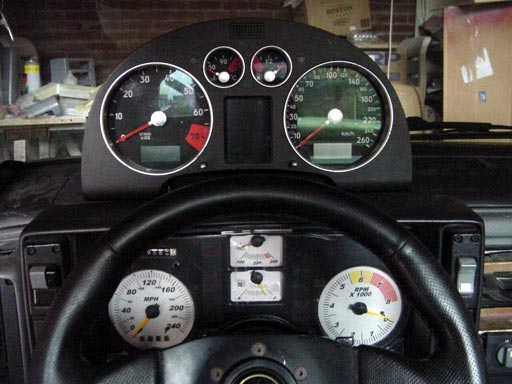 That looks quite cool on the butchered dash of my daily driver 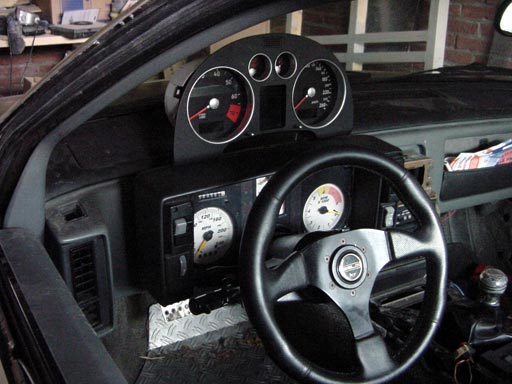 the size is quite close to the stock cluster, about an inch can be easily chopped from the TT front if needed Heres the challenge: wiring from the fiero cluster connector to the green and blue connectors on this one...
I got some instructions how to wire it to a VW Golf3, it identifies most of the pins (in german) but I will need more info! I hope you guys can help me out with this... - I need a pinout diagram of the fiero cluster connector. My haynes doesnt help
- a pinout of the numbering on the audi TT cluster connectors.. (without CAN bus)
|
|
03:26 PM
|
|
Fie Ro
Member Posts: 3735
From: Soest, The Netherlands
Registered: Sep 2001
|
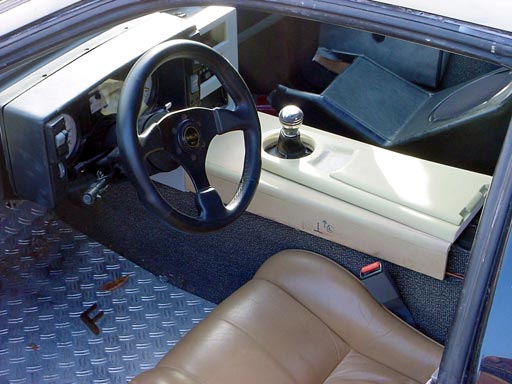
one more picture: 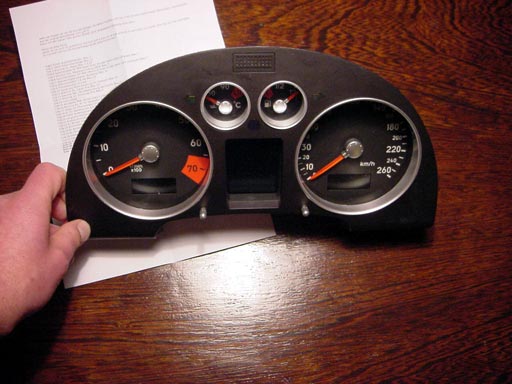
|
|
03:58 PM
|
|
David DeVoe
Member Posts: 1358
From: Grand Blanc, MI US
Registered: Jul 2001
|
Your second photoshop rendering is absolutely killer...that perforated material looks very cool and would work well with satin finish aluminum and carbon fiber. Keep it coming!
|
|
05:24 PM
|
|
4.9 PFI FIERO
Member Posts: 189
From: new orleans louisiana
Registered: Jul 2004
|
Just a thought.
Make a conversion wiring diagram for those whom may want to use that cluster it will make life so easy for the diy...
|
|
05:35 PM
|
|
|
Feb 12th, 2005
|
PaulJK
Member Posts: 6638
From: Los Angeles
Registered: Oct 2001
|
Hope this helps: 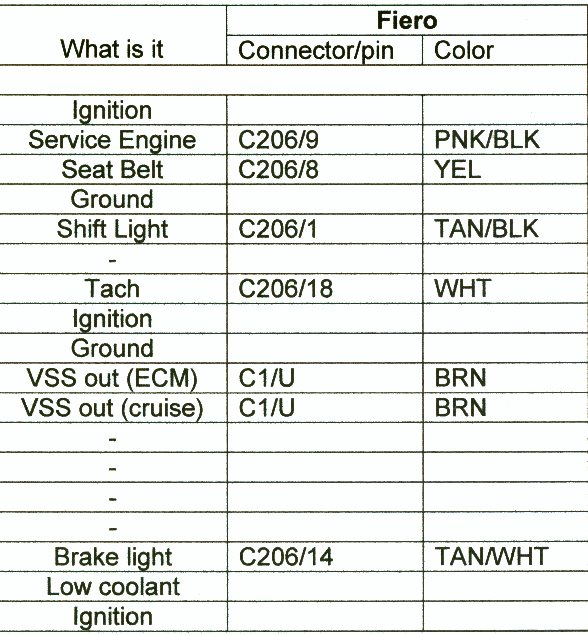
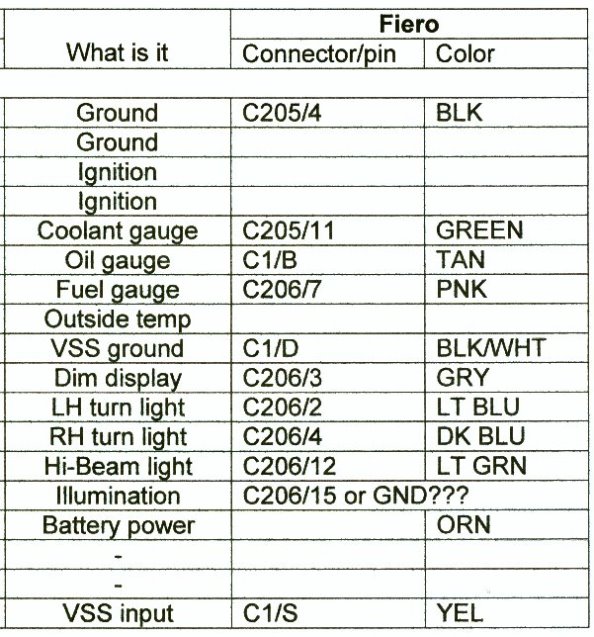
I don't think these are the absolute reerence, but it's a start  [This message has been edited by PaulJK (edited 02-12-2005).]
|
|
02:28 AM
|
|
Fie Ro
Member Posts: 3735
From: Soest, The Netherlands
Registered: Sep 2001
|
Thanks, that already helps a bit. | | | quote | Originally posted by 4.9 PFI FIERO:
Just a thought.
Make a conversion wiring diagram for those whom may want to use that cluster it will make life so easy for the diy... |
|
I sure will do that if I can get it to work! I already share every little thing I am doing....
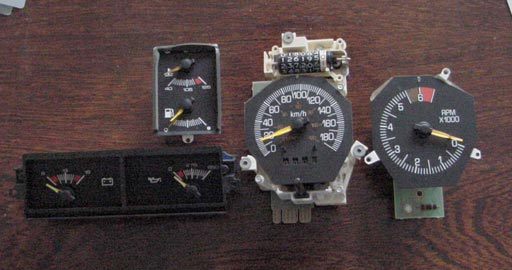
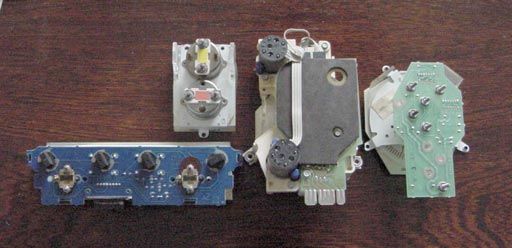
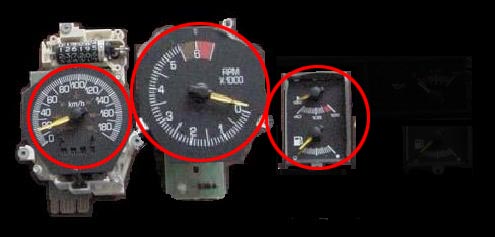
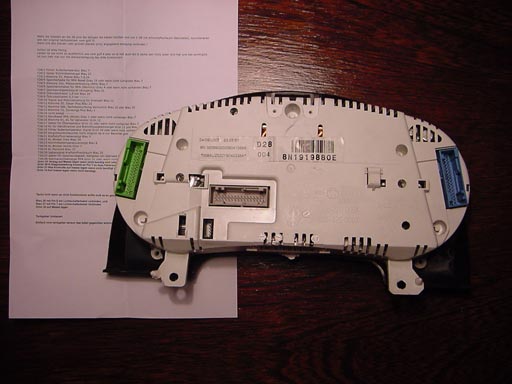
I took my spare fierocluster to look how to do the new setup. The housing of the fierocluster is actually the connector itself.So if I can mount and wire the TT cluster into the old case it would be a drop-in replacement for a stock cluster....this looks like the best solution for now...
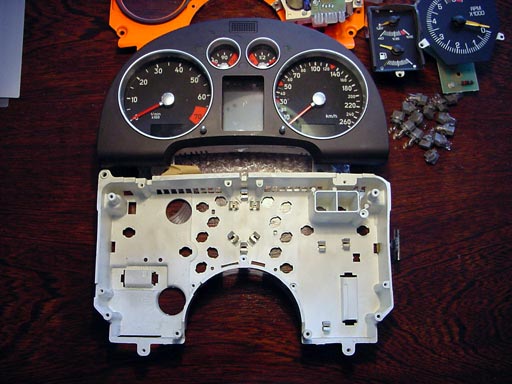
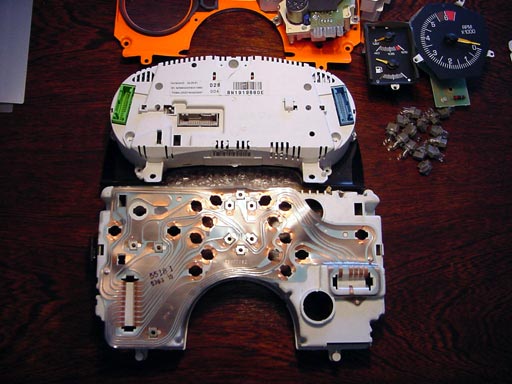
The odometer has it own connector:
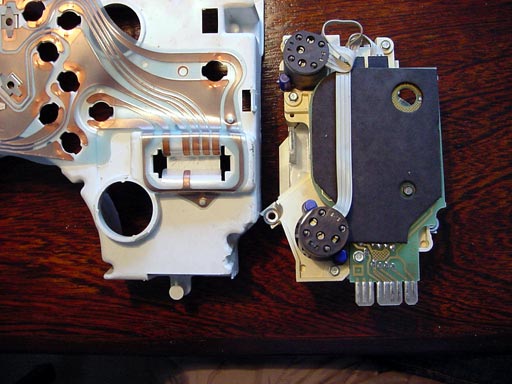 last one of the "digital" version
|
|
10:39 AM
|
|
|
Feb 16th, 2005
|
David DeVoe
Member Posts: 1358
From: Grand Blanc, MI US
Registered: Jul 2001
|
Bump
|
|
05:01 PM
|
|
|
PFF
System Bot
|
|
|
Feb 18th, 2005
|
Kohburn
Member Posts: 7349
From: Oriental, NC
Registered: Jul 2003
|
had a thought on this.. you mentioned audi swaps to VW's does that mean the VW clusters are cheap? and could be swapped to a fiero?
|
|
10:00 AM
|
|
Fie Ro
Member Posts: 3735
From: Soest, The Netherlands
Registered: Sep 2001
|
Yes many VW's share the "same" cluster, audi TT and Golf4 interchange.....I got some pinouts today from someone from a UK TT forum....oh well heres his mail: ------- Roderick, While nothing is impossible I think you are underestimating the complexity
of what you are trying to do...Your biggest problem will be to disable the
immobilizer chip - which wont be easy as the immobilizer code must tie up
with the code read by the transponder off a key, so unless you have the
matching key you will need to get one (and the matching barrel) and somehow
persuade an Audi dealer to recode the pod to the key...which he wont do
unless its in a car.. I ahve heard of a (dubious) organisation that claims
to be able to do the recodes independently of Audi but have no idea who they
are. Unless the immobilzer is disabled the pod will not function
sufficiently to be useful... you cant see the key and barrel in my pic... Secondly, once you managed the above problem, the pod then looks for the
engine management system over the high-speed CANBus (even the early ones
with no 'Comfort' CANBus still do this). If it can't find it then various
alarms go off... and the pod disables many functions and the DIS will show
an DEF warning although the basics are usable... For speedo and rev counter you will need to supply pulses at the appropriate
rate, pulse width, voltage and shape... 1 pulse per mph and 1 pulse per rev For temp and fuel gauges you will need to provide appropriate variable
resistances to sensor ground and calibrate them, mimicing the TT's temp and
fuel senders Anyhow, here are the pinouts and other info you may find useful... good luck Irving...
--------
Now I only want use the speedo/tacho/coolant temp/fuel level gauges and turn lights/warning lights so I hope I can work around all the digital stuff..the connector itself has individual pins for the input of the above....the trick is to make them function right does this match up with the fiero?:
For speedo and rev counter you will need to supply pulses at the appropriate
rate, pulse width, voltage and shape... 1 pulse per mph and 1 pulse per rev
|
|
10:47 AM
|
|
Kohburn
Member Posts: 7349
From: Oriental, NC
Registered: Jul 2003
|
hmm ok - sound slike I'll be rearanging the fiero cluster with a custom faceplate after all.. just seems so much easier to design a laminat faceplate that changes the apearance of the dash while using the stock mechanicals after rearanging them.
|
|
10:57 AM
|
|
Kohburn
Member Posts: 7349
From: Oriental, NC
Registered: Jul 2003
|
|
|
Feb 20th, 2005
|
Fie Ro
Member Posts: 3735
From: Soest, The Netherlands
Registered: Sep 2001
|
|
JazzMan
Member Posts: 18612
From:
Registered: Mar 2003
|
Total ratings: 653
User Banned
|
|
. [This message has been edited by JazzMan (edited 04-21-2009).]
|
|
08:22 PM
|
|
|
Feb 22nd, 2005
|
Kohburn
Member Posts: 7349
From: Oriental, NC
Registered: Jul 2003
|
| | | quote | | Originally posted by JazzMan: I like that layout, the only change I would make is to swap the tack and speedo. It always seemed to me that the tach should be the more prominant of the two. Awesome work! JazzMan |
|
yeah I haven't gotten around to reduing it at home with my image files for the 150mph speedo but I plan to increase the diameter of the center guage.. and I'm also thinking about flipping the extra guages to the right side.. we'll see
|
|
01:23 PM
|
|
Fie Ro
Member Posts: 3735
From: Soest, The Netherlands
Registered: Sep 2001
|
..I want to keep the equal left/right sized speedo/tach orientation like the stock fiero setup. Its hard to find a nice aftermarket set of those gauges, usually most tachs are big standalone units. thats why I try this audi dash thingie first.If it doesnt work with all the digital ssht inside I might just mockup the fierogauges and use the TT's faceplate and bezel...I like a "balanced" look..
|
|
03:48 PM
|
|
|
Feb 23rd, 2005
|
Kohburn
Member Posts: 7349
From: Oriental, NC
Registered: Jul 2003
|
like this? 
i'm thinking more enlarged center tach 
|
|
06:53 AM
|
|
Fie Ro
Member Posts: 3735
From: Soest, The Netherlands
Registered: Sep 2001
|
|
|
10:08 AM
|
|
|
PFF
System Bot
|
|
|
|
Kohburn
Member Posts: 7349
From: Oriental, NC
Registered: Jul 2003
|
ooh pretty.. true about the guage layout - not sure just yet how I want to lay it out. i'll work on it
|
|
10:25 AM
|
|
Joe Torma
Member Posts: 3485
From: Hillsborough, NJ USA
Registered: Jul 2001
|
Really nice work Fie Ro! You have some amazing wood(and other material)working skills! Can't wait to see your stuff done! My gauge setup is similar to what you posted...
 [This message has been edited by Joe Torma (edited 02-23-2005).]
|
|
11:44 AM
|
|
Fie Ro
Member Posts: 3735
From: Soest, The Netherlands
Registered: Sep 2001
|
Hi Joe, Your dash buildup has been quite some inspiration for mine, thanks! Made me decide to use wood instead of foam... Havent seen updates on yours lately, or did I missed it? Are you still doing a 3D kind of gauges setup?....I really liked that one! -edit: forgot to say this looks really cool!!!! Have you built it yet?
| | | quote | Originally posted by Joe Torma:
|
|
[This message has been edited by Fie Ro (edited 02-23-2005).]
|
|
12:10 PM
|
|
Joe Torma
Member Posts: 3485
From: Hillsborough, NJ USA
Registered: Jul 2001
|
Hehe...me an inspiration? Thanks!! MDF is my friend!! This is how I left it in the fall. I'm taking all the boards off the guages and using just the center gizmos(what are they called?!). Since they have threaded terminals it will be really easy to use ring terminals and nuts...and the boards have just about everything labels so its so easy. Needles will be repainted blue, I have lots of EL material laying around and I will make my own EL guage faces, in blue, to look like the VWs.
I am using the entire AUX panel though, that will get mounted behind everything.
The biggest thing for me was the visibility of all the gauges behind the wheel. It's pretty good...note that the camera lens makes everything look even more visible though. I have 2 notches with the steering column where all guages are visible from my seating position. Unless you place the outside ones lower(doesn't look good to me) it's hard to fit them all in there. 
[This message has been edited by Joe Torma (edited 02-23-2005).]
|
|
12:40 PM
|
|
Kohburn
Member Posts: 7349
From: Oriental, NC
Registered: Jul 2003
|
| | | quote | | Originally posted by Joe Torma: Hehe...me an inspiration? Thanks!!
MDF is my friend!! This is how I left it in the fall. I'm taking all the boards off the guages and using just the center gizmos(what are they called?!). Since they have threaded terminals it will be really easy to use ring terminals and nuts...and the boards have just about everything labels so its so easy. Needles will be repainted blue, I have lots of EL material laying around and I will make my own EL guage faces, in blue, to look like the VWs.
I am using the entire AUX panel though, that will get mounted behind everything.
The biggest thing for me was the visibility of all the gauges behind the wheel. It's pretty good...note that the camera lens makes everything look even more visible though. I have 2 notches with the steering column where all guages are visible from my seating position. Unless you place the outside ones lower(doesn't look good to me) it's hard to fit them all in there.
|
|
VW guages, blue needles, looks like you beat me to it - I hadn't though of eliminating the odo/trip odo though... my guage inspiration is a little more from the new subaru legacy gt though.. my interior will come later but will share similarity to both of you
|
|
02:04 PM
|
|
Fie Ro
Member Posts: 3735
From: Soest, The Netherlands
Registered: Sep 2001
|
|
Kohburn
Member Posts: 7349
From: Oriental, NC
Registered: Jul 2003
|
| | | quote | | Originally posted by Fie Ro: 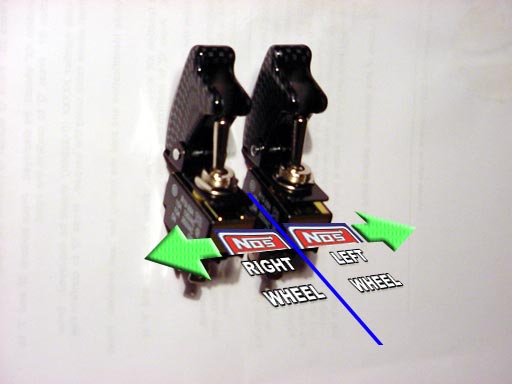
|
|
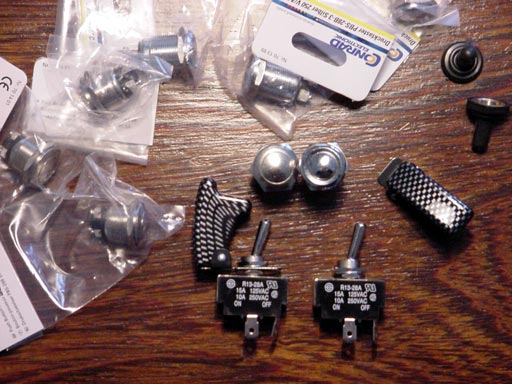
I guess your car is designed to be a wheel stander then - using nos instead of brakes to stear I like aircraft style switches (but i work with em all the time since I am part of a team that builds military flight simulators)
they do seem to be a bit overdone by the import crowd around here - i suspect your use will be very tasteful tho
|
|
02:57 PM
|
|
Fie Ro
Member Posts: 3735
From: Soest, The Netherlands
Registered: Sep 2001
|
well I played a bit with them tonight....some zippo tricks (I never had one lol)...yeah they look too "�mportant", its just a switch...! But I guess they look best on a horizontal surface...and.. got some ideas coming The pushbuttons will work for the mirrors/decklid up/manual headlights down (a common fiero mod) but I will need those extra ..switches for the headlights and extra lighting I guess..I figure some lineing up with the shifter ring rounding...I should try a photoshop if I dont fall asleep.
|
|
03:44 PM
|
|
Fie Ro
Member Posts: 3735
From: Soest, The Netherlands
Registered: Sep 2001
|
|
Custom2M4
Member Posts: 4414
From: Winnipeg, Manitoba Canada
Registered: Sep 2004
|
I am sorry.. But I just hate you.. lol looks amazing yet again! hurry up and finish though!
|
|
05:53 PM
|
|
|
PFF
System Bot
|
|
Fie Ro
Member Posts: 3735
From: Soest, The Netherlands
Registered: Sep 2001
|
last one...might try something like this one of these days.... 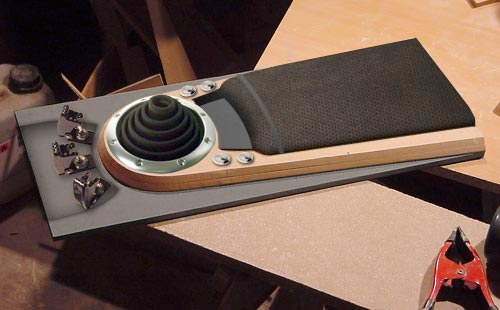 good night!
|
|
06:56 PM
|
|
Kohburn
Member Posts: 7349
From: Oriental, NC
Registered: Jul 2003
|
| | | quote | | Originally posted by Fie Ro: well I played a bit with them tonight....some zippo tricks (I never had one lol)...yeah they look too "�mportant", its just a switch...! But I guess they look best on a horizontal surface...and.. got some ideas coming
The pushbuttons will work for the mirrors/decklid up/manual headlights down (a common fiero mod) but I will need those extra ..switches for the headlights and extra lighting I guess..I figure some lineing up with the shifter ring rounding...I should try a photoshop if I dont fall asleep. |
|
I think they look best on a non-horizontal surface either on a \- or on an overhead /- but thats how i'm used to seeing them in aircraft
|
|
07:29 PM
|
|
|
Feb 27th, 2005
|
Fie Ro
Member Posts: 3735
From: Soest, The Netherlands
Registered: Sep 2001
|
|
|
12:46 PM
|
|
Scott-Wa
Member Posts: 5392
From: Tacoma, WA, USA
Registered: Mar 2002
|
good to see you making progress. Have you thought about eliminating the original skeleton so you could narrow/blend your center consoleto end in front of the shifter more organically? If I ever get to doing something like this I'd like to pretty much steal your shape for the upper part of the console and subwoofer idea but maybe make the lower section wrap around the shifter also narrowing as it goes from the back to the front. Maybe eliminate having the stereo/hvac section being part of it or bring that into it as a distinctly seperate transition so there is still room for the cabling that goes thru that area. I can't draw worth a squat in 'paint' but I may see if I can snag one of your photos to draw some lines across to get the idea.
|
|
01:04 PM
|
|
Fie Ro
Member Posts: 3735
From: Soest, The Netherlands
Registered: Sep 2001
|
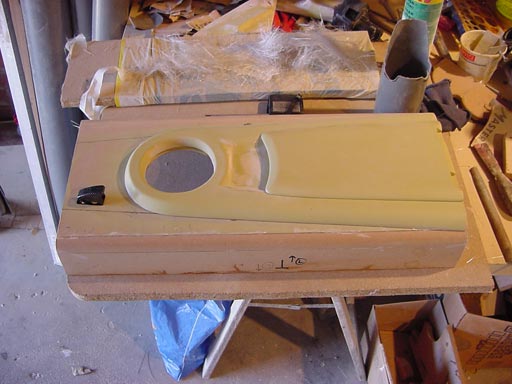
yeah I think I understand what you mean....theres a lot of space indeed around the shifter area esp. when youre a non-smoker in the car ....however I committed to stay quite close to the original dimensions and fitment so I leave the original bracket in place. but theres enough space between shifter and midcluster to make some recessed cupholders if you wanted to...! I'll use a little of that space to mount the rockerswitches almost an inch lower.....theres sooo much you can do
|
|
02:24 PM
|
|
Scott-Wa
Member Posts: 5392
From: Tacoma, WA, USA
Registered: Mar 2002
|
sent you an email with a picture... not bad for a first shot at editing a photo in Paint of all programs. Oh... I think putting the switches with covers on the console is a bad idea ergonomicly... in front of shifter they would be hard to access and behind it they might get hit driving by accident. I'd integrate them into a roof console or into the dash. [This message has been edited by Scott-Wa (edited 02-27-2005).]
|
|
03:37 PM
|
|
Fie Ro
Member Posts: 3735
From: Soest, The Netherlands
Registered: Sep 2001
|
| | | quote | | Originally posted by Scott-Wa: sent you an email with a picture... not bad for a first shot at editing a photo in Paint of all programs. Oh... I think putting the switches with covers on the console is a bad idea ergonomicly... in front of shifter they would be hard to access and behind it they might get hit driving by accident. I'd integrate them into a roof console or into the dash. |
|
I cant check email before tomorrow, I hope it looks good ...Now thats 2 votes against my rocker switch setup.....thanks for the feedback...lol, so lets see what we can do. I want the dash kinda clean so the roofconsole looks like a nice option.... I am redoing it anyway for the leds.
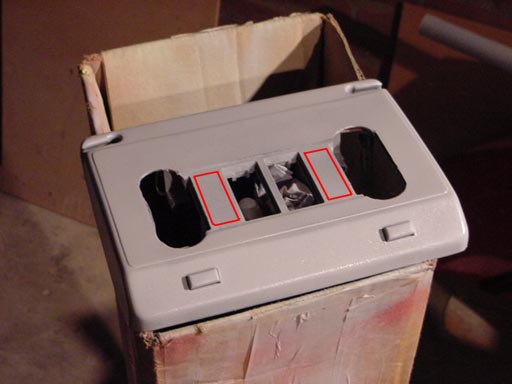
I'll try a mockup tomorrow...
|
|
04:43 PM
|
|
ricreatr
Member Posts: 610
From: Flint, mi
Registered: May 2004
|
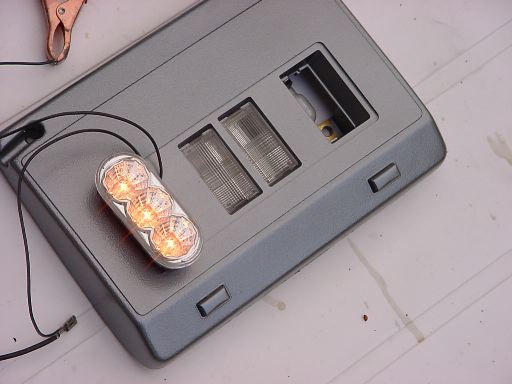
i really like scott-wa's roof console idea! cool place for em. and those lights will look good too!
|
|
08:37 PM
|
|
|
Mar 13th, 2005
|
Fie Ro
Member Posts: 3735
From: Soest, The Netherlands
Registered: Sep 2001
|
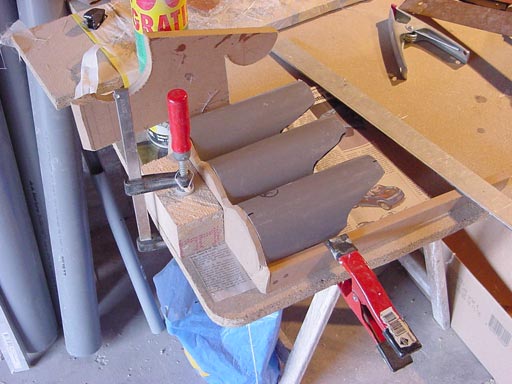
console needs a repaint and an aluminium bezel but this setup will work! thnx Scott-wa. 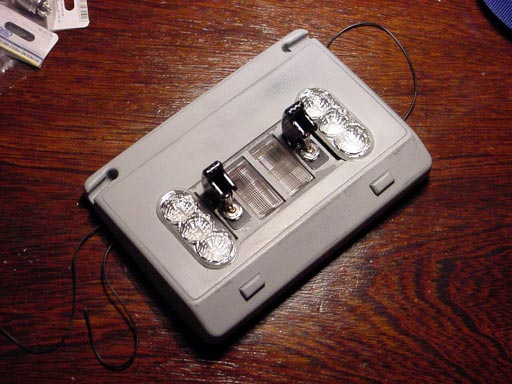 Finally got the rallygauges shipped across the ocean...oilpressure/volts/boost (I replaced watertemp with boost when I knew I was close to my SC purchase ) testing the volts gauge:  with 7 colors to choose from it wont be hard to match them to the final interior.....nice gauges. [This message has been edited by Fie Ro (edited 03-13-2005).]
|
|
01:43 PM
|
|