|
|
|

|
My interior build... by RCR
| Started on | : 03-19-2006 09:28 AM |
| Replies | : 178 (24536 views) |
| Last post by | : kendell on 02-06-2023 08:57 PM |
|
|
|
|
Mar 19th, 2006
|
RCR
Member Posts: 4416
From: Shelby Twp Mi
Registered: Sep 2002
|
In the spirit of "My dash conversion" thread, I thought I would start a thread more appropriate to what's now going on. It's no longer just a dash conversion (located here: https://www.fiero.nl/forum/Forum2/HTML/043545.html ), but a total update of the interior, including the center console, headliner, dash, door panels, AV system, etc. Jscott convinced me that a cassete/cd changer audio system was not the way to go (Thanx Jon  ), so I pulled it all out and picked up a Chinese knock-off DVD player (cds & MP3's too) and a 10.4" video screen. Still working on how the screen goes, but I roughed in all the stereo equipment so I can put the dash back in. The addition of the dash required tossing out the center console. My plan was to find one I liked and incorporate it into a totally new design. Also, one of my later ideas was to incorporate a subwoofer in the dash, but after putting the dash back in, I realized it just wasn't going to fit. So I've decided to go with a center console subwoofer. So, here are a couple of pics to get this started. More will come as the thread builds towards completion. The first thing I did was build an amp rack to mount the equipment. I did not want to sacrifice space in the cab for the amps, but I wanted the extra power and room to grow. Here is the top of the rack:
 I had to situate the amps around the brake booster, AC stuff, and washer bottle. I also wanted everything servicable, so it had to be hinged.
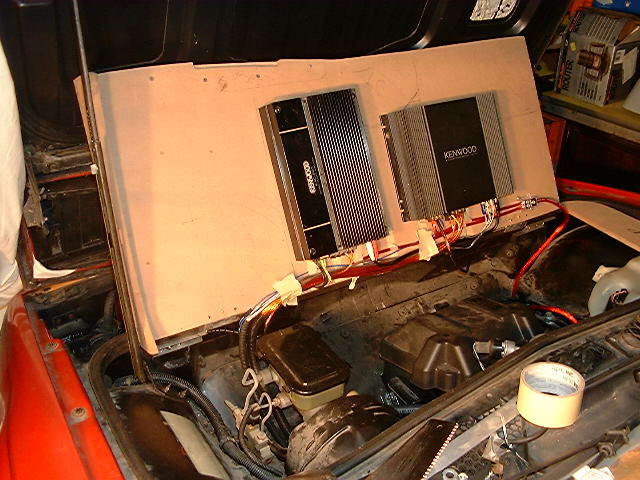
I plan on finishing it off with a glass cover over the amps, and fabric over the outside. With the wiring in and the dash sub out, I went to work on the console sub.
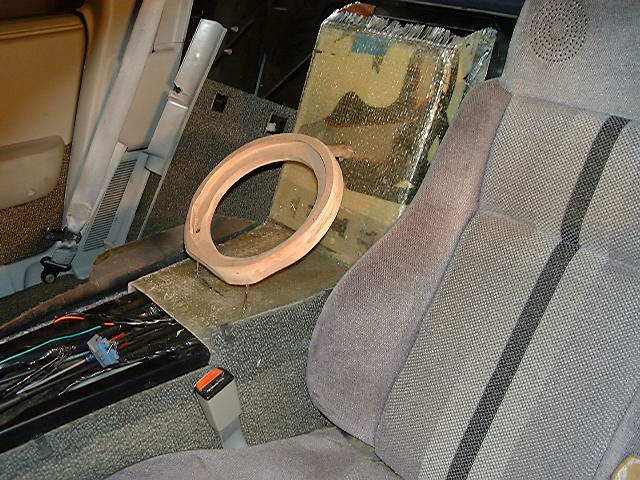
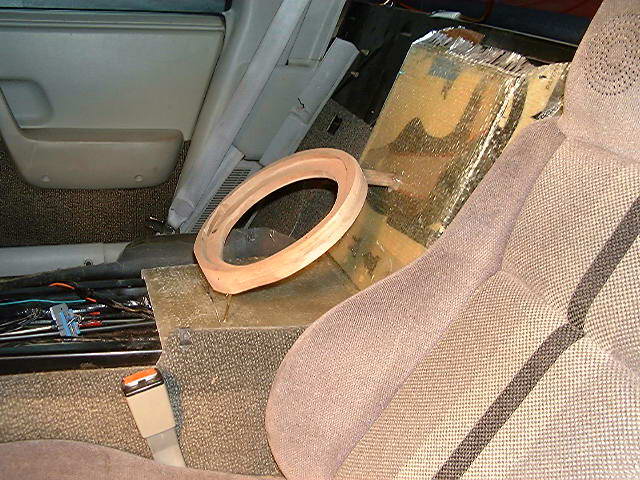
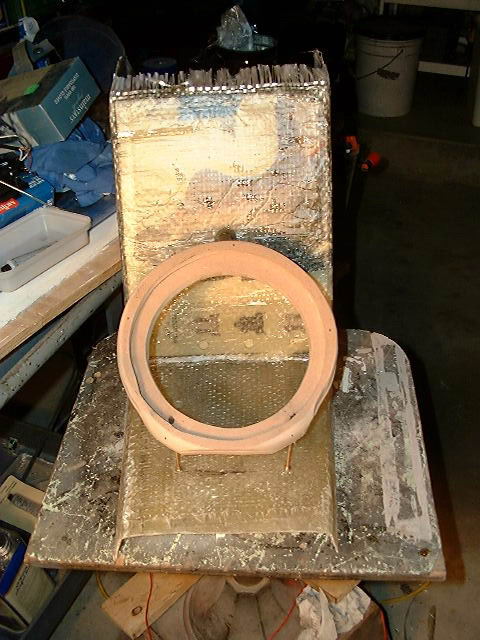
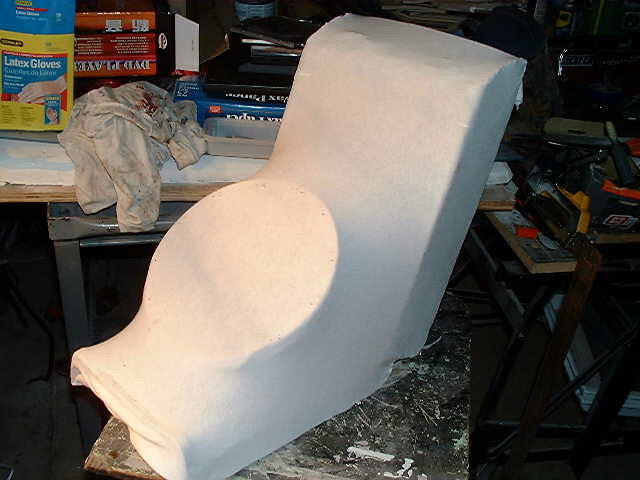
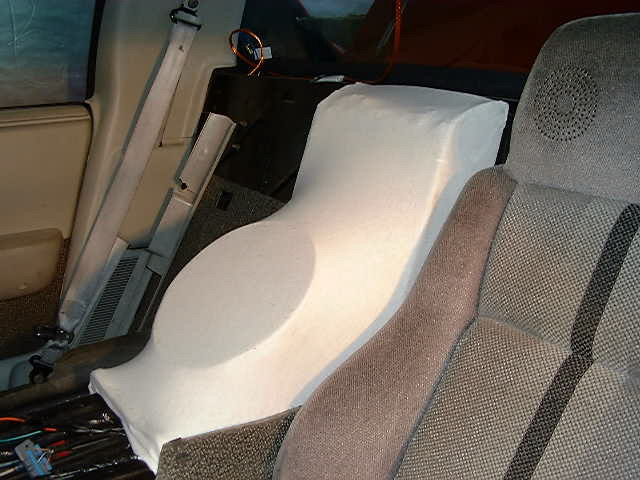
I started out by forming a piece of cardboard around the ECM, making sure it fit nice up against the firewall. I removed it and built a form on my table to keep everything square. Then I put a coat of resin over the cardboard, making it nice and stiff. I put it back in the cabin and taped up the console area to get it's shape. Wax paper and paiters tape kept everything from sticking to the console. I layed several layers of glass over the back and bottom, to form the base for the subwoofer. (Sorry, no pics of any of this). Then I built up the ring. I decided I didn't need thunderous bass and I didn't want something protruding out that would get in the way of my arm, so I went with an 8" sub. I haven't picked one yet, but I'm leaning towards Kicker, or Rockford Fosgate. I built the ring around these. My buddy Matt came down for a few hours, so I put him on making the rings. He did a decent job considering the equipment he had to work with. He made two rings, meant to be stacked on each other. The bottom ring is where the sub is mounted, the top ring gives the sub a flush-mount look. Here are the pics so far:
 Today I hope to get the fleese and resin on to give it some shape. More later, Bob edits for speelin' [This message has been edited by RCR (edited 03-19-2006).]


|
09:28 AM
|
|
|
PFF
System Bot
|
|
|
|
revin
Member Posts: 8684
From: Pville, TX
Registered: Aug 2001
|
| | | quote | | Originally posted by RCR:
|
|
Are you planning a fan in there to keep the amps cool? I say a few computer fans need to be added.
or you can cut ahole toward the rad fan.
|
|
09:53 AM
|
|
Custom2M4
Member Posts: 4414
From: Winnipeg, Manitoba Canada
Registered: Sep 2004
|
| | | quote | | Originally posted by revin: or you can cut ahole toward the rad fan. |
|
That might actually make it hotter then the amps would do... But I still agree on something cooling them off.. one computer fan facing one way, forcing hot air out, and another one sucking it in should work, as long as you had a hood scoop  . .
|
|
12:16 PM
|
|
Fino
Member Posts: 813
From: St. Johns, MI. USA
Registered: Jan 2002
|
I think you are doing great work and it looks nice. But I also have to agree with the amps AND battery you need to cool it. Can you cut two holes in the front and install a fan on one to move air, then protect the two holes from water intrusion. Not going to be easy. Ed ------------------
Fino
www.feroce.us
Member National Kit Car Club 
|
|
12:32 PM
|
|
Fiero1Fan
Member Posts: 4364
From: Brachttal, Germany
Registered: Sep 2005
|
Looks real good. ------------------
The Steel Lady: Pix to follow........ Super Bowl XL CHAMPS!!!
|
|
01:20 PM
|
|
jscott1
Member Posts: 21676
From: Houston, TX , USA
Registered: Dec 2001
|
Nice work Bob, welcome to the 21st century  Hopefully no one has a hood scoop that vents into the forward trunk. That area is supposed to be sealed from the elements. Which means it will get hot up there. With the amps mounted upside down natural convection is going to be working against you. You might conider changing to an aluminum plate and mount the amps to that as a heat sink. I like your center console. I am just startng to work with fiberglass and my next one is going to be a lot better than the one I have now. If I ever figure out how to do molds I would be all set to make more. I'm very interested to see your large screen. I'm wanting to do a carputer one of these days but mounting a large touch screen in our cars is the challenge.
|
|
02:12 PM
|
|
RCR
Member Posts: 4416
From: Shelby Twp Mi
Registered: Sep 2002
|
OK, I hadn't considered the heat in front. I guess I'll have to come up with something slick.  Or, maybe a hole somewhere..Hmm, I'll have to think on that. Last update for the week: I put the fabric on. It's a 100% polyester t-shirt type material. $2.00 a yard at Walmart. I think I looked like a fool feeling up all the material there, trying to find the stretchiest stuff they had. Oh well, I've got enough to do a bunch of stuff. The material is attached to the backing using staples (temporarily, I pulled them afterward), and hot glue. Here's what it looks like attached to the framework:
 And in the car for fitting:
 Once satisfied with the fit, I coated it with a layer of resin:
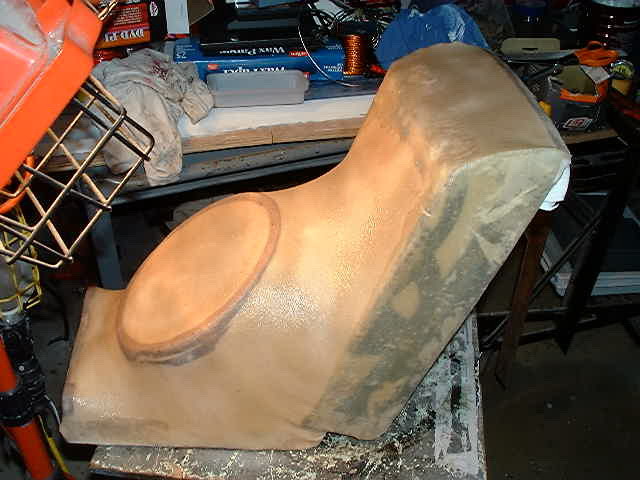
 Afterwards, it gets several layers of fiberglass. The glass I picked up on Ebay. It's 18oz weave. It seems to flow with the curves pretty well. And for 16lbs of glass for $16, you can't beat that. I'll get more pics when it's further along. Bob ...Ventilation, huh?? Hmmm....
|
|
05:49 PM
|
|
revin
Member Posts: 8684
From: Pville, TX
Registered: Aug 2001
|
run a drier vent hose from the front facia and drill a hole in the trunk for the "fresh air" Then down under the tub of the trunk.
|
|
06:12 PM
|
|
|
Mar 22nd, 2006
|
RCR
Member Posts: 4416
From: Shelby Twp Mi
Registered: Sep 2002
|
I purchased an 8" Kicker CVR for the subwoofer box. I'm hoping it sounds as good as it looks.  Bob
|
|
02:40 PM
|
|
datacop
Member Posts: 1426
From: Indianapolis, IN, USA
Registered: Jan 2004
|
Love how that center console is turning out! I can't wait to see the final result.
|
|
03:37 PM
|
|
fiero_silva
Member Posts: 1493
From: Winnipeg, Manitoba, Canada
Registered: Jun 2003
|
Very nice work.. I love the amp rack idea!
|
|
05:54 PM
|
|
|
PFF
System Bot
|
|
|
Apr 9th, 2006
|
RCR
Member Posts: 4416
From: Shelby Twp Mi
Registered: Sep 2002
|
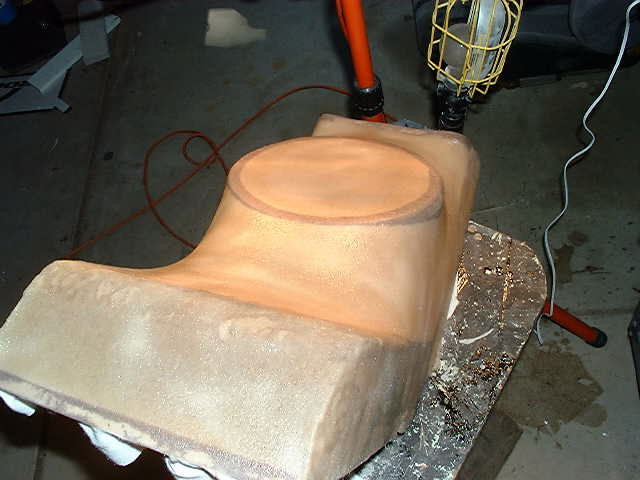
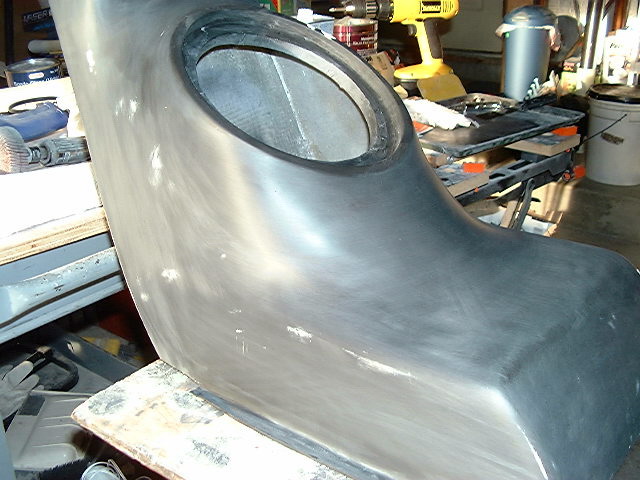
Update time: The weather has been warm then cold, so work is sporadic, but I have the box built up with glass and the mounting flanges installed. The following picture shows the creation of the flanges. I taped off the areas on the firewall where the flanges would be, using painters tape and wax paper. I put a coat of carnuba wax on the tape to help seperation. I installed the box back in the car, making sure it was at the proper mounting location. I then built up a flange using 2oz mat and 18oz cloth, overlapping the box and the flange to ensure it was nice and strong. 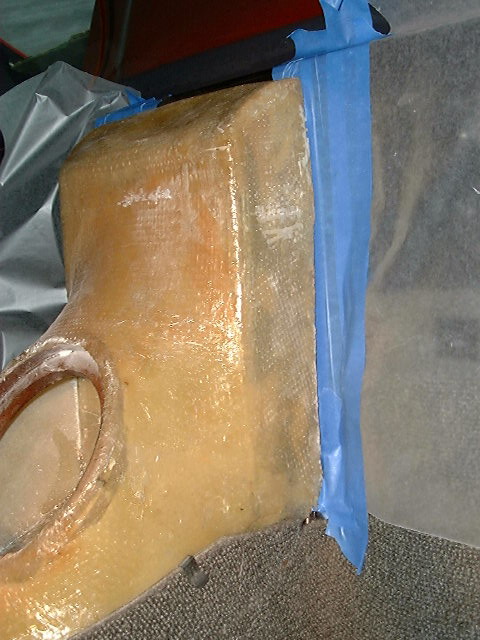 This picture shows the flange cut to shape. The back of the flange is an exact mirror copy of the firewall. (Pss..that's my first shot at the new door panel in the background)
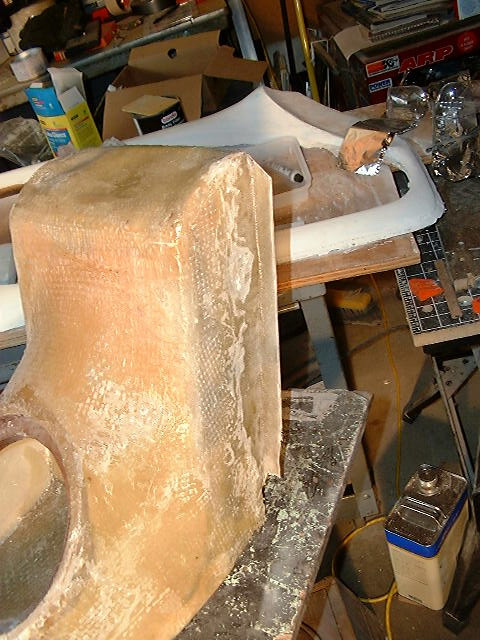 The last two pics show the box in early sanding steps. I've added some kitty hair to strengthen the box and give it a better shape, and I've used a guidecoat of primer to see where I'm at with the sanding. I hate sanding....Lots more of that to come.
Bob
[This message has been edited by RCR (edited 04-09-2006).]
|
|
07:57 AM
|
|
3800superfast
Member Posts: 8568
From: ohio U.S.
Registered: Apr 2004
|
|
RCR
Member Posts: 4416
From: Shelby Twp Mi
Registered: Sep 2002
|
Thanx for the heads-up. Bob
|
|
09:58 AM
|
|
vortecfiero
Member Posts: 996
From: Toronto Area, Canada
Registered: Feb 2002
|
very nice ! Looks great !!! I have always wondered how the custom installers did that kind of work.. I never really asked.. but the pics tell all ------------------

84 Fiero Turbo Vortec 4300 Phantom GT
L35 block, Syclone Intake and ECM with Moates adapter
50lb injectors, 3 bar map sens, T04B H3 Turbo 87 GT just waiting for the conversion www.cardomain.com/id/vortecfiero
Murphy's Constant Matter will be damaged in direct proportion to its value
Murphy's Law of Thermodynamics Things get worse under pressure.
Arthur C. Clarke "Any significantly advanced technology is indistinguishable from magic"
|
|
10:02 AM
|
|
jscott1
Member Posts: 21676
From: Houston, TX , USA
Registered: Dec 2001
|
| | | quote | | Originally posted by RCR: This picture shows the flange cut to shape. The back of the flange is an exact mirror copy of the firewall. (Pss..that's my first shot at the new door panel in the background)
|
|
Any more detals on those door panels??
|
|
01:17 PM
|
|
Fiero1Fan
Member Posts: 4364
From: Brachttal, Germany
Registered: Sep 2005
|
RCR, you're doing some very fine work. Keep up the progress pix. Good ideas are always welcome.
|
|
01:29 PM
|
|
RCR
Member Posts: 4416
From: Shelby Twp Mi
Registered: Sep 2002
|
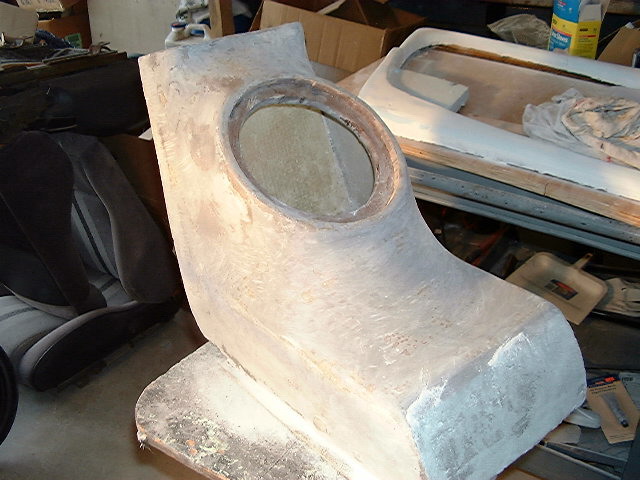
Just a couple more pics of todays progress. This one shows a half can of primer to start the "smoothing" process. 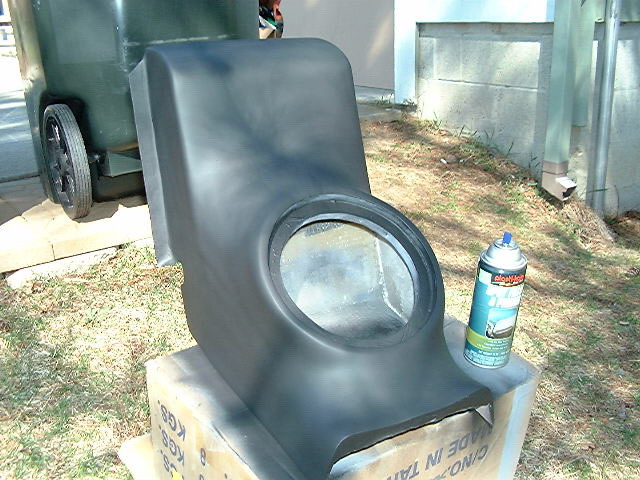 Almost smooth:
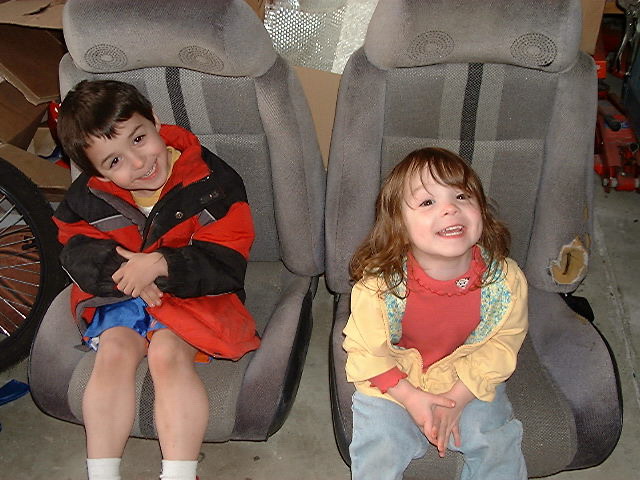
 And todays fan club. My two youngest cheering on Dad.
 Thanx for popping in.
Bob
|
|
07:44 PM
|
|
Sourmug
Member Posts: 4538
From: Calgary, Alberta, Canada
Registered: Sep 2002
|
Bob: The speaker enclosure looks great! Isn't sanding fun  I'd like to see some pictures of the door panels as well. Nolan
|
|
11:23 PM
|
|
|
Apr 10th, 2006
|
UCFieroCharger
Member Posts: 976
From: Cincinnati, OH
Registered: Nov 2005
|
Just a quick question, and other peopel with subboxes, what is the interior volume of the sub box? Can anyone tell me what the suggested volume is for an 8in sub? I tried looking online and actually wasnt very successful. Im just curious. After seeing everyone doing all this work since its getting nice, im getting that itch to do something....
|
|
02:01 AM
|
|
RCR
Member Posts: 4416
From: Shelby Twp Mi
Registered: Sep 2002
|
Sorry guys, the door panel is an up & coming project. I don't have much info on it, other than I started by following what Roy did on his Firebird panels. The gist of the door panel is that I'm using firebird components and form fitting it to the dash. The raised portions will be custom made, their will be an integrated 5.25" door speaker, and a custom center section. Not much else to tell, yet. The recommended volume for my Kicker CVR is .4 to 1.8 cuft for a sealed enclosure and .8 to 1.2 cuft for a ported enclosure. I'm estimating that I'm just short of .4 cuft so I will be using polyester batting to fill the box to make it seem larger to the sub. Bob
|
|
07:38 AM
|
|
|
PFF
System Bot
|
|
|
|
UCFieroCharger
Member Posts: 976
From: Cincinnati, OH
Registered: Nov 2005
|
ok, thanks for the info.
|
|
09:07 AM
|
|
Fiero1Fan
Member Posts: 4364
From: Brachttal, Germany
Registered: Sep 2005
|
Cute little girls. Aren't dads lucky people?
|
|
08:20 PM
|
|
Custom2M4
Member Posts: 4414
From: Winnipeg, Manitoba Canada
Registered: Sep 2004
|
| | | quote | | Originally posted by Fiero1Fan: Cute little girls. Aren't dads lucky people? |
|
I don't know what kids look like in germany.. but one of them is a boy . So cute boy/girl. The build is looking pretty good so far! Maybe it will look even better with a widebody?!?!?!?! Muahhaha Best of luck,
Chase.
|
|
08:44 PM
|
|
Fiero1Fan
Member Posts: 4364
From: Brachttal, Germany
Registered: Sep 2005
|
Oops!!! I'm blind in one eye (j/k), that must have caused the stupidity!!! Thanks for the correction.
|
|
08:52 PM
|
|
|
Apr 11th, 2006
|
RCR
Member Posts: 4416
From: Shelby Twp Mi
Registered: Sep 2002
|
Custom2M4: Widebody??? Hmmm. Maybe you're onto something....Maybe something like this?  Only a handful of projects at one time. Bob
|
|
07:34 AM
|
|
Custom2M4
Member Posts: 4414
From: Winnipeg, Manitoba Canada
Registered: Sep 2004
|
|
RCR
Member Posts: 4416
From: Shelby Twp Mi
Registered: Sep 2002
|
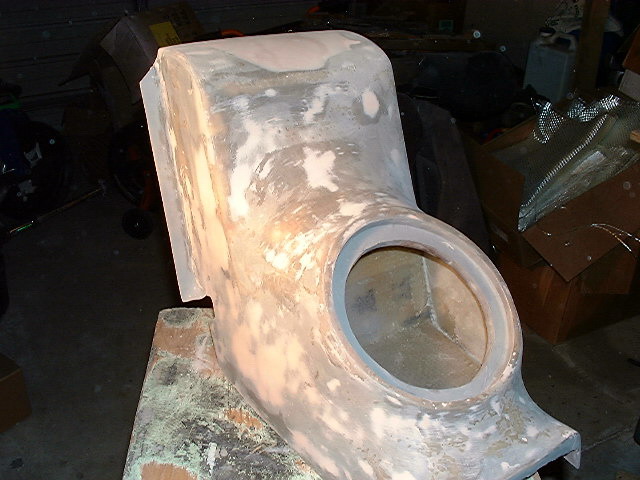
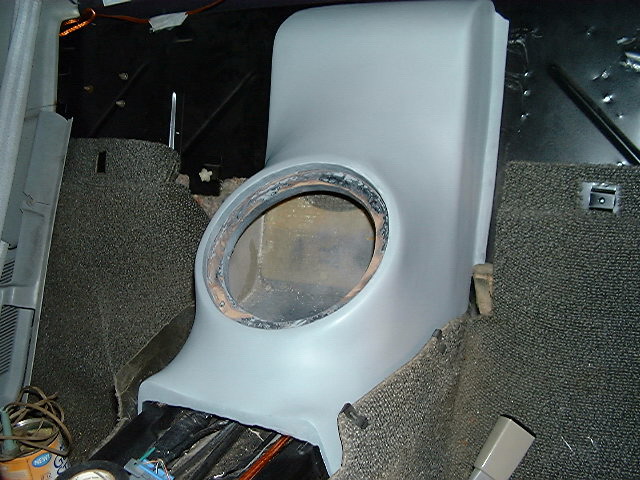
Custom2M4: It's not as wide as yours, but it is 3.5" wider that stock, on each side. Plus it still "looks" stock, just modern. But, back on topic... Here is a quick shot of the final product, in primer, just to make sure it all still fits properly.
 I shot the first coat of metalic cast iron, butran out of paint, Doh! More later... Bob
|
|
07:53 PM
|
|
Scott-Wa
Member Posts: 5392
From: Tacoma, WA, USA
Registered: Mar 2002
|
Looks sweet... going to have clearance for your arm?
|
|
08:38 PM
|
|
Custom2M4
Member Posts: 4414
From: Winnipeg, Manitoba Canada
Registered: Sep 2004
|
Well mine is only about 3.5-4inches wider then stock... I dont really wany anymore because I don't plan on running spacers.. Just a RWD offset.. Its looking pretty good!
| | | quote | | Originally posted by Scott-Wa: Looks sweet... going to have clearance for your arm? |
|
If you look in the first picture of the box, it seems like its about perfect for your arm .
|
|
10:09 PM
|
|
Sourmug
Member Posts: 4538
From: Calgary, Alberta, Canada
Registered: Sep 2002
|
Nice job, it looks like it belongs there. Much better looking than most sub enclosures I have seen. Nolan [This message has been edited by Sourmug (edited 04-11-2006).]
|
|
11:18 PM
|
|
|
PFF
System Bot
|
|
fieroracer86
Member Posts: 345
From: pa
Registered: Jan 2004
|
That looks sweeet! Can't wait to see it covered or painted
|
|
11:45 PM
|
|
|
Apr 12th, 2006
|
RCR
Member Posts: 4416
From: Shelby Twp Mi
Registered: Sep 2002
|
Arm clearance will be good for me. With my hand resting on shifter, my arm doesn't touch the box. The speaker is recessed, so that won't be an issue, either. Thanx everyone for popping in and the kind words. I'm just hoping to add to the knowledge base and show that it's not that difficult if you work at it a little. Bob
|
|
07:36 AM
|
|
cliffw
Member Posts: 37512
From: Bandera, Texas, USA
Registered: Jun 2003
|
Looking good.
Curious if you are gonna be using your seat speakers. If so, what type do you have in mind ?
|
|
07:50 AM
|
|
RCR
Member Posts: 4416
From: Shelby Twp Mi
Registered: Sep 2002
|
cliffw: I will be eliminating the seat speakers. I plan on getting new seats sometime in the future. I'm thinking of building some boxes up in the corners to house some 5.25s or 6.5s since my '84 does not have the provision for B-pillar speakers. Not sure how that'll work out, yet. Bob
|
|
12:09 PM
|
|
Fie Ro
Member Posts: 3735
From: Soest, The Netherlands
Registered: Sep 2001
|
Nice work! Love to see the little tricks like the stretched polyester to make these shapes -relatively- easy. I still spend way too much time on filling and sanding...your work looks good.
|
|
01:28 PM
|
|
Sourmug
Member Posts: 4538
From: Calgary, Alberta, Canada
Registered: Sep 2002
|
|
RCR
Member Posts: 4416
From: Shelby Twp Mi
Registered: Sep 2002
|
I'm a silent member at Glassman's. That and the Alpine site is where I came up with most of this. Thanx Fie Ro, having watched your progress, I had a high target to shoot for. Still a long way to go. Bob
|
|
04:55 PM
|
|
Sourmug
Member Posts: 4538
From: Calgary, Alberta, Canada
Registered: Sep 2002
|
Bob: Have you purchased any of the products from Glassman particularily the instruction videos? If you did, how do you like them? Thanks
Nolan
|
|
11:58 PM
|
|
|
Apr 13th, 2006
|
BobadooFunk
Member Posts: 5436
From: Pittsburgh PA
Registered: Jun 2003
|
looks awesome so far!!
|
|
12:14 AM
|
|


