|
|
|

|
Sourmug's Decklid Vent Build ** 56K Warning!!** by Sourmug
| Started on | : 03-12-2006 03:40 AM |
| Replies | : 681 (60189 views) |
| Last post by | : labbe001 on 02-22-2024 04:39 PM |
|
|
|
|
Sep 16th, 2007
|
Sourmug
Member Posts: 4538
From: Calgary, Alberta, Canada
Registered: Sep 2002
|
When the stock hub is in place on the back of the wheel the nuts for the front cap would no longer have sufficient space. I cant just rotate the cap as there are two rods that tie into it from the bottom curve of the new wheel. However, the inside piece that holds the horn button can rotate but that meant that I would have to drill new holes for the machine screws that came with the wheel. Here is a picture showing the plastic center piece rotated and used as a template to punch the new hole locations. There are two existing holes that I will reuse (they are for 2 screws from the back that won't be installed) and they were used to hold the "template" in place: .JPG) The front aluminum piece was then drilled for the new holes and the whole assembly was but together to check the fit. Here's the backside: .JPG) What do you know... It all lined up!  I then used JB weld to attach the nuts to the wheel as there is no way to access these once the wheel is on the column. I also covered the screw heads with tape first so that there would be no JB weld on them: .JPG) And here's the assembled wheel: .JPG) .JPG) And the shroud in place. .JPG) Now I just have to figure out how to wire up the horn.  Nolan [This message has been edited by Sourmug (edited 09-22-2007).]


|
03:54 PM
|
|
|
Sep 22nd, 2007
|
Sourmug
Member Posts: 4538
From: Calgary, Alberta, Canada
Registered: Sep 2002
|
|
|
07:51 PM
|
|
Fiero1Fan
Member Posts: 4364
From: Brachttal, Germany
Registered: Sep 2005
|
Looks like fun...... 
|
|
10:42 PM
|
|
|
Sep 23rd, 2007
|
Sourmug
Member Posts: 4538
From: Calgary, Alberta, Canada
Registered: Sep 2002
|
Oh yeah! loads of fun!
|
|
04:26 PM
|
|
FieroWannaBe
Member Posts: 2292
From: USA
Registered: Oct 2004
|
It really has come a long way, and youve done amazing work so far. Keep, it up, your inspiring. ------------------
PROJECT 1986 GT Stormbringer

|
|
08:42 PM
|
|
MordacP
Member Posts: 1300
From: Clovis, California, US
Registered: Sep 2007
|
Have you gone to the dark side of rice?? No, my freind; rice is a paint-job you did in your garage with a brush, rice is a muffler dangling off the end of a car because it's too big. No, you've gone to the light side of awesomeness.
This thread is great because it's everything most people will ever want to do with their fiero, keep it up!
|
|
11:35 PM
|
|
|
Sep 25th, 2007
|
Sourmug
Member Posts: 4538
From: Calgary, Alberta, Canada
Registered: Sep 2002
|
Thanks for the kind comments guys, I really appreciate it!
Nolan
|
|
12:28 AM
|
|
|
Nov 19th, 2007
|
Sourmug
Member Posts: 4538
From: Calgary, Alberta, Canada
Registered: Sep 2002
|
Anti-achival bump! Nothing to report, too busy doing reno's in the house - gotta keep the spousal unit happy! Nolan
|
|
12:41 PM
|
|
Erik
Member Posts: 5625
From: Des Moines, Iowa
Registered: Jul 2002
|
|
|
06:09 PM
|
|
Emc209i
Member Posts: 3091
From: Charlotte, NC
Registered: Apr 2005
|
Total ratings: 225
User Banned
|
|
| | | quote | Originally posted by Sourmug:
OK...
I finally started:
 
|
|
Hahaha I thought I would warn you. I'm running into all sorts of lq1 troubles on my end. I would like to thoroughly suggest you remake the thin 1/8 steel bracket that runs from the front transmission mount (under driver) to the transmission. Mine has folded in half ! Since you can already make parts at your shop, make another out of 1/4 steel. It may save you tons of headache down the road. Everything else looks amazing. Keep up the good work!
|
|
06:33 PM
|
|
|
Nov 20th, 2007
|
Sourmug
Member Posts: 4538
From: Calgary, Alberta, Canada
Registered: Sep 2002
|
|
|
PFF
System Bot
|
|
Sourmug
Member Posts: 4538
From: Calgary, Alberta, Canada
Registered: Sep 2002
|
| | | quote | Originally posted by Emc209i:
Hahaha
I thought I would warn you. I'm running into all sorts of lq1 troubles on my end. I would like to thoroughly suggest you remake the thin 1/8 steel bracket that runs from the front transmission mount (under driver) to the transmission. Mine has folded in half ! Since you can already make parts at your shop, make another out of 1/4 steel. It may save you tons of headache down the road.
Everything else looks amazing. Keep up the good work! |
|
I assume that this is the mount you are talking about? .JPG) I think that it should be fairly easy to rienforce this if it is. Thanks For the compliment! Nolan [This message has been edited by Sourmug (edited 11-20-2007).]
|
|
12:44 PM
|
|
Nate16
Member Posts: 153
From:
Registered: Jan 2007
|
I have read your entire thread and have to say that this is the most awesome thread with this kind of work being done. Being that you have never done this before it inspires me to tackle this kind of work. If only I had a garage. I really like the interior work on your fiero. I also have to ask where did you get the seat covers for your car? I really like them.
|
|
03:48 PM
|
|
Sourmug
Member Posts: 4538
From: Calgary, Alberta, Canada
Registered: Sep 2002
|
Thanks Nate! The seats have Mr. Mike's seat covers on them. I believe he has a Christmas sale on now.
Nolan
|
|
04:29 PM
|
|
Emc209i
Member Posts: 3091
From: Charlotte, NC
Registered: Apr 2005
|
Total ratings: 225
User Banned
|
|
| | | quote | Originally posted by Sourmug:
I assume that this is the mount you are talking about?
Thanks For the compliment!
Nolan
|
|
Close. Its the bracket that bolts on top of that and wraps around the front of the tranny housing. Keep up the good work!
|
|
05:32 PM
|
|
|
Jan 13th, 2008
|
Sourmug
Member Posts: 4538
From: Calgary, Alberta, Canada
Registered: Sep 2002
|
Hi everyone: Sorry that I have not had an update for you. Life has interfered and I haven't really been able to work on the car. I have been doing some home reno's (keeps the Wife happy ) Also our '96 Subaru Outback bit the dust so I have purchased a '05 Subaru Legacy GT Limited Wagon with the 2.5l turbo!! I'll post some pictures of it later. It's a great car and fun to drive. Hopefully I'll be able to post an update on the Fiero soon. Nolan [This message has been edited by Sourmug (edited 01-15-2008).]
|
|
09:27 PM
|
|
|
Feb 19th, 2008
|
fierofetish
Member Posts: 19173
From: Northeast Spain
Registered: Jul 2003
|
Nolan...I just took the time to actually read the whole thread from start to finish....and I am in awe!!!! What a wonderful, detailed account of a true labour of love!! And I am happy to have been able to contribute in a small way!! Hope you can get going again soon  Best wishes Nick [This message has been edited by fierofetish (edited 02-20-2008).]
|
|
03:21 PM
|
|
|
Apr 6th, 2008
|
Kuta
Member Posts: 94
From: Chicago, IL
Registered: Dec 2007
|
wow all this from a bust clutch . ... i am replacing mine so wish me luck!
|
|
09:49 AM
|
|
Kuta
Member Posts: 94
From: Chicago, IL
Registered: Dec 2007
|
also, this is the most mods i have seen in 1 thread
-> v.impressed
|
|
09:50 AM
|
|
jscott1
Member Posts: 21676
From: Houston, TX , USA
Registered: Dec 2001
|
| | | quote | Originally posted by Sourmug:
And the assembly attached to the door:
.JPG)
Nolan |
|
Wow, I don't know how I missed this thread up until now. I guess I should have realized a decklid vent couldn't take 16 pages! I really wished I had seen this last year when I spent hours staring at my doors trying to figure out where to mount the actuator on my firebird door panel conversion. It ended up in the exact same place. I'd give you a "+" but you already have one.
|
|
12:32 PM
|
|
|
Apr 8th, 2008
|
Riceburner98
Member Posts: 2179
From: Natick, Ma, USA
Registered: Apr 2002
|
Damn! I'd never read it either, because of the title.. Didn't know what I'd been missing out on! Kind of inspires me to do something with the 3KGT dash that's propped up in the corner... Good job man, some really cool stuff going on there! I like the heater controls...
|
|
06:26 PM
|
|
|
PFF
System Bot
|
|
|
|
|
Apr 10th, 2008
|
Sourmug
Member Posts: 4538
From: Calgary, Alberta, Canada
Registered: Sep 2002
|
Hi All: Thanks for the comments and sorry I haven't responded sooner. I guess I should check my own thread.  I have done a little bit of work on the car and will try to post some pictures when I get home tonight. Thanks! Nolan
|
|
11:26 AM
|
|
Sourmug
Member Posts: 4538
From: Calgary, Alberta, Canada
Registered: Sep 2002
|
OK, time for an update. I have been working on attaching the various bits and pieces for the doors and fenders that come with the stage 2 scoops. The adhesive that I'm using is the 3M Automix Panel Bonding Adhesive which comes in cartridges: 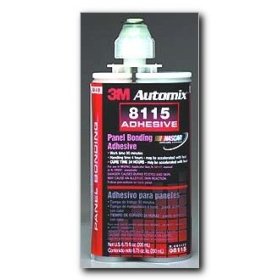 there is an applicator available that costs on the order of $150 to $200 but I didn't bother with it. I just squeezed out the two components using even pressure on the back and mixed then together and applied it to the parts. Don't bother with the applicator unless you really want one. To start, I sanded off the paint and primer to expose the base material on the door panels and fenders: .JPG) Then did some test fits without the adhesive: .JPG) .JPG) After marking out where I wanted the pieces to sit I then applied the adhesive and clamped the parts in place: .JPG) And here are the parts after the adhesive set but prior to filling: .JPG) .JPG) .JPG) .JPG) There fiberglass pieces don't precisely follow all the contours but they are close. I added fiberglass to the bottom edge as seen above to help fill in the gaps. .JPG) .JPG) .JPG) .JPG) To fill in the holes in the fender left by the GT ground FX I adhered pieces of the fender material to the back side. These holes will then be filled in with filler. [This message has been edited by Sourmug (edited 04-10-2008).]
|
|
09:14 PM
|
|
Sourmug
Member Posts: 4538
From: Calgary, Alberta, Canada
Registered: Sep 2002
|
Also, I purchased an older model Firebird wing. I like the rear diffuser that was made here in this ThreadHere are a couple of pictures of 3.8 SC's car: 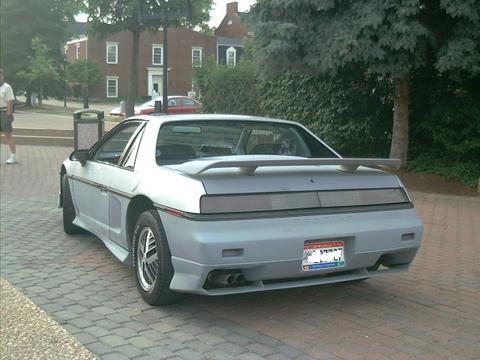 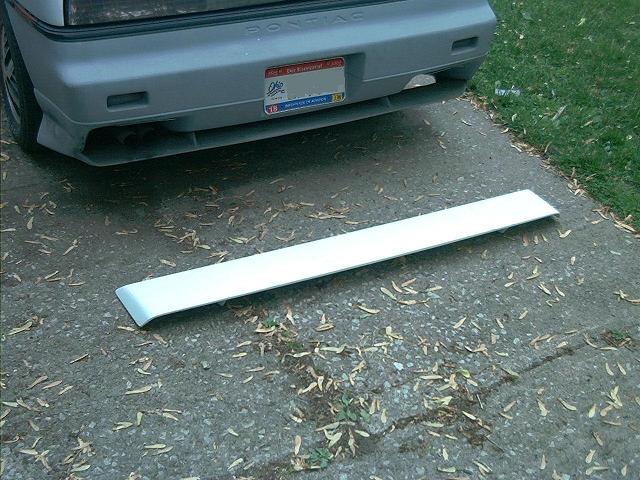 As noted in the thread above, the wing stand locations need to be modified to suit the rear fascia. Here is the stock position with the cuts marked out: .JPG) To make the cuts I used my trusty Dremmel tool with a cutting wheel. Make sure you wear a mask while doing this: .JPG) First I cut the marks across the wing: .JPG) And then along the seams on the front and rear edges of the wing. Once the cuts were done I carefully pried the pieces loose. They are bonded to a pair of ribs running lengthwise down the inside of the wing: .JPG) I then flipped the pieces and switched the ends that they were attached to and did a trial fit. As you can see there were a few gaps as I had slightly the wrong angle on my cuts: .JPG) During the prying process, the top and bottom surfaces of the wing separated slightly at the cuts so using the 3M adhesive I reattached them. In the picture below you can see the ribs: .JPG) To add more bonding surface, I attached some SMC tabs on the inside surface of the wing. These were bonded with the 3M and clamped: .JPG) Once the tabs were set the stands were bonded into their new locations: .JPG) The tabs also provide backing for filler to be added into the gaps, and some quick sanding was done to smooth out the edges prior to filling: .JPG) I then used the reinforced "kitty hair" filler: .JPG) And then of course the sanding begins .JPG) OK, that's all for tonight. Nolan [This message has been edited by Sourmug (edited 04-10-2008).]
|
|
10:46 PM
|
|
|
Apr 11th, 2008
|
thismanyfieros
Member Posts: 3468
From: Red Deer, alberta,canada
Registered: Dec 2002
|
i am beginning to think it will never be done..this thread makes me scared for my own ideas...thats why i just drive my car...lol...tooo little time ....looks sweet man....tim
|
|
12:37 AM
|
|
Sourmug
Member Posts: 4538
From: Calgary, Alberta, Canada
Registered: Sep 2002
|
|
|
12:42 AM
|
|
Sourmug
Member Posts: 4538
From: Calgary, Alberta, Canada
Registered: Sep 2002
|
| | | quote | Originally posted by thismanyfieros:
i am beginning to think it will never be done..this thread makes me scared for my own ideas...thats why i just drive my car...lol...tooo little time ....looks sweet man....tim |
|
Me too! 
|
|
12:44 AM
|
|
thismanyfieros
Member Posts: 3468
From: Red Deer, alberta,canada
Registered: Dec 2002
|
hahahah...i have a solution nolan...you have too many ideas for just one car....so buy another one!!!!!!!!!!......tim
|
|
11:17 AM
|
|
SAFASTRO
Member Posts: 604
From: Calgary, Alberta, Canada
Registered: Nov 2006
|
WOW Nolan.......you never cease to amaze me!! And I'm sure a few more members watching this thread. I hope to one day see this thing in person. Great work, and I'm sure I'll be asking you tonnes of questions this spring, as I'm just starting the tear-down of my 87 GT, for my mods. Hopefully the first thing will be the frame stretch. Any experience with that?? Or should I be asking Don that question?? ------------------
Order your Official Pennock's Forum decals in this thread. https://www.fiero.nl/forum/Forum4/HTML/040445.html

2" Choptop
Shortened Front Bumper
Shortened Rear Bumper
10" Stretch
Dubs
'07 3900 V6 Crate Motor Conversion
|
|
02:40 PM
|
|
85LAMB
Member Posts: 763
From: FL
Registered: Nov 2002
|
Thanks for this great tread, I can't believe I never read it before......
|
|
04:29 PM
|
|
|
Apr 12th, 2008
|
Sourmug
Member Posts: 4538
From: Calgary, Alberta, Canada
Registered: Sep 2002
|
| | | quote | Originally posted by SAFASTRO:
WOW Nolan.......you never cease to amaze me!! And I'm sure a few more members watching this thread.
I hope to one day see this thing in person.
Great work, and I'm sure I'll be asking you tonnes of questions this spring, as I'm just starting the tear-down of my 87 GT, for my mods.
Hopefully the first thing will be the frame stretch. Any experience with that?? Or should I be asking Don that question??
|
|
Thanks! No I don't have any experience with stretches, Don's the local "authority" for that, I'm sure he could help you out. | | | quote | Originally posted by 85LAMB:
Thanks for this great tread,
I can't believe I never read it before...... |
|
My Pleasure [This message has been edited by Sourmug (edited 04-13-2008).]
|
|
08:23 PM
|
|
|
PFF
System Bot
|
|
|
Apr 26th, 2008
|
RCR
Member Posts: 4416
From: Shelby Twp Mi
Registered: Sep 2002
|
Hey Nolan,
The console looks fantastic. Keep up the great work.
Bob
|
|
08:06 AM
|
|
|
May 6th, 2008
|
fieromadman
Member Posts: 2217
From: Oconomowoc WI, USA
Registered: Jan 2003
|
Wow! Amazing work! Good luck with the rest of the swap... oh and everything else too
|
|
08:21 AM
|
|
fiero go fast
Member Posts: 1728
From: Royersford, PA
Registered: Apr 2002
|
| | | quote | Originally posted by Sourmug:
OK, time for an update.
I have been working on attaching the various bits and pieces for the doors and fenders that come with the stage 2 scoops. The adhesive that I'm using is the 3M Automix Panel Bonding Adhesive which comes in cartridges:
there is an applicator available that costs on the order of $150 to $200 but I didn't bother with it. I just squeezed out the two components using even pressure on the back and mixed then together and applied it to the parts. Don't bother with the applicator unless you really want one.
|
|
Does this epoxy flex at all? I'm looking for good adhesive/epoxy to use on the chin spoiler on my car. I want to move my fog lights to the chin spoiler and add "bucket" section (like the front parking lights) to the chin spoiler. I want to try to find something that won't crack and can flex. By the way, have been following this thread since the beginning, and everytime I see the work on your car I want to go out and work on my car. Thanks for giving me the motivation, your work is awesome. Matt
|
|
08:58 AM
|
|
Sourmug
Member Posts: 4538
From: Calgary, Alberta, Canada
Registered: Sep 2002
|
Thanks everyone!
fiero go fast: The 3M product that I used isn't intended for bumper repair. They do have another product which is 3M Automix 5895 Plastic repair. The description for this is:
"3M 5895 is a two-part epoxy used to repair most flexible plastic parts, including bumper covers and other plastic body panels. This product should NOT be used with SMC/Fiberglass. This product is easy sanding and formulated for excellent featheredge. Can be used to repair most plastic parts used on vehicles today. This product does not require a special applicator gun."
I have never used this but I think that it would be better suited for your application. **Note that this is NOT SUITABLE for SMC/Fiberglass**
Nolan
|
|
02:34 PM
|
|
fiero go fast
Member Posts: 1728
From: Royersford, PA
Registered: Apr 2002
|
| | | quote | Originally posted by Sourmug:
Thanks everyone!
fiero go fast: The 3M product that I used isn't intended for bumper repair. They do have another product which is 3M Automix 5895 Plastic repair. The description for this is:
"3M 5895 is a two-part epoxy used to repair most flexible plastic parts, including bumper covers and other plastic body panels. This product should NOT be used with SMC/Fiberglass. This product is easy sanding and formulated for excellent featheredge. Can be used to repair most plastic parts used on vehicles today. This product does not require a special applicator gun."
I have never used this but I think that it would be better suited for your application. **Note that this is NOT SUITABLE for SMC/Fiberglass**
Nolan |
|
Well the chin spoiler is just the bottom urethane portion cut off and flipped upside down. The parts I will be using for the bucket portion came from another front fascia's parking light ports. I'm unsure if the parking light area of the front fascia is SMC or urethane or not. Any clue?
|
|
02:55 PM
|
|
Sourmug
Member Posts: 4538
From: Calgary, Alberta, Canada
Registered: Sep 2002
|
As I understand it, the panel materials are as follows:
"SMC Sheet Molded Compound was used for the hood, roof, rear upper quarter, and rear decklid.
RRIM Reinforced Reaction Injection Molded urethane was used for fenders, door panels, and lower rear quarters. The rear lowers were later changed to injection molded nylon.
RIM Reaction Injected Molded urethane was used for front and rear fascias.
TPO Thermoplastic Olefin was used for rocker panels."
So the front fascia is a urethane.
Nolan
|
|
04:14 PM
|
|
|
May 7th, 2008
|
fiero go fast
Member Posts: 1728
From: Royersford, PA
Registered: Apr 2002
|
Damn, thanks... I'll need to save that info somewhere. I'd give you a plus, but it looks like you had one from me already.
|
|
07:41 AM
|
|
TRiAD
Member Posts: 4464
From: Central IL
Registered: May 2001
|
DAMN! What a thread! You got a + from me, I'd have left you 5 if I could, lol! What amazing work, and incredible documentation!!! THANKS!! ------------------
~Michael

Project IMSA Formula Coming Soon!
'85 GT 4sp white - SOLD | | '85 2M6 Auto red - SOLD | | '84 2M4 bare chassis - SOLD
Crap, I'm out of Fieros! Time to buy another!! - "Your mileage may vary."
|
|
08:34 AM
|
|
|
May 15th, 2008
|
ALLTRBO
Member Posts: 2023
From: College Park, MD
Registered: Mar 2006
|
Whoa. Nice deck lid build! :P I'm almost speechless - Where the heck do some of you guys find the time to build things like this? It looks like a full time job plus plenty of overtime.  That car is rolling art. [This message has been edited by ALLTRBO (edited 05-15-2008).]
|
|
07:52 PM
|
|


.JPG)


.JPG)
.JPG)
.JPG)
.JPG)

.JPG)
.JPG)
.JPG)
.JPG)


