Pennock's Fiero Forum
  The Construction Zone
  Rebuild of Indy Fiero #163 Super Duty 4 (Page 1)

Post New Topic  Post A Reply
Email This Page to Someone! | Printable Version

This topic is 7 pages long:  1   2   3   4   5   6   7 
Previous Page | Next Page
next newest topic | next oldest topic
Rebuild of Indy Fiero #163 Super Duty 4 by fierosound
Started on: 11-03-2008 08:53 AM
Replies: 278 (61721 views)
Last post by: fierosound on 10-31-2024 11:56 PM
fierosound
Member
Posts: 15200
From: Calgary, Canada
Registered: Nov 1999


Feedback score: N/A
Leave feedback


Total ratings: 286
Rate this member

Report this Post11-03-2008 08:53 AM Click Here to See the Profile for fierosoundClick Here to visit fierosound's HomePageSend a Private Message to fierosoundEdit/Delete MessageReply w/QuoteDirect Link to This Post
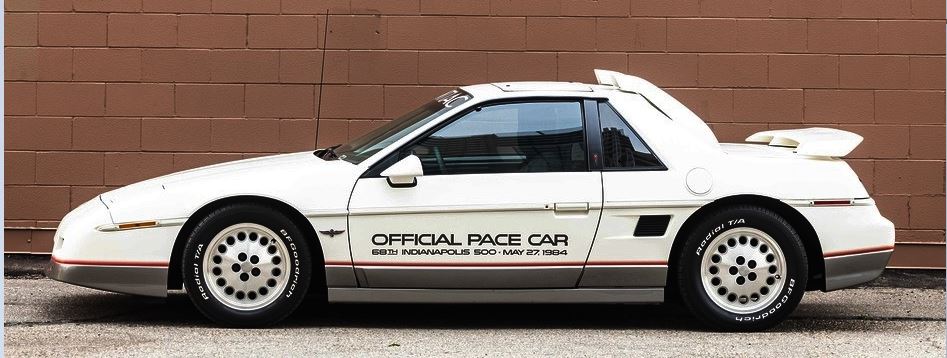
As it looks today (not your stock Indy...)
What sets it apart mechanically is the Super Duty 4 race engine with 5-speed Getrag.


DESPITE ALL THE HOOPLA, all 2000 of the consumer version of 1984 Fiero Indy Pace Car is mechanically just the same white 2M4 SE it started out as.
All SE's have the WS6 performance suspension and quick ratio steering rack.

The Indy Package (RPO Y82) added a new Aero-nose fascia, ground effects, new rear fascia and wing with interior and exterior cosmetic packages.
There were a couple cosmetic touches on its stock 4-cylinder 90hp "Iron Duke" engine and dual exhaust added.
Other than a choice of automatic or manual transmission, all the Indy models performed the same as any other 20-second 1/4 mile "Iron Duke" Fiero.

Indy #163 was sold to me by Chester (I'm 3rd owner) with a 3.3L SD4 engine and TH125 automatic.
The original owner transplanted the SD4 from his tube-frame Fiero race car when he upgraded to a V6 or V8.

Many of you know from my threads that I started working on an 84 project in 2006.
My first post Sept. 3 2006 https://www.fiero.nl/forum/A...070315-2-076520.html


------------------
My World of Wheels Winners (Click on links below)

3.4L Supercharged 87 GT and Super Duty 4 Indy #163

keywords: Fiero SD4, Pontiac SD4, Super Duty 4, SD4 engine, SD4, Fiero Pace Car,

[This message has been edited by fierosound (edited 09-02-2023).]

IP: Logged
PFF
System Bot
fierosound
Member
Posts: 15200
From: Calgary, Canada
Registered: Nov 1999


Feedback score: N/A
Leave feedback


Total ratings: 286
Rate this member

Report this Post11-03-2008 01:26 PM Click Here to See the Profile for fierosoundClick Here to visit fierosound's HomePageSend a Private Message to fierosoundEdit/Delete MessageReply w/QuoteDirect Link to This Post
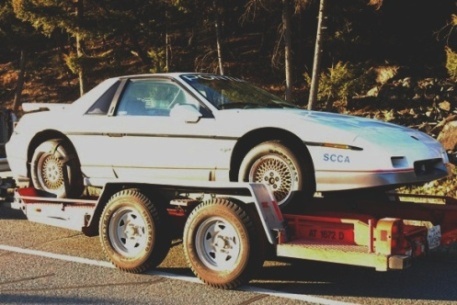
I was too embarrassed by true condition of my "mint car" when I started working on the car 2 years ago in secret.
https://www.fiero.nl/forum/Forum2/HTML/095615.html

These pics were taken in late 2006 after I started disassembling the car.


Once the engine was out and in the shop, the first order of business was getting some basic mechanicals cleaned up.

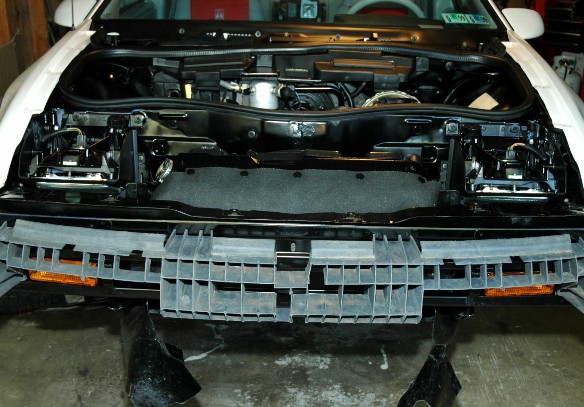
The front bodywork had already been pulled off to examine the how extensive some prior accident damage
(that was NEVER mentioned to me) had been. After cleanup/touchup of everything, it was reassembled.


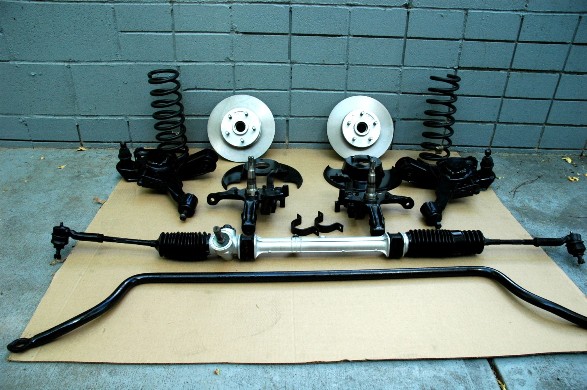
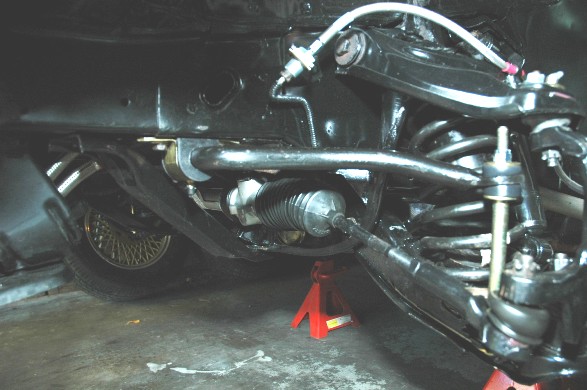
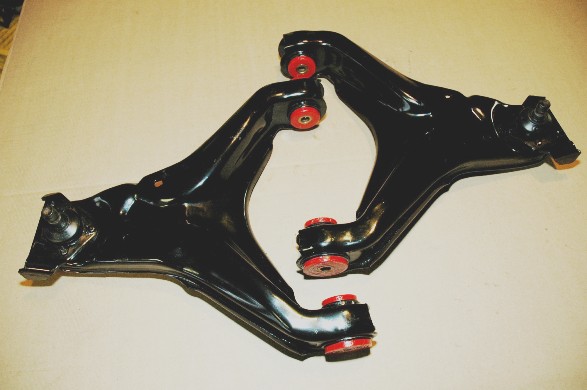
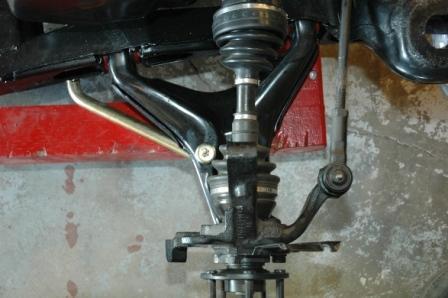
Here's the cleaned/painted front suspension parts. Although I replaced the worn steering rack bushing and tie-rod ends (only 19,000 miles on the car??),
once the car was driveable, it steered terribly and adjustment of the pinion pre-load was never able to correct the inherent looseness.
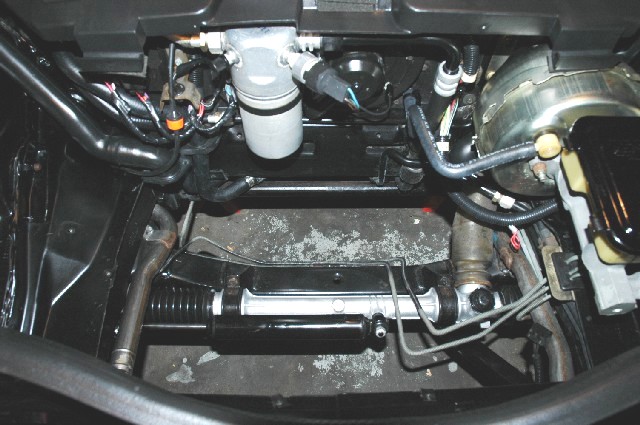
I eventually replaced the entire rack with another one from Pick 'n Pull.


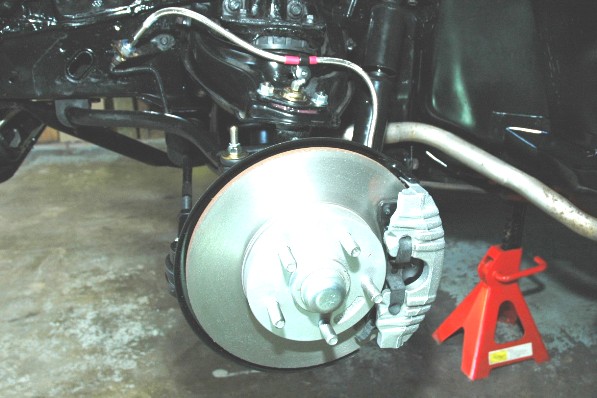
Here's the front suspension reassembled. I scrapped the original rusted rotors, and used "like new" rotors I removed from my GT when I did the Lebaron rotor brake upgrade.
New SS brake lines, calipers and Porterfield R4-S pads make up the new braking system. I later installed a new master cylinder when it became apparent the old one was no good.


The ball joints were replaced - MOOG "problem solvers" on the upper, and Dickman's 1" lowering balljoints on the lower.
Monroe shocks were installed on the front. Energy suspension poly bushings were used for the sway bar and 4" long endlinks.
I also decided to install the front springs that came off my GT (thinner wire). The suspension actually moved now.


Part numbers
Energy Suspension PN 9-5158 - black poly sway bar bushings for 7/8" bar w/brackets
Energy Suspension PN 9-8118 - 4" endlinks with black poly
Monroe front shocks PN 5921
Moog upper (problem solver) ball joints PN K5292

At the rear, the balljoints seemed OK and left in place. After cleanup and painting of the control arms, Prothane poly bushings were installed.
New Monroe struts and Eibach rear springs were purchased for installation when the cradle would be reinstalled.


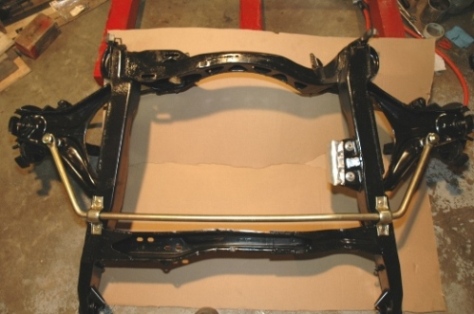
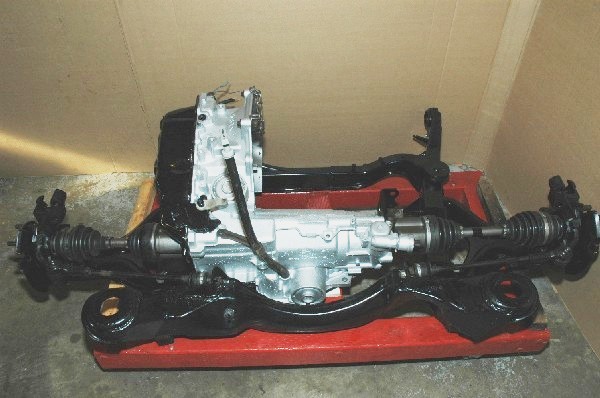
I had an '86 cradle that I cleaned up and painted for the new engine and transmission.
The control arms were installed and the Addco rear sway bar was fitted.


As for the braking system, new SS brake lines, calipers and Porterfield R4-S pads were also installed on the rear.
In addition, all 3 parking brake cables were replaced.

Part numbers
Monroe rear struts PN 71814
Prothane control-arm bushings PN 7-304
Addco sway bar (rear) PN 387

[This message has been edited by fierosound (edited 09-02-2023).]

IP: Logged
KurtAKX
Member
Posts: 4008
From: West Bloomfield, MI
Registered: Feb 2002


Feedback score:    (9)
Leave feedback


Total ratings: 128
Rate this member

Report this Post11-03-2008 01:50 PM Click Here to See the Profile for KurtAKXSend a Private Message to KurtAKXEdit/Delete MessageReply w/QuoteDirect Link to This Post
 
quote
Originally posted by fierosound:


Nevermind. I just realized the cradle is upside down from how i thought it was.

[This message has been edited by KurtAKX (edited 11-04-2008).]

IP: Logged
KEV
Member
Posts: 2590
From: Green Isle, MN
Registered: Dec 2000


Feedback score:    (13)
Leave feedback


Total ratings: 82
Rate this member

Report this Post11-03-2008 05:53 PM Click Here to See the Profile for KEVSend a Private Message to KEVEdit/Delete MessageReply w/QuoteDirect Link to This Post
It's looking great! I'll be doing the same thing to my Indy this winter!

------------------


1999 GMC Jimmy 2dr 4x4
1996 Chevy Lumina LS

1986 Fiero Base Coupe...NO OPTIONS !!
1985 Fiero GT 3800 N/A-sometime this year 3800S/C..maybe
1984 Fiero Indy-Restoring back to former glory

IP: Logged
Bremertonfiero
Member
Posts: 390
From: Bremerton WA USA
Registered: Sep 2008


Feedback score: N/A
Leave feedback

Rate this member

Report this Post11-03-2008 07:40 PM Click Here to See the Profile for BremertonfieroSend a Private Message to BremertonfieroEdit/Delete MessageReply w/QuoteDirect Link to This Post
where do u get Sd parts?
IP: Logged
fierosound
Member
Posts: 15200
From: Calgary, Canada
Registered: Nov 1999


Feedback score: N/A
Leave feedback


Total ratings: 286
Rate this member

Report this Post11-03-2008 07:55 PM Click Here to See the Profile for fierosoundClick Here to visit fierosound's HomePageSend a Private Message to fierosoundEdit/Delete MessageReply w/QuoteDirect Link to This Post
 
quote
Originally posted by Bremertonfiero:

where do u get Sd parts?


This engine came with it. Use the LINK in the first message to see the details.

New stuff can be bought here: http://www.kansasracingprod...About_the_Block.html

[This message has been edited by fierosound (edited 11-03-2008).]

IP: Logged
Bremertonfiero
Member
Posts: 390
From: Bremerton WA USA
Registered: Sep 2008


Feedback score: N/A
Leave feedback

Rate this member

Report this Post11-03-2008 08:09 PM Click Here to See the Profile for BremertonfieroSend a Private Message to BremertonfieroEdit/Delete MessageReply w/QuoteDirect Link to This Post
yeah i know about them but like 10 grand for the whole thing.... is there cheaper? or am i dreaming
IP: Logged
fierosound
Member
Posts: 15200
From: Calgary, Canada
Registered: Nov 1999


Feedback score: N/A
Leave feedback


Total ratings: 286
Rate this member

Report this Post11-03-2008 11:47 PM Click Here to See the Profile for fierosoundClick Here to visit fierosound's HomePageSend a Private Message to fierosoundEdit/Delete MessageReply w/QuoteDirect Link to This Post
 
quote
Originally posted by Bremertonfiero:

yeah i know about them but like 10 grand for the whole thing.... is there cheaper? or am i dreaming


eBay http://cgi.ebay.com/ebaymot...dZ1QQsspagenameZWDVW
IP: Logged
Mister
Member
Posts: 1975
From: Calgary, Alberta, Canada
Registered: Aug 2004


Feedback score: (2)
Leave feedback


Total ratings: 56
Rate this member

Report this Post11-04-2008 01:26 AM Click Here to See the Profile for MisterSend a Private Message to MisterEdit/Delete MessageReply w/QuoteDirect Link to This Post
I've seen this car in person. And Fierosound has done an amazing job on it
Stay tuned - you are in for a treat

------------------

T-Top ~HUD~LEDs ~Red Fieros~Carputer~Reverse lights

IP: Logged
The_Stickman2
Member
Posts: 1030
From: Lehigh Valley Pa.
Registered: Sep 2007


Feedback score: (1)
Leave feedback

Rate this member

Report this Post11-04-2008 02:13 AM Click Here to See the Profile for The_Stickman2Click Here to visit The_Stickman2's HomePageSend a Private Message to The_Stickman2Edit/Delete MessageReply w/QuoteDirect Link to This Post
 
quote
Originally posted by fierosound:


eBay http://cgi.ebay.com/ebaymot...dZ1QQsspagenameZWDVW


Not a bad price for a complete engine plus a spare intake, valve cover, and 3 heads.
IP: Logged
Dennis LaGrua
Member
Posts: 15566
From: Hillsborough, NJ U.S.A.
Registered: May 2000


Feedback score:    (13)
Leave feedback


Total ratings: 329
Rate this member

Report this Post11-04-2008 01:53 PM Click Here to See the Profile for Dennis LaGruaSend a Private Message to Dennis LaGruaEdit/Delete MessageReply w/QuoteDirect Link to This Post
All this talk on the Indy Fiero raises questions as to why GM didn't make the SD4 available as an option. The original Indy cars were SD4's but GM ended up offering only a cosmetic copy with a Duke engine for the entire production run. I believe that the answer is that the move was political. An Indy Fiero with an SD4 would have outperformed the Corvettes of that era. GM top brass probably couldn't live with a sports car selling at 1/2 the cost with the ability to blow away a Corvette.

------------------
87GT - 3800SC Series III engine, 3.4" Pulley, N* TB, LS1 MAF, Flotech Exhaust Autolite 104's Custom CAI 4T65eHD w. custom axles, HP Tuners VCM Suite.
87GT - 3.4L Turbocharged engine, modified TH125H
" I'M ON THE LOOSE WITHOUT THE JUICE "

IP: Logged
PFF
System Bot
Bremertonfiero
Member
Posts: 390
From: Bremerton WA USA
Registered: Sep 2008


Feedback score: N/A
Leave feedback

Rate this member

Report this Post11-04-2008 06:18 PM Click Here to See the Profile for BremertonfieroSend a Private Message to BremertonfieroEdit/Delete MessageReply w/QuoteDirect Link to This Post
thanks and im sorry i hyjacked your thread i will start my own to ask superduty questions.
IP: Logged
fierosound
Member
Posts: 15200
From: Calgary, Canada
Registered: Nov 1999


Feedback score: N/A
Leave feedback


Total ratings: 286
Rate this member

Report this Post11-06-2008 08:45 AM Click Here to See the Profile for fierosoundClick Here to visit fierosound's HomePageSend a Private Message to fierosoundEdit/Delete MessageReply w/QuoteDirect Link to This Post
UPDATE: After all this work with the 4T60 4-speed automatic,
I later switched to a Getrag 5-speed manual transmission

https://www.fiero.nl/forum/F...L/000077-3.html#p113

4-speed Automatic Install
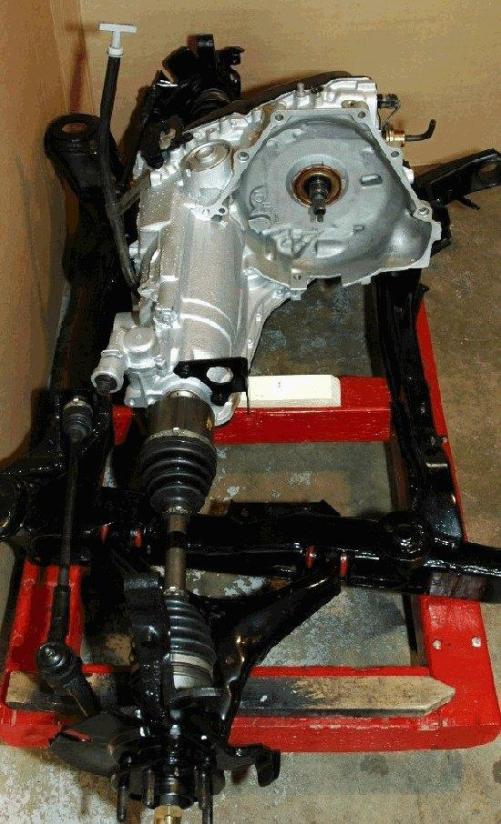
Since the engine needed rebuilding (in spite of assurances that it didn't), I decided to replace the stock TH125 3-speed automatic (3.18 final drive)
with a stronger 4T60 4-speed automatic with a 3.33 final drive (35/35 gears). I purchased a new rebuilt from one of the most reputable shops in town.

Details on this kind of transmission swap here:
https://web.archive.org/web...s.com/tech/440-4T60/

This non-electronic transmission uses both a TV (Throttle Valve) cable AND vacuum modulator to control shifting.
The TV cable is synchronized with the thottle to control shift points, downshifting etc. while the vacuum modulator
(get adjustable one) controls line pressure and the firmness of the shifts.


The ECM controls the Torque Convertor Lockup (TCC).
To do this the ECM uses engine RPM and inputs from the MAP, TPS, VSS, O2 and engine TEMP sensors.
To retain ECM control of the TCC these sensors would need to be retained and a TPS needed to be mounted to the intake manifold.
There's other standalone alternatives for TCC control as well.

At a later time, once the car was up and running, I didn't like the 3.33 final drive (35/35 gears),
so I dropped the cradle again to have the transmission gearing changed to a 3.73 final drive (33/37 gears)
which was much better match with the engine performance and the larger 15" wheels I would be using.
Runs 70mph at about 2400rpm with 215/60R15 tires.

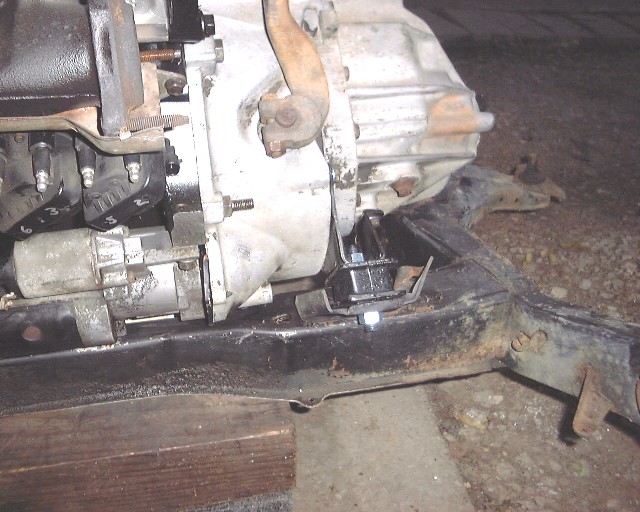
Stock transmission and engine mounts were used at first. It later became apparent that this tilted the engine/tranmission toward the trunk firewall and would cause manifold clearance issues.
The first indicator that something was off was that the axles didn't seem to line up correctly. Hadn't anyone ever noticed this before?


It became more apparent when we test fit the engine.
I was not possible to get the 4-cylinder intake on because there wasn't enough clearance between the head and firewall.
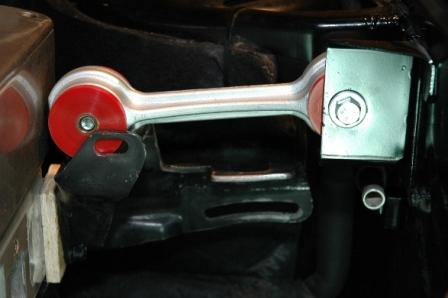
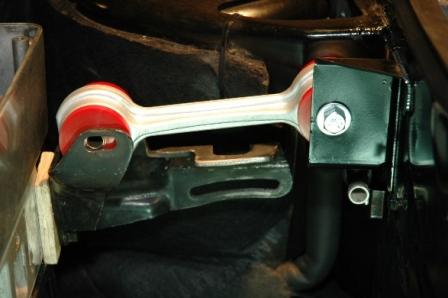
Basically, the front of the transmission was too high and the mount needed to be modified. Before and after pictures.

The bracket sits on the end of the intake manifold and the 3/8" thick plywood is a mockup of this thickness.


Changing the front transmission mount brings everything back in line. The intake manifold will now fit.


The rubber was burned off the stock Fiero bracket. An Anchor Industries 2266 mount (67-69 Dodge Dart 273 V8 engine mount) is used.
It is about 1-inch thick and has 2 offset mounting bolts. It was positioned and a bolt was drilled in the Fiero bracket.
It was then bolted in place between the transmission side bracket and the Fiero bracket.
The assembly lines up with the second set of bolt holes in the cradle. This positions the transmission correctly.

Not my pic, but this gives you an idea on what the transmission mount would look like.
More on this here: https://www.fiero.nl/forum/Forum2/HTML/082950.html


Both the right and left axle assemblies for a 1989 Pontiac 6000 (with 2.8 V6, 4T60 and light duty brakes w/o ABS) were purchased.
There are plenty of other combinations of parts that can be used to assemble DIY axles that will fit, but this was the simplest solution.
These have the correct mating ends for the transmission and the 20mm diameter spindle to match the Fiero hubs.
They can be purchased off the shelf at most auto parts stores and install directly without modification.

Part numbers
A1 CARDONE PN 601078 - LEFT side drive axle (21-inches long overall)
A1 CARDONE PN 601115 - RIGHT side drive axle (26.25-inches long overall)

A Derale transmission cooler was installed to handle transmission cooling requirements. The radiator didn't leak in static testing, so it was reinstalled.
Later it turned out that coolant would seep out around the edges of the driver's side end tank once the system was hot and pressurized.
A new radiator was installed at that time.

[This message has been edited by fierosound (edited 09-05-2023).]

IP: Logged
fierosound
Member
Posts: 15200
From: Calgary, Canada
Registered: Nov 1999


Feedback score: N/A
Leave feedback


Total ratings: 286
Rate this member

Report this Post11-10-2008 09:53 AM Click Here to See the Profile for fierosoundClick Here to visit fierosound's HomePageSend a Private Message to fierosoundEdit/Delete MessageReply w/QuoteDirect Link to This Post
Not much interest in any of this?? But someone paints their GT yellow and there's 5 pages of comments?

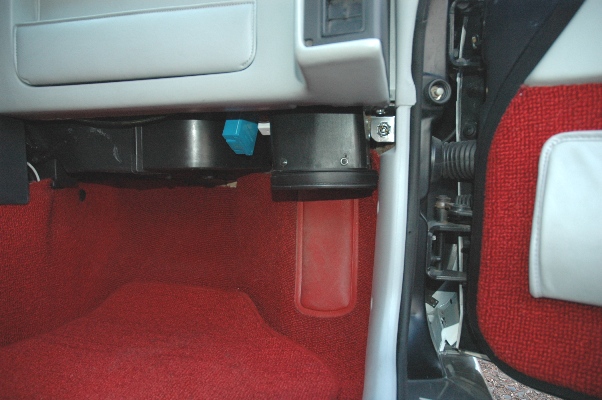
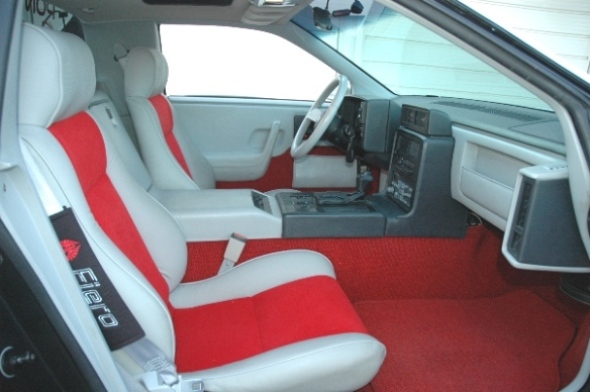
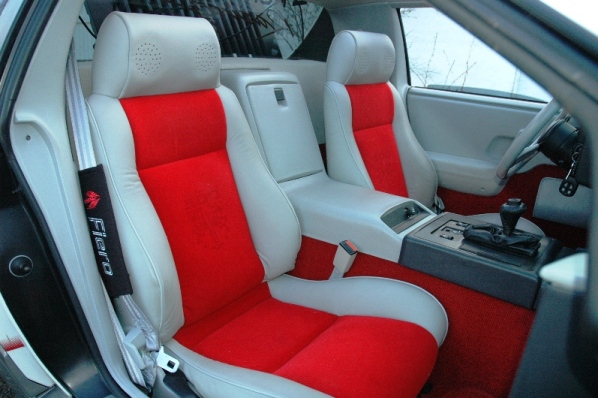
Here's what I did on the interior. It was completely removed and a thorough cleaning of the door panels and all other components was undertaken.
The floor mats and carpeting was steam cleaned. The sun-faded "blue" speaker grills were recovered with new speaker fabric.
The shifter surround and shifter plate were reglued.

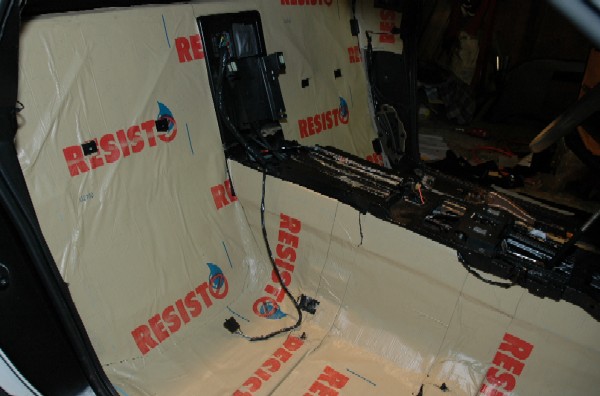
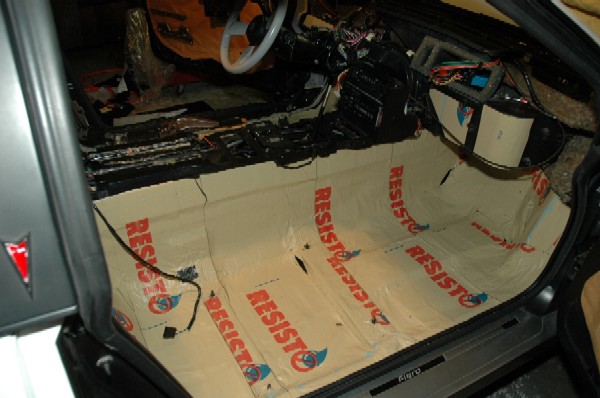
While the interior was out, sound proofing was installed as well as a new stereo system.


To still maintain a "factory" look a Pontiac CD player was installed, but high-end equipment was used in all hidden locations.
New Clearwater speakers were installed in the seat headrests and Infinity component speakers went in the dash.

A factory sub-woofer housing with a Tang-band sub went into the factory location.


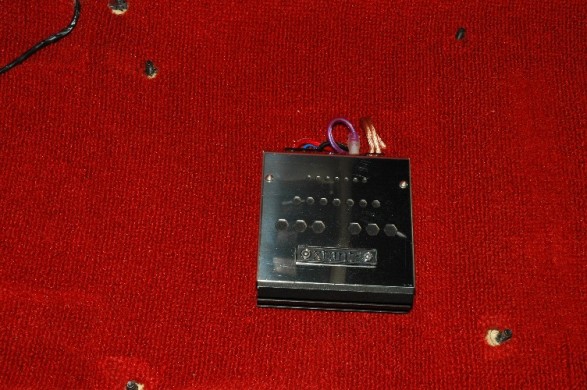
To power the sub, a Xtant 1.1i 100 watt mono amp was used. This tiny amp really delivers and is perfect for the job because it can be installed under the passenger seat.


Complete stereo writeup here: https://www.fiero.nl/forum/Forum3/HTML/000031.html

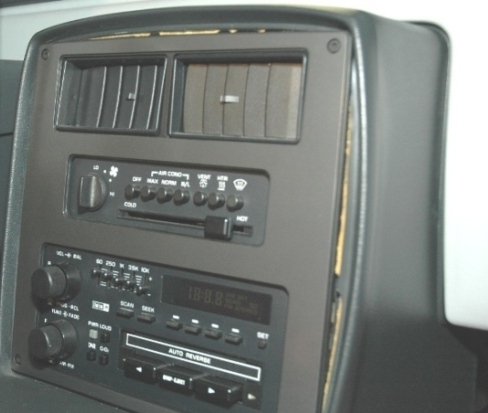
When I received the car, the radio surround was terribly warped and needed to repaired or replaced.


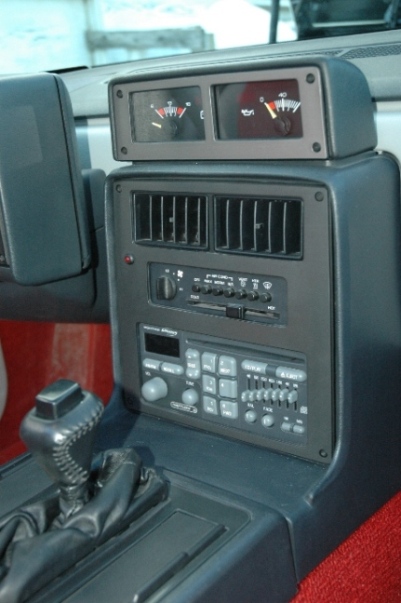
The lack of an oil pressure gauge in the instrument cluster REALLY bothered me because I consider that the MOST important gauge to have.
That's why I installed GT gauges and a new radio surround. It's "factory", looks correct, does the job and I needed to replace the warped radio surround anyway.
I still have a 2nd voltmeter in the tach, but that's not a big bother.

How to add the gauge cluster: http://www.frontiernet.net/...tt/AuxGageInstal.htm

I never did like the original T-bar type automatic shifter and most others eithers are either too big (Cobra head type) or look wrong (aftermarket aluminum).
I found something perfect from 97-04 Corvette - a small size, top-button, dark grey leather wrapped knob that suits the car's interior perfectly.
This is smaller than a similar design used in other GMs like Cavaliers, Grand AMs etc.
I mounted it on a shortened shifter shaft and installed a new leather boot I purchased from Rodney Dickman.


The previous owner sold the original "mint" Indy seats. Although the Mr Mike's leathers were nice, I'd have preferred a set of originals,
but another set of mint seats are few and far between. As luck would have it, we found some OEM red embossed Indy seat fabric which
I purchased and had sent off to Mr Mike. Mike did up a beautiful set of repro Indy seats.


I cleaned up the rusty seat rails and repainted them and bought the proper light grey color recliner covers to replace the incorrect dark grey ones the seats in the Indy came with.
Once assembled, only an Indy purist would notice that these are not the original seats. The only difference is that the backs of the seats aren't grey fabric like the originals.


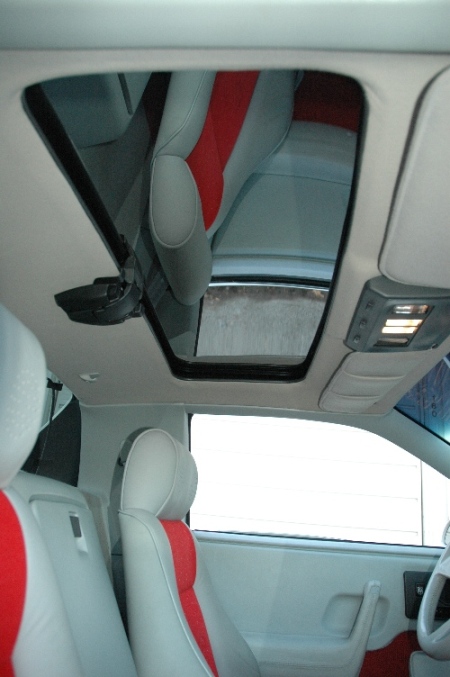
The terrible condition of the sunvisors and headliner required that they be replaced. I bought new sunvisors and a headliner recover kit from the Fiero Store.
It was a bit of work, but I successfully recovered and reinstalled the headliner and the new visors. I also added the coathooks - 84's didn't have any.


More to come. The engine is next...

Edit: pictures added

[This message has been edited by fierosound (edited 08-25-2020).]

IP: Logged
87_special
Member
Posts: 266
From: San Diego, CA
Registered: Oct 2006


Feedback score: (3)
Leave feedback

Rate this member

Report this Post11-10-2008 12:24 PM Click Here to See the Profile for 87_specialSend a Private Message to 87_specialEdit/Delete MessageReply w/QuoteDirect Link to This Post
Wow! What a nice job you are doing. I'd love to be able to just fully restore my 87 se. Keep up the good work I'm watching eagerly.

-Joseph

------------------

1987 Fiero SE/Fastback - 3100HO (Ported LIM, Ported Heads, Competion Valve Job, LS6 Springs, 3500 UIM, LX5 65mm TB) / 4t60e full manual / ZZP shift kit / 7730 ecm Emulated w/Ostrich - Boost coming soon!

IP: Logged
fierosound
Member
Posts: 15200
From: Calgary, Canada
Registered: Nov 1999


Feedback score: N/A
Leave feedback


Total ratings: 286
Rate this member

Report this Post11-10-2008 12:34 PM Click Here to See the Profile for fierosoundClick Here to visit fierosound's HomePageSend a Private Message to fierosoundEdit/Delete MessageReply w/QuoteDirect Link to This Post
 
quote
Originally posted by 87_special:

Wow! What a nice job you are doing.


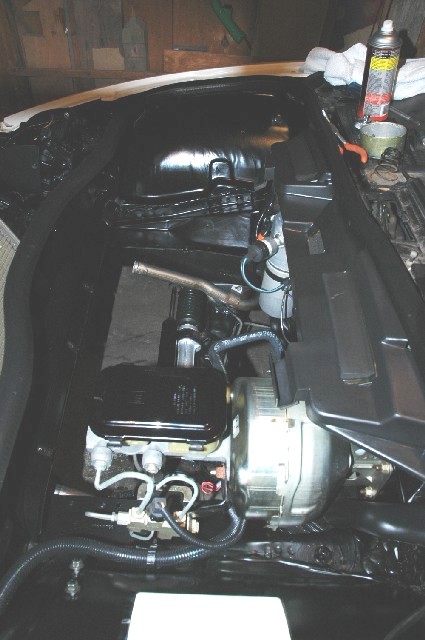
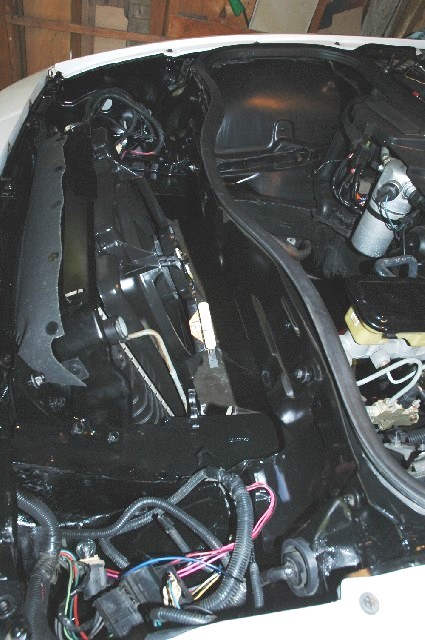
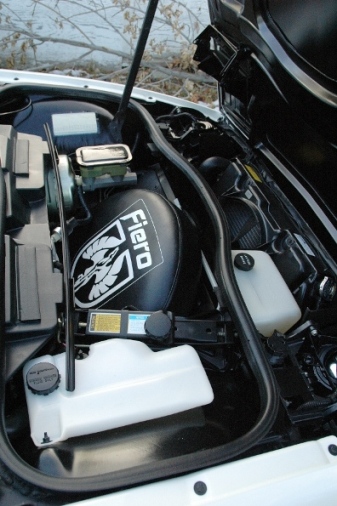
Thank you. Here's a shot of the front compartment. After getting the damage to the hood repaired, the underside was repainted.
The overflow and windshield washer tanks had both yellowed, so I replaced them with new ones from Fiero Store.
I had the spare tire cover from some time ago and decided to use it here.

[This message has been edited by fierosound (edited 03-04-2019).]

IP: Logged
FieroWannaBe
Member
Posts: 2292
From: USA
Registered: Oct 2004


Feedback score: N/A
Leave feedback

Rate this member

Report this Post11-10-2008 01:56 PM Click Here to See the Profile for FieroWannaBeSend a Private Message to FieroWannaBeEdit/Delete MessageReply w/QuoteDirect Link to This Post
 
quote
Originally posted by fierosound:

Details on this kind of transmission swap here: www.spacecoastfieros.com/tech/440%2D4T60

Both the right and left axle assemblies for a 1989 Pontiac 6000 (with 2.8 V6, 4T60 and light duty brakes w/o ABS) were purchased. There are plenty of other combinations of parts that can be used to assemble DIY axles that will fit, but this was the simplest solution. These have the correct mating ends for the transmission and the 20mm diameter spindle to match the Fiero hubs. They can be purchased off the shelf at most auto parts stores and install directly without modification.

Part numbers
A1 CARDONE PN 601078 - LEFT side drive axle (21-inches long overall)
A1 CARDONE PN 601115 - RIGHT side drive axle (26.25-inches long overall)


That's great Info on the transmission, I was given one that I would like to use in one of my cars, pending on its driving condition.

[This message has been edited by FieroWannaBe (edited 11-10-2008).]

IP: Logged
wftb
Member
Posts: 3692
From: kincardine,ontario,canada
Registered: Jun 2005


Feedback score: (4)
Leave feedback

Rate this member

Report this Post11-10-2008 04:00 PM Click Here to See the Profile for wftbSend a Private Message to wftbEdit/Delete MessageReply w/QuoteDirect Link to This Post
great job .keep up the posts , this is all good info .
IP: Logged
blackrams
Member
Posts: 32424
From: Covington, TN, USA
Registered: Feb 2003


Feedback score:    (9)
Leave feedback


Total ratings: 229
Rate this member

Report this Post11-10-2008 04:59 PM Click Here to See the Profile for blackramsSend a Private Message to blackramsEdit/Delete MessageReply w/QuoteDirect Link to This Post
Wow Tony! All I can say is that sure isn't the car I delivered to you way back when. Though I don't pretend to have any special insight into the car, I did transport it and therefore was under the car to tie it down and did a pretty close inspection to note any issues prior to transporting it. It was a pretty nice but typical car with the exception of the SD4 in the engine bay and a pretty nice interior. You've really transformed that ride into something special. Congrats

Ron
IP: Logged
fierosound
Member
Posts: 15200
From: Calgary, Canada
Registered: Nov 1999


Feedback score: N/A
Leave feedback


Total ratings: 286
Rate this member

Report this Post11-10-2008 05:32 PM Click Here to See the Profile for fierosoundClick Here to visit fierosound's HomePageSend a Private Message to fierosoundEdit/Delete MessageReply w/QuoteDirect Link to This Post
 
quote
Originally posted by blackrams:

You've really transformed that ride into something special. Congrats


Thanks. Stay tuned - you aint' seen nothing yet!

This car will "wow" people at WoW (World of Wheels) next February.

[This message has been edited by fierosound (edited 11-10-2008).]

IP: Logged
fiero67
Member
Posts: 2397
From: Maine
Registered: Jan 2003


Feedback score:    (13)
Leave feedback


Total ratings: 107
Rate this member

Report this Post11-10-2008 06:00 PM Click Here to See the Profile for fiero67Send a Private Message to fiero67Edit/Delete MessageReply w/QuoteDirect Link to This Post
great job you are doing. I love threads like these that restore indy fieros. I wish I had one. keep posting !!! John

------------------


Project88GT build up thread

IP: Logged
PFF
System Bot
Dennis LaGrua
Member
Posts: 15566
From: Hillsborough, NJ U.S.A.
Registered: May 2000


Feedback score:    (13)
Leave feedback


Total ratings: 329
Rate this member

Report this Post11-10-2008 06:31 PM Click Here to See the Profile for Dennis LaGruaSend a Private Message to Dennis LaGruaEdit/Delete MessageReply w/QuoteDirect Link to This Post
I saw this car a few years back at Carlisle when the previous owner showed it and it looked nothing like you have it looking now. For the money that you paid it should have looked like this when you received it. Not trying to rub it in but just wanted to complement your fine work. Do the future plans include converting to EFI? The Webers that you have are efficient carbs but there is no room for any real air filtering. I believe that EFI would boost cold weather starting, efficiency, drivability and gas mileage With a 4BBL manifold from Clifford you could bolt on a Holley TB or even an AC Delco injection system.

------------------
87GT - 3800SC Series III engine, 3.4" Pulley, N* TB, LS1 MAF, Flotech Exhaust Autolite 104's Custom CAI 4T65eHD w. custom axles, HP Tuners VCM Suite.
87GT - 3.4L Turbocharged engine, modified TH125H
" I'M ON THE LOOSE WITHOUT THE JUICE "

IP: Logged
The_Stickman2
Member
Posts: 1030
From: Lehigh Valley Pa.
Registered: Sep 2007


Feedback score: (1)
Leave feedback

Rate this member

Report this Post11-10-2008 07:02 PM Click Here to See the Profile for The_Stickman2Click Here to visit The_Stickman2's HomePageSend a Private Message to The_Stickman2Edit/Delete MessageReply w/QuoteDirect Link to This Post
Actually an intake from Clifford research won't work on a Super Duty head. It will bolt up alright. But the ports on the SD-4 head are so big they are actually taller than the intake flange in those intakes. Same with the stock ones. Not sure about the Holley TBI intake.
IP: Logged
Dennis LaGrua
Member
Posts: 15566
From: Hillsborough, NJ U.S.A.
Registered: May 2000


Feedback score:    (13)
Leave feedback


Total ratings: 329
Rate this member

Report this Post11-10-2008 10:00 PM Click Here to See the Profile for Dennis LaGruaSend a Private Message to Dennis LaGruaEdit/Delete MessageReply w/QuoteDirect Link to This Post
 
quote
Originally posted by The_Stickman2:

Actually an intake from Clifford research won't work on a Super Duty head. It will bolt up alright. But the ports on the SD-4 head are so big they are actually taller than the intake flange in those intakes. Same with the stock ones. Not sure about the Holley TBI intake.


Well, it looks like the four expert has me proved wrong again but what do you expect from a diehard V6 man? Then I must acknowledge that the SD4 head ports must be huge, so much so, that even porting the Clifford intake won't do it. The Holley TB FI system will bolt up to any manifold that is drilled for a Holley carburetor but since we don't have such a manifold then that takes out that option unless an intake can be made up from mandrel tubing with a flange welded to it or we modifiy an SD4 manifold. A while ago I read the performance specs of the SD4 and geeze that engine screams!

------------------
87GT - 3800SC Series III engine, 3.4" Pulley, N* TB, LS1 MAF, Flotech Exhaust Autolite 104's Custom CAI 4T65eHD w. custom axles, HP Tuners VCM Suite.
87GT - 3.4L Turbocharged engine, modified TH125H
" I'M ON THE LOOSE WITHOUT THE JUICE "

IP: Logged
Raydar
Member
Posts: 40994
From: Carrollton GA. Out in the... country.
Registered: Oct 1999


Feedback score:    (13)
Leave feedback


Total ratings: 460
Rate this member

Report this Post11-10-2008 10:46 PM Click Here to See the Profile for RaydarSend a Private Message to RaydarEdit/Delete MessageReply w/QuoteDirect Link to This Post
Nice job!
I wondered about that car...

 
quote
Originally posted by fierosound:

...I didn't like the 3.33 final drive (35/35 gears), so I dropped the cradle again to have the transmission gearing changed to a 3.73 final drive (33/37 gears) which was much better match with the engine performance and the larger 15" wheels I would be using.


Before I did my 5 speed swap, I was also contemplating doing this with a 4T60, to use with my 3.4.
Did you do the work yourself?
Do you know how difficult it was?

------------------
Raydar
88 4.9 Formula IMSA Fasback..........................88 3.4 coupe -soon to be something other than red

Read Nealz Nuze! Praise the Lowered!

IP: Logged
Bradley Jay
Member
Posts: 794
From: Redlands, CA
Registered: Jun 2008


Feedback score: (3)
Leave feedback

Rate this member

Report this Post11-10-2008 11:49 PM Click Here to See the Profile for Bradley JaySend a Private Message to Bradley JayEdit/Delete MessageReply w/QuoteDirect Link to This Post
And where the HECK did you get that Indy Fabric?

Great build so far, keep it up.
IP: Logged
fierosound
Member
Posts: 15200
From: Calgary, Canada
Registered: Nov 1999


Feedback score: N/A
Leave feedback


Total ratings: 286
Rate this member

Report this Post11-11-2008 11:27 AM Click Here to See the Profile for fierosoundClick Here to visit fierosound's HomePageSend a Private Message to fierosoundEdit/Delete MessageReply w/QuoteDirect Link to This Post
 
quote
Originally posted by Bradley Jay:

And where the HECK did you get that Indy Fabric?

Great build so far, keep it up.


Thank you

Dom Corey Interiors - I don't think he has any left though.
https://www.fiero.nl/forum/...100421-4-042279.html

[This message has been edited by fierosound (edited 09-02-2023).]

IP: Logged
fierosound
Member
Posts: 15200
From: Calgary, Canada
Registered: Nov 1999


Feedback score: N/A
Leave feedback


Total ratings: 286
Rate this member

Report this Post11-11-2008 12:39 PM Click Here to See the Profile for fierosoundClick Here to visit fierosound's HomePageSend a Private Message to fierosoundEdit/Delete MessageReply w/QuoteDirect Link to This Post

fierosound

15200 posts
Member since Nov 1999
 
quote
Originally posted by blackrams:

Wow Tony! All I can say is that sure isn't the car I delivered to you way back when. Though I don't pretend to have any special insight into the car, I did transport it and therefore was under the car to tie it down and did a pretty close inspection to note any issues prior to transporting it. It was a pretty nice but typical car with the exception of the SD4 in the engine bay and a pretty nice interior...


Thanks Ron. Pictures of what you delivered here:
https://www.fiero.nl/forum/Forum2/HTML/095615.html

[This message has been edited by fierosound (edited 09-02-2023).]

IP: Logged
Fiero5
Member
Posts: 8882
From: Arecibo, PR
Registered: Jun 2000


Feedback score: (1)
Leave feedback


Total ratings: 367
Rate this member

Report this Post11-12-2008 11:49 AM Click Here to See the Profile for Fiero5Click Here to visit Fiero5's HomePageSend a Private Message to Fiero5Edit/Delete MessageReply w/QuoteDirect Link to This Post
Wow!
IP: Logged
fierosound
Member
Posts: 15200
From: Calgary, Canada
Registered: Nov 1999


Feedback score: N/A
Leave feedback


Total ratings: 286
Rate this member

Report this Post11-12-2008 07:46 PM Click Here to See the Profile for fierosoundClick Here to visit fierosound's HomePageSend a Private Message to fierosoundEdit/Delete MessageReply w/QuoteDirect Link to This Post
 
quote
Originally posted by Dennis LaGrua:

IDo the future plans include converting to EFI? The Webers that you have are efficient carbs but there is no room for any real air filtering. I believe that EFI would boost cold weather starting, efficiency, drivability and gas mileage With a 4BBL manifold from Clifford you could bolt on a Holley TB or even an AC Delco injection system.


Nope. We don't have the expertise up here to get something like that tuned and working properly. If it was a Chev or Ford V8 - no problem. Everybody's an "expert" in those things to the point where they don't have to think. And THAT's the problem. It's like the problem I had when I went Supercharged - it's outside everyone's area of expertise. The engine shop never saw a 4-banger like this before - luckliy all they needed was a complete copy of the SD4 guide.

Keep in mind, this will not be a daily driver, won't be driven in winter weather at all and will be primarily a summer weekend driver and a Show and Shine participant.

IP: Logged
Lilchief
Member
Posts: 1741
From: Vevay,Indiana
Registered: Feb 2004


Feedback score: (3)
Leave feedback

Rate this member

Report this Post11-12-2008 08:06 PM Click Here to See the Profile for LilchiefSend a Private Message to LilchiefEdit/Delete MessageReply w/QuoteDirect Link to This Post
Fierosound: Very impressive rebuild. Just a few questions. How does the SD 3.3L compare to the 2.8 or even a 3.4 ? Or is it closer to a SC 3.8 ? Have you ran any 1/4 mile times? And what kind of gas mileage does it get? You said something in the lines of engine work, what are your plans? Do you have any specs on the present engine,hp, tq, internal components? Just curious cause I'm working on a 3.0L SD/Merc for my 88 coupe. Well a big 2 thumbs up on your project. I like it.

------------------

85 GT 3.4
14.9 @ 90 1.9 60' Old TH125/3.06
Unknown New 4T60/3.42

IP: Logged
PFF
System Bot
fierosound
Member
Posts: 15200
From: Calgary, Canada
Registered: Nov 1999


Feedback score: N/A
Leave feedback


Total ratings: 286
Rate this member

Report this Post11-13-2008 09:05 AM Click Here to See the Profile for fierosoundClick Here to visit fierosound's HomePageSend a Private Message to fierosoundEdit/Delete MessageReply w/QuoteDirect Link to This Post
Lilchief - see your PM

The real "meat" of the project was the 3.3L SD4 engine.

After all, that was the BIG selling point "Dirty Rat" Chester was bragging about and supposedly made this Indy
such a bargain for whoever "bought in" (suckered by) what he was saying. https://www.fiero.nl/forum/A...070315-4-032634.html

Unfortunately, contrary to everything that was said, the engine did need a complete rebuild and many $$$.

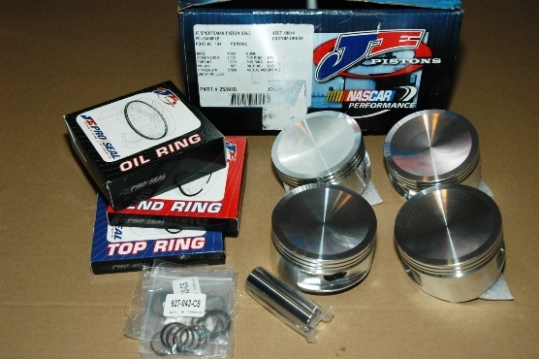
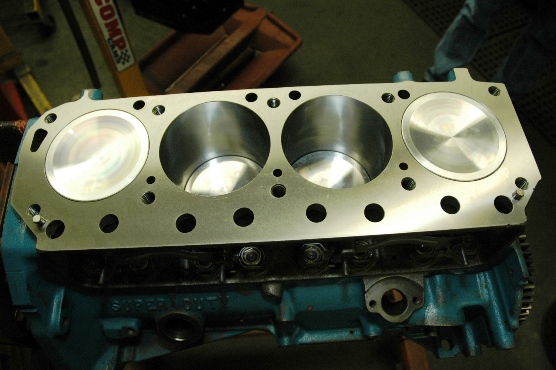
The cylinders had some wear and we determined that the pistons had .008" piston-to-wall clearance - way too much!!
That explained in part the low compression test readings of 92psi.
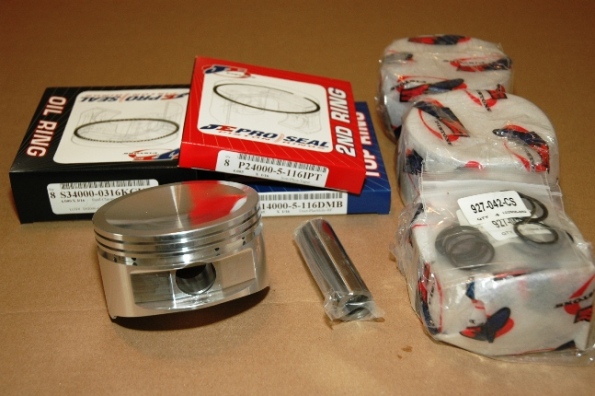
JE pistons specify a .0045" piston-to-wall clearance for their pistons (these were JE's).

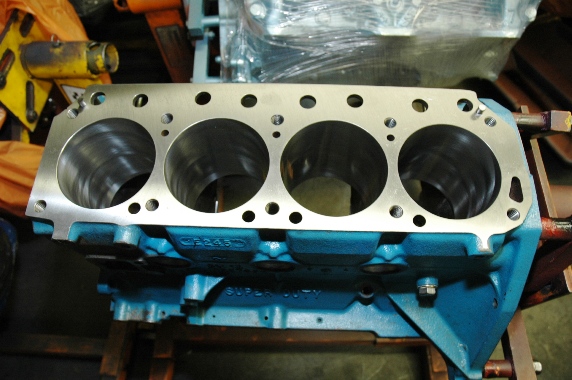
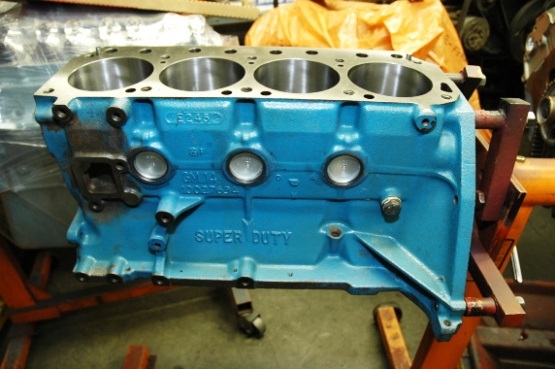
The engine block went through all the usual rebuild procedures.
The block was hot-tanked, align honed, decked, cylinders bored and honed for 4.020" diameter pistons, and new freeze plugs installed.


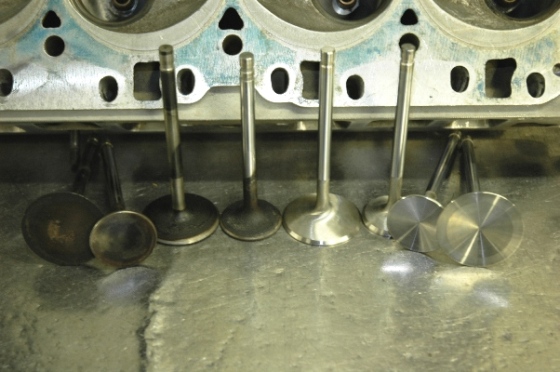
The new Stainless Steel intake valves are 2.055" diameter and the exhaust valves are 1.600" in diameter.
Here's a comparison of what came out and the new SS valves that would be installed.


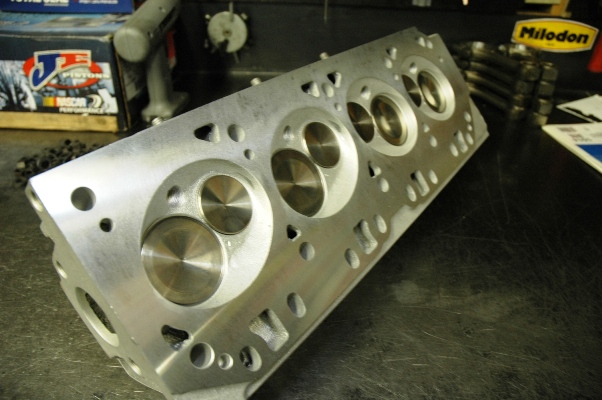
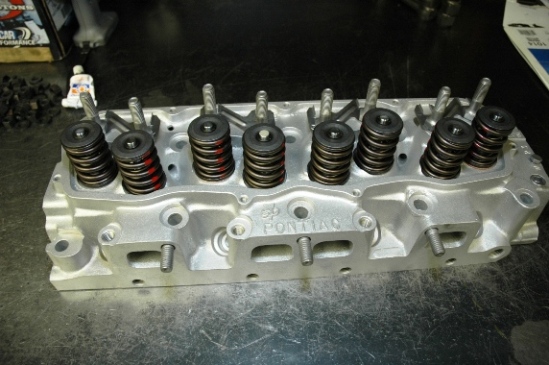
The bare head was cleaned up, milled, and new bronze guides installed, along with the new SS valves, dual valve springs, keepers and locks.
According to the SD4 engine guide, the Paul Vanderley designed SD4 heads out of the box (before any porting) flow 88% more than a stock Duke head!


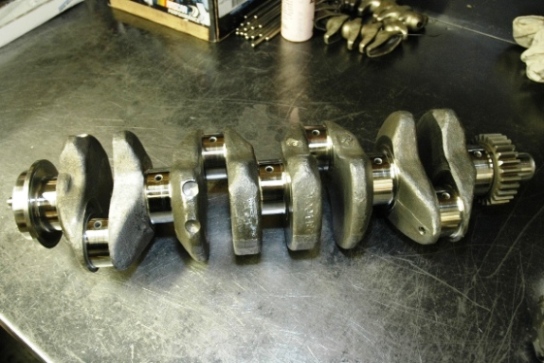
I had the crank and rods magnafluxed to make sure they were OK. They passed inspection and were then prepped for the engine.
The crank bearing surfaces were ground/polished and the connecting rods had their ends resized.


The head cc'd at 58cc in the combustion chambers. It was calculated that a 4.020" zero deck piston with a
20cc dish would give us a 10.5 to 1 compression ratio - should be workable with premium pump gas.


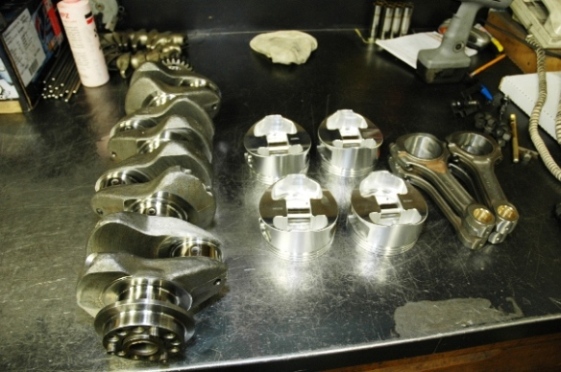
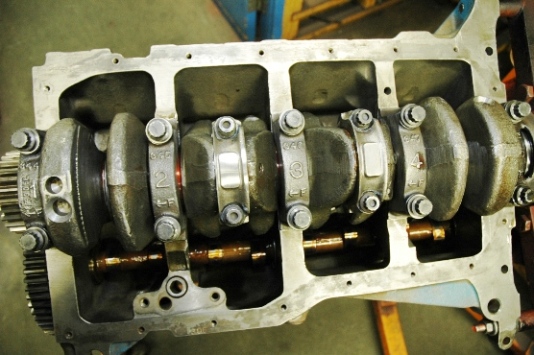
Here's the "goods" waiting to go into the readied block after coming back from balancing - pistons, reground crank, and resized rods.


...and a couple of shots of the reassembled short block.


You can see some minor grinding in the block walls required to clear the connecting rod throws.


Once they had the head installed, I would be bringing it home!

The installed billet Crane roller camshaft PN 298011 was designed for solid roller lifters and a 1.55 ratio.
It had been sent to Geoff at Colt Cams Inc (Langley, B.C.) and was reground to a suitable single-pattern hydraulic roller
street/strip profile compatible with the new CR of 10.5, and the Crane Gold 1.71 ratio roller rockers that were on the engine.

Colt Cams camshaft (ref# C822IH) specs:
Duration: intake/exhaust 224 degrees @ .050"
Lift @ cam: intake/exhaust .310"
Lift @ valve: intake/exhaust .530"
LDA (Lobe Displacement Angle): 110 degrees
Rocker arm ratio: 1.71

Operating RPM range of the cam with matching springs is 2000-6500rpm.
New hydraulic roller lifters and hardened pushrods will complete the valvetrain.
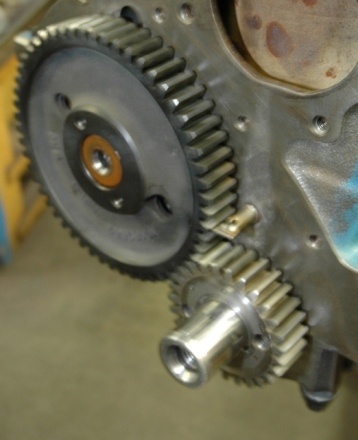
A steel camshaft gear set was used to drive the camshaft off the crank.
Here's how the specs of the reground camshaft compare to the Ultradyne hydraulic roller cams made for the SD4.


Part numbers
SD4 Engine block GM PN 10027634
SD4 aluminium cylinder head (Brodix?) GM PN 10038433
SD4 GM head gasket PN 10038952
Forged connecting rods (6") GM PN 14011091
Forged crankshaft (3.9375" stroke) GM PN 10041860

There were several SD4 cranks available for displacements from 2.0 to 3.3L
(with 4.000" bore) so engine could be used in many racing classes.

PN 10042835 2.600" stroke - 2.0L
PN 10027778 3.000" stroke - 2.5L
PN 10027779 3.250" stroke - 2.7L
PN 10093312 3.625" stroke - 3.0L
PN 10041860 3.9375" stroke - 3.3L

[This message has been edited by fierosound (edited 03-29-2022).]

IP: Logged
Hudini
Member
Posts: 9030
From: Tennessee
Registered: Feb 2006


Feedback score: N/A
Leave feedback


Total ratings: 165
Rate this member

Report this Post11-13-2008 09:36 AM Click Here to See the Profile for HudiniSend a Private Message to HudiniEdit/Delete MessageReply w/QuoteDirect Link to This Post
Very, very nice.
IP: Logged
stinky817
Member
Posts: 230
From: Delta, PA, USA
Registered: Nov 2008


Feedback score:    (8)
Leave feedback

Rate this member

Report this Post11-13-2008 10:14 AM Click Here to See the Profile for stinky817Send a Private Message to stinky817Edit/Delete MessageReply w/QuoteDirect Link to This Post
yes yes, very very nice

I've always had a soft spot for the 84's as well. i actually own 2 84's
IP: Logged
The_Stickman2
Member
Posts: 1030
From: Lehigh Valley Pa.
Registered: Sep 2007


Feedback score: (1)
Leave feedback

Rate this member

Report this Post11-13-2008 02:13 PM Click Here to See the Profile for The_Stickman2Click Here to visit The_Stickman2's HomePageSend a Private Message to The_Stickman2Edit/Delete MessageReply w/QuoteDirect Link to This Post
Now that's an engine and build done right.

------------------
My sites
http://the-stickman.tripod.com

http://www.youtube.com/TheStickman

[This message has been edited by The_Stickman2 (edited 11-13-2008).]

IP: Logged
82-T/A [At Work]
Member
Posts: 24488
From: Florida USA
Registered: Aug 2002


Feedback score: (1)
Leave feedback


Total ratings: 200
Rate this member

Report this Post11-13-2008 03:20 PM Click Here to See the Profile for 82-T/A [At Work]Send a Private Message to 82-T/A [At Work]Edit/Delete MessageReply w/QuoteDirect Link to This Post
Wow, that really, REALLY looks nice.

I've got a quick question. Do you have other projects you're working on at the same time, or are you JUST focusing all your attention and time to this one vehicle? Only reason I ask is because the attention to detail is amazing... I've done work of that quality as well, but now that I'm stupidly juggling 3 projects, I find that I just don't have the time to sand down every part and repaint it.


Also, that sound deadening material, is that dynomat type stuff? I typically install stuff like that in cars that I fix up, but I'm hesitant to do it on my 87 Fiero since I don't want to line the floorpans with stuff I won't be able to remove. Is the stuffy tacky, or does it just lay in there?

Thanks!!!

------------------
Todd,
2006 Pontiac Solstice
2004 Volkswagen Beetle Convt. (Wife's)
2002 Ford Crown Victoria LX
1987 Pontiac Fiero SE / V6
1981 EZ-GO Xi875-A "Miami Dolphins" Medical Cart
1973 Volkswagen Type-2 Transporter
1973 Oldsmobile Cutlass Supreme 350

IP: Logged
fierosound
Member
Posts: 15200
From: Calgary, Canada
Registered: Nov 1999


Feedback score: N/A
Leave feedback


Total ratings: 286
Rate this member

Report this Post11-13-2008 03:49 PM Click Here to See the Profile for fierosoundClick Here to visit fierosound's HomePageSend a Private Message to fierosoundEdit/Delete MessageReply w/QuoteDirect Link to This Post
 
quote
Originally posted by 82-T/A [At Work]:

...but now that I'm stupidly juggling 3 projects, I find that I just don't have the time to sand down every part and repaint it.

Is the stuffy tacky, or does it just lay in there?


Thanks everyone, been working on it since Sept 2006. You'll find that working on more than one project at the same time means none ever get finished.

The soundproofing I used is a peel & stick roofing material that seems to made of a similar material to Dynamat. Thought I’d try it. Covered it here in the stereo thread: https://www.fiero.nl/forum/Forum2/HTML/081643.html

The “other car” - 87 GT - is kinda done. Just maintaining it so it keeps winning awards. It's been jealous of the attention on the Indy.

[This message has been edited by fierosound (edited 04-01-2012).]

IP: Logged
fierosound
Member
Posts: 15200
From: Calgary, Canada
Registered: Nov 1999


Feedback score: N/A
Leave feedback


Total ratings: 286
Rate this member

Report this Post11-15-2008 12:01 PM Click Here to See the Profile for fierosoundClick Here to visit fierosound's HomePageSend a Private Message to fierosoundEdit/Delete MessageReply w/QuoteDirect Link to This Post
 
quote
Originally posted by Dennis LaGrua:

I saw this car a few years back at Carlisle when the previous owner showed it and it looked nothing like you have it looking now. For the money that you paid it should have looked like this when you received it. Not trying to rub it in but just wanted to complement your fine work.


I'd have to agree with you. What really shocked me was how "beat up" the car was for something with ONLY 19,000 miles...

I've seen cars with 50,000 miles or more that still look BRAND NEW so I don't think I was out of line expecting this to be better than it was.

[This message has been edited by fierosound (edited 11-17-2008).]

IP: Logged
fierosound
Member
Posts: 15200
From: Calgary, Canada
Registered: Nov 1999


Feedback score: N/A
Leave feedback


Total ratings: 286
Rate this member

Report this Post11-17-2008 08:36 AM Click Here to See the Profile for fierosoundClick Here to visit fierosound's HomePageSend a Private Message to fierosoundEdit/Delete MessageReply w/QuoteDirect Link to This Post
Wo-hoo!! The assembled long-block engine is painted and on the cradle.

My machine shop matched the old ruined harmonic balancer with one from a Chevy truck 6-cylinder engine.
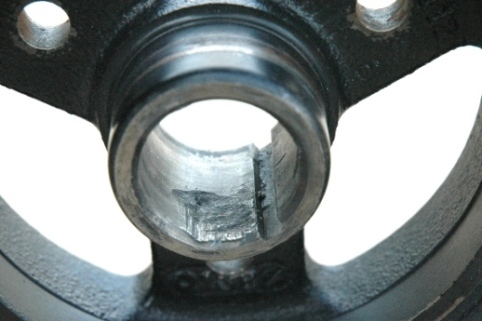


All that was required was a slight sizing to fit the crank and cutting of a new timing mark.
https://www.fiero.nl/forum/...HTML/146575.html#p35

Here it is with the timing cover, harmonic balancer and water pump installed.


We did a test fit of the cradle and that's when we confirmed that something was not sitting right with the way the engine/transmission was mounted.
We had "pushed" the engine to get the dogbone bolted up, but the Edelbrock 4-bbl manifold did not fit between the head and trunk firewall.
There was LOTS of head scratching trying to figure this one out.

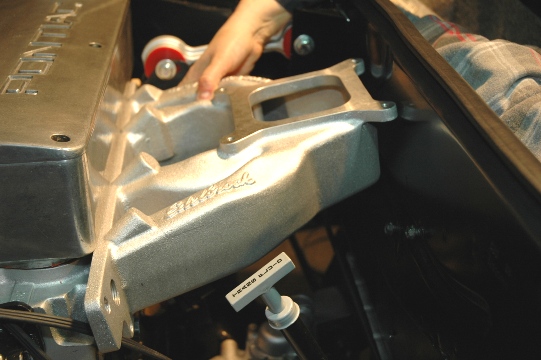

Only after checking things over and over again, we discovered that mounting the 4-speed automatic transmission on stock Fiero mounts tilted the powertrain back,
because the front transmission mount is too high and needed modification. I'd never seen this mentioned anywhere before, but then the V6
engines aren't as close to the trunk firewall so people likely haven't noticed.

It's covered in earlier posts above and in a thread here:
https://www.fiero.nl/forum/A...110502-2-082950.html

When I bought this car, Chester said it "only needed" a custom mounting block for a hi-torque starter because nobody made one to fit the SD4.
Actually, Tilton has a high-torque starter to fit the SD4 and has it listed on their website. I had it in my hands before the car arrived!!
But it was immediately obvious that the car needed more than a new starter, battery, oil change, coolant and fresh fuel to get the thing running.

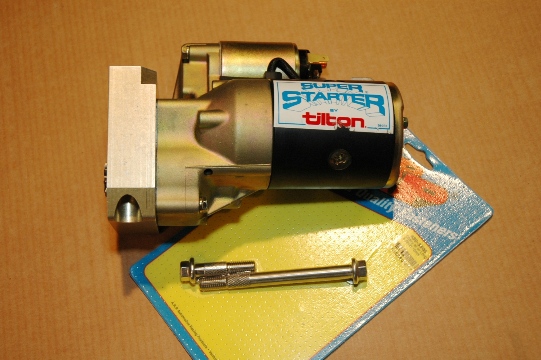

I then found a Tilton starter with a butchered mounting block that they'd been trying to fit, in the Indy's trunk!
The problem wasn't lack of a suitable starter, but the way the solenoid is "clocked" when the Tilton starter is installed.
The starter only fits this way because the offset gearing doesn't permit clocking it to get the solenoid on top - the motor hits the block.
The solenoid clashes with the header's primary pipe from cylinder #4 because of the way the it is tilted outward.
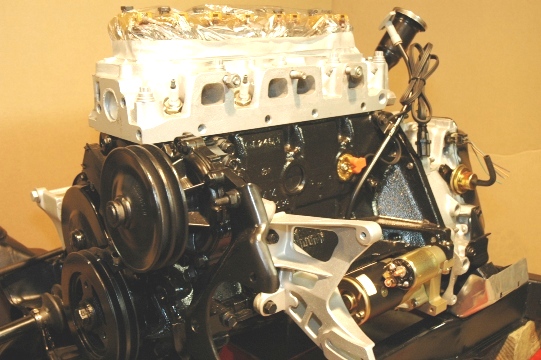


Rather than try to modify the way the starter mounted to the engine (as Chester had tried), it was necessary to change the header
- either to a different one, or modify the one we have. Finding new headers of any type for the Fiero Duke was impossible, so I decided to modify the old header.
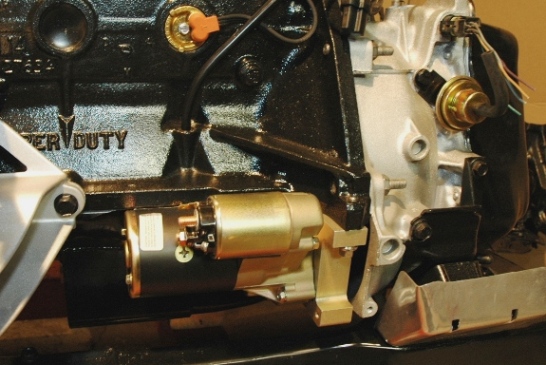


The old exhaust is shown in detail here: https://www.fiero.nl/forum/Forum2/HTML/095615.html

You can see that the while header's primary pipe from cylinder #4 would clear the stock starter with solenoid directly on top, it would now clash with the Tilton starter's solenoid.
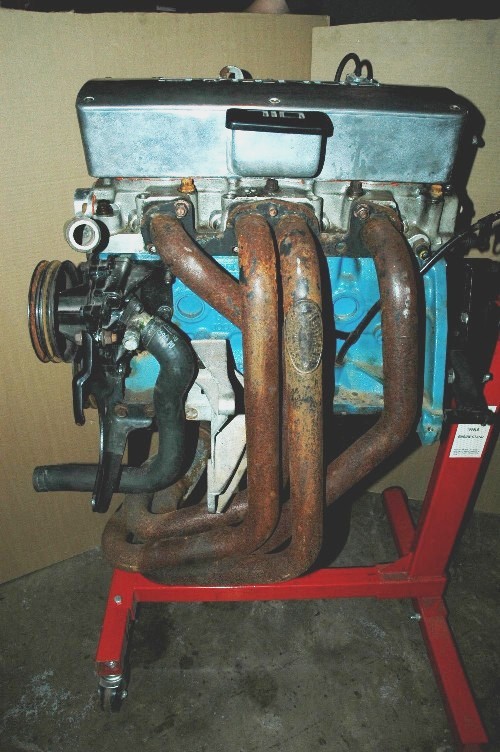


The "Competition" Hooker header was a 4-into1 long primary tube design.
It wasn't especially suited to the street because of the way it ran under the cradle and reduced road clearance
- a liability if the car is lowered. You also can't install a rear sway bar because of it.
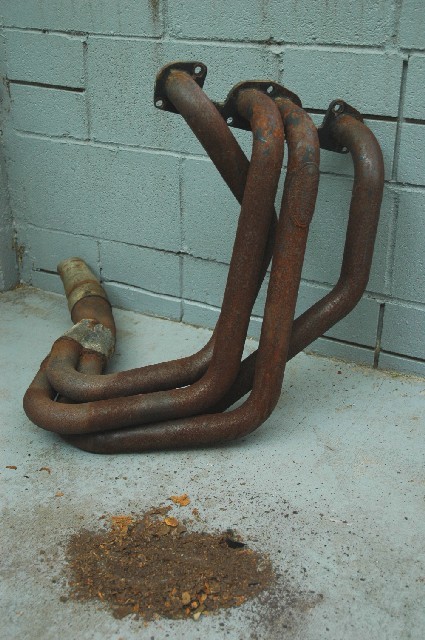


I decided on a compromise and modify it into a 4-into1 "shorty" design header.
We cut back the tubes to change the location of the collector, and changed the routing of the primary pipe from
cylinder #4 to clear the starter. After modification and the final welding, the entire header was ceramic coated.
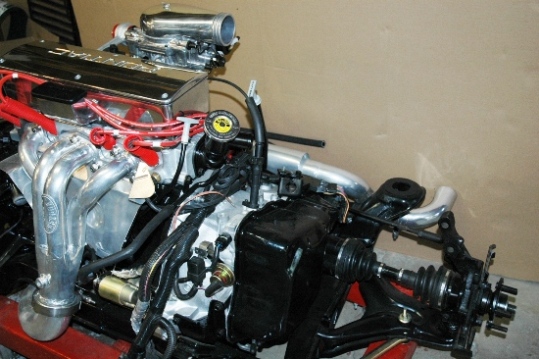


A ceramic coated exhaust heat shield was also installed. It shields the water pump and A/C compressor from exhaust heat at the front of the engine,
and protects the wiring and starter to some degree on the transmission end. The 3" exhaust runs under the cradle and just clears the rear sway bar below it.
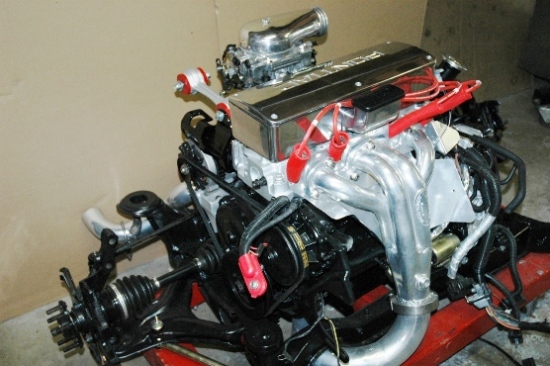


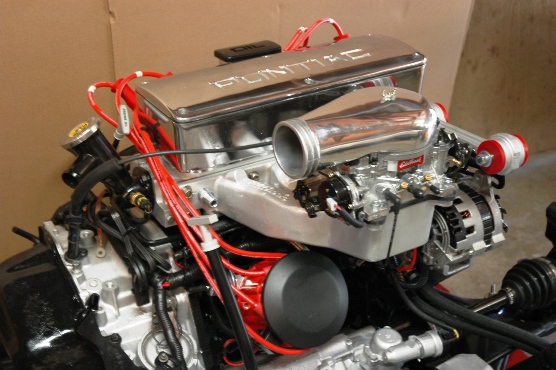
On the other side of the engine I installed an Paul Vanderley designed Edelbrock Victor Jr 4-bbl aluminum manifold.
The SD4 head had already been ported, so both the intake gasket and intake manifold were ported to match the head.
Prior to installation, the manifold was clear powder coated to protect it and keep it looking good. It is topped with a polished Edelbrock AVS 4-bbl carburetor.

An ATI polished aluminum carb bonnet will be directing air into the carburetor.
This item is originally intended for use in supercharged or turbocharged blow-through carburetor applications.
As it happens, it matches the new polished Edelbrock valve cover topping the engine perfectly.


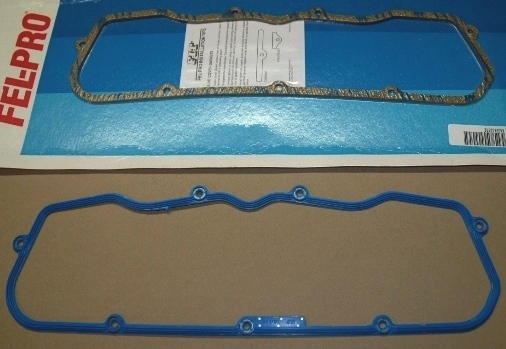
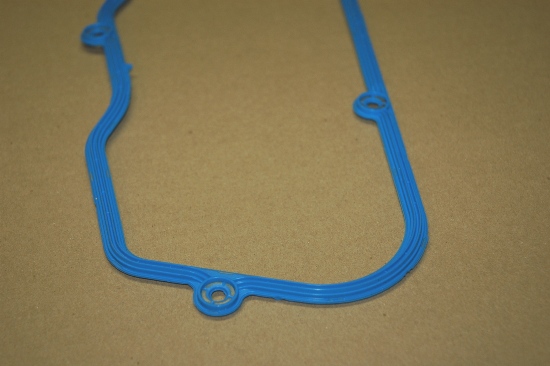
The ONLY valve cover gasket you want to use on the Duke is Felpro PN FEL-VS50179T - especially with this Edelbrock valve cover.
Don't use the cork or cork/rubber ones as they always tend to leak.
This rubber/steel gasket has raised edges to seal properly and comes with all the hardware needed for installation.


Part numbers
SD4 PONTIAC valve cover (Edelbrock) GM PN 10031327
Edelbrock/GM 4-bbl manifold GM PN 10038470
Fel-Pro intake gasket (cut to fit) PN FPP-12381
Edelbrock Thunder AVS carb PN 1803
Fel-Pro valve cover gasket PN FEL-VS50179T
Fel-Pro oil pan gasket PN FEL-1813
Tilton starter PN 54-10011
Stant 180* thermostat PN 13818, PN 45818 (Premium)
OR MotoRad PN 211-180, PN 7211-180 (Fail safe)

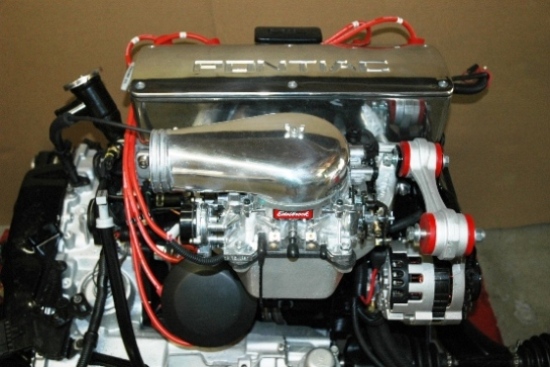
The distributor I decided to use was a coil-in-cap HEI design with centrifugal and adjustable vacuum advance
as this would be the best and simplest solution and because of the great number of performance items available.
I'm using an MSD distributor module and MSD coil with it. Has a Crower bronze drive gear.

The distributor's centrifugal advance was tailored to bring in 38* by 2800rpm and limited to 52* total with vacuum advance.
Magnecor plug wires send the charge to Autolite spark plugs. DEI boots protect the plugs and boots from the heat of the headers.


Part numbers
Crower bronze distributor drive gear PN 76063 (.500" shaft)
Magnecor wire kit PN 49143 (universal cut-to-fit)
DEI Protect-A-Boots (heat protection) PN 010522 (set/8)
Spark Plugs - Autolite 4062

At the front of the engine, it was now possible to use the proper dogbone/alternator bracket and dogbone.
The clunky old alternator was tossed in favor of the newer smaller CS design used on the 88 Fieros.
Braided lines drain oil from connections on the intake manifold to inlet ports in the Moroso PN 2035 oil pan.
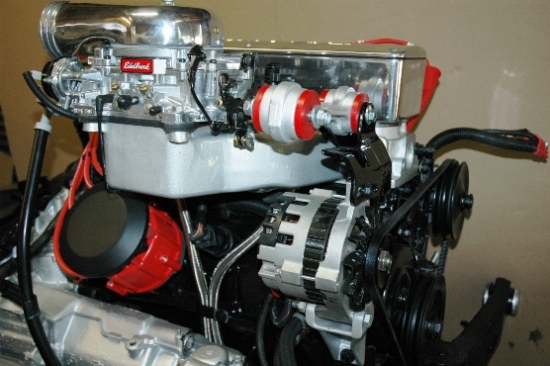


This is now spotless and looking VERY different from the engine that came out of this Indy.
Refresh your memory: https://www.fiero.nl/forum/Forum2/HTML/095615.html

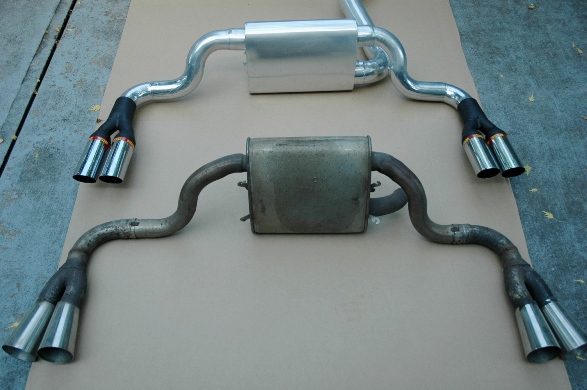
A new exhaust was built, header to tips. I used a Flowtech Afterburner cross-flow muffler designed for the Camaro.
The dolly is pushing up on the exhaust pipe which is why it looks like the muffler is hanging crooked in this picture.
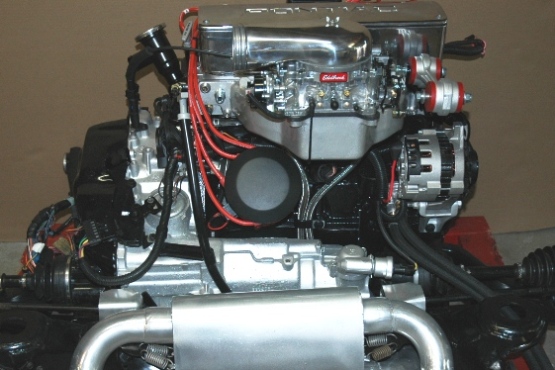


Part numbers
Fel-Pro SD4 header gasket PN FPP-1441
Flowtech Afterburner muffler PN 50363FLT
Hooker resonator tips PN 21430HKR


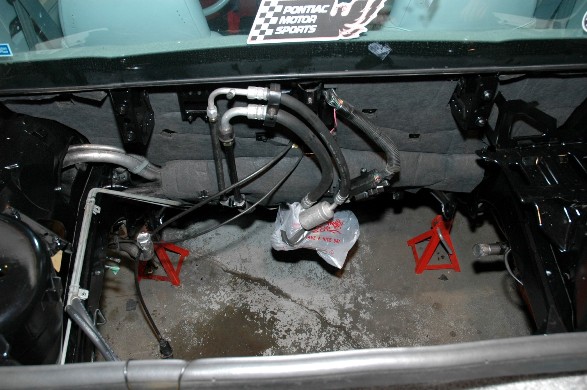
In the meantime, I also got the engine bay ready. The old ratty insulation was removed,
everything scrubbed down and paint touched up as needed, before new OEM looking insulation went in.
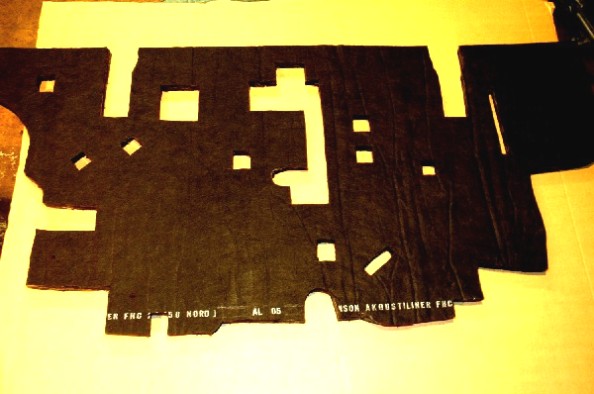

[This message has been edited by fierosound (edited 09-01-2023).]

IP: Logged
The_Stickman2
Member
Posts: 1030
From: Lehigh Valley Pa.
Registered: Sep 2007


Feedback score: (1)
Leave feedback

Rate this member

Report this Post11-17-2008 02:49 PM Click Here to See the Profile for The_Stickman2Click Here to visit The_Stickman2's HomePageSend a Private Message to The_Stickman2Edit/Delete MessageReply w/QuoteDirect Link to This Post
I am SOOO jealous.
IP: Logged
Previous Page | Next Page

This topic is 7 pages long:  1   2   3   4   5   6   7 
next newest topic | next oldest topic

All times are ET (US)

Post New Topic  Post A Reply
Hop to:

Contact Us | Back To Main Page

Advertizing on PFF | Fiero Parts Vendors
PFF Merchandise | Fiero Gallery
Real-Time Chat | Fiero Related Auctions on eBay


Copyright (c) 1999, C. Pennock