Pennock's Fiero Forum
  The Construction Zone
  LS4 / F40 swap - fieroguru (Page 16)

Post New Topic  Post A Reply
Email This Page to Someone! | Printable Version

This topic is 51 pages long:  1   2   3   4   5   6   7   8   9   10   11   12   13   14   15   16   17   18   19   20   21   22   23   24   25   26   27   28   29   30   31   32   33   34   35   36   37   38   39   40   41   42   43   44   45   46   47   48   49   50   51 
Previous Page | Next Page
next newest topic | next oldest topic
LS4 / F40 swap - fieroguru by fieroguru
Started on: 12-13-2010 01:34 PM
Replies: 2024 (165320 views)
Last post by: fieroguru on 11-24-2024 04:14 PM
fieroguru
Member
Posts: 12307
From: Champaign, IL
Registered: Aug 2003


Feedback score:    (45)
Leave feedback


Total ratings: 259
Rate this member

Report this Post01-16-2013 02:19 PM Click Here to See the Profile for fieroguruSend a Private Message to fieroguruEdit/Delete MessageReply w/QuoteDirect Link to This Post
 
quote
Originally posted by RumbleB:

That method of lifting won't rip at the metal, in the trunk? .


The metal is folded over into the cutouts which makes it stronger and harder to bend. If you lift the whole car with the complete drivetrain it will put a small dent in the edge of the hole, but it is still one of the best methods of lifting a fiero. Using some 3/8" bolts to a chain on the strut towers works as well, but it is easy to scratch the paint on the strut towers with that method.
IP: Logged
fieroguru
Member
Posts: 12307
From: Champaign, IL
Registered: Aug 2003


Feedback score:    (45)
Leave feedback


Total ratings: 259
Rate this member

Report this Post01-16-2013 02:20 PM Click Here to See the Profile for fieroguruSend a Private Message to fieroguruEdit/Delete MessageReply w/QuoteDirect Link to This Post

fieroguru

12307 posts
Member since Aug 2003
 
quote
Originally posted by F355spider:

A lot of nice work. I like the detail and thanks for the nice pics of the fuel filter set up.


Thanks and you are welcome!

[This message has been edited by fieroguru (edited 01-16-2013).]

IP: Logged
qwikgta
Member
Posts: 4669
From: Virginia Beach, VA
Registered: Jan 2001


Feedback score:    (21)
Leave feedback


Total ratings: 84
Rate this member

Report this Post01-18-2013 06:13 PM Click Here to See the Profile for qwikgtaSend a Private Message to qwikgtaEdit/Delete MessageReply w/QuoteDirect Link to This Post
 
quote
Originally posted by fieroguru:


If the 3800's use a vacuum referenced FPR, then they probably can not use the Vette filter/regulator. If they are not vacuum referenced, then I see no reason that it wouldn't work.
Yes, these filter/regulator assemblies are set for 58psi.


I have this same setup on my LS3 and asked Ryan if I could use it on my 3800 swap. He explained it all to me, bottom line "no".

Rob
IP: Logged
fieroguru
Member
Posts: 12307
From: Champaign, IL
Registered: Aug 2003


Feedback score:    (45)
Leave feedback


Total ratings: 259
Rate this member

Report this Post01-20-2013 01:34 PM Click Here to See the Profile for fieroguruSend a Private Message to fieroguruEdit/Delete MessageReply w/QuoteDirect Link to This Post
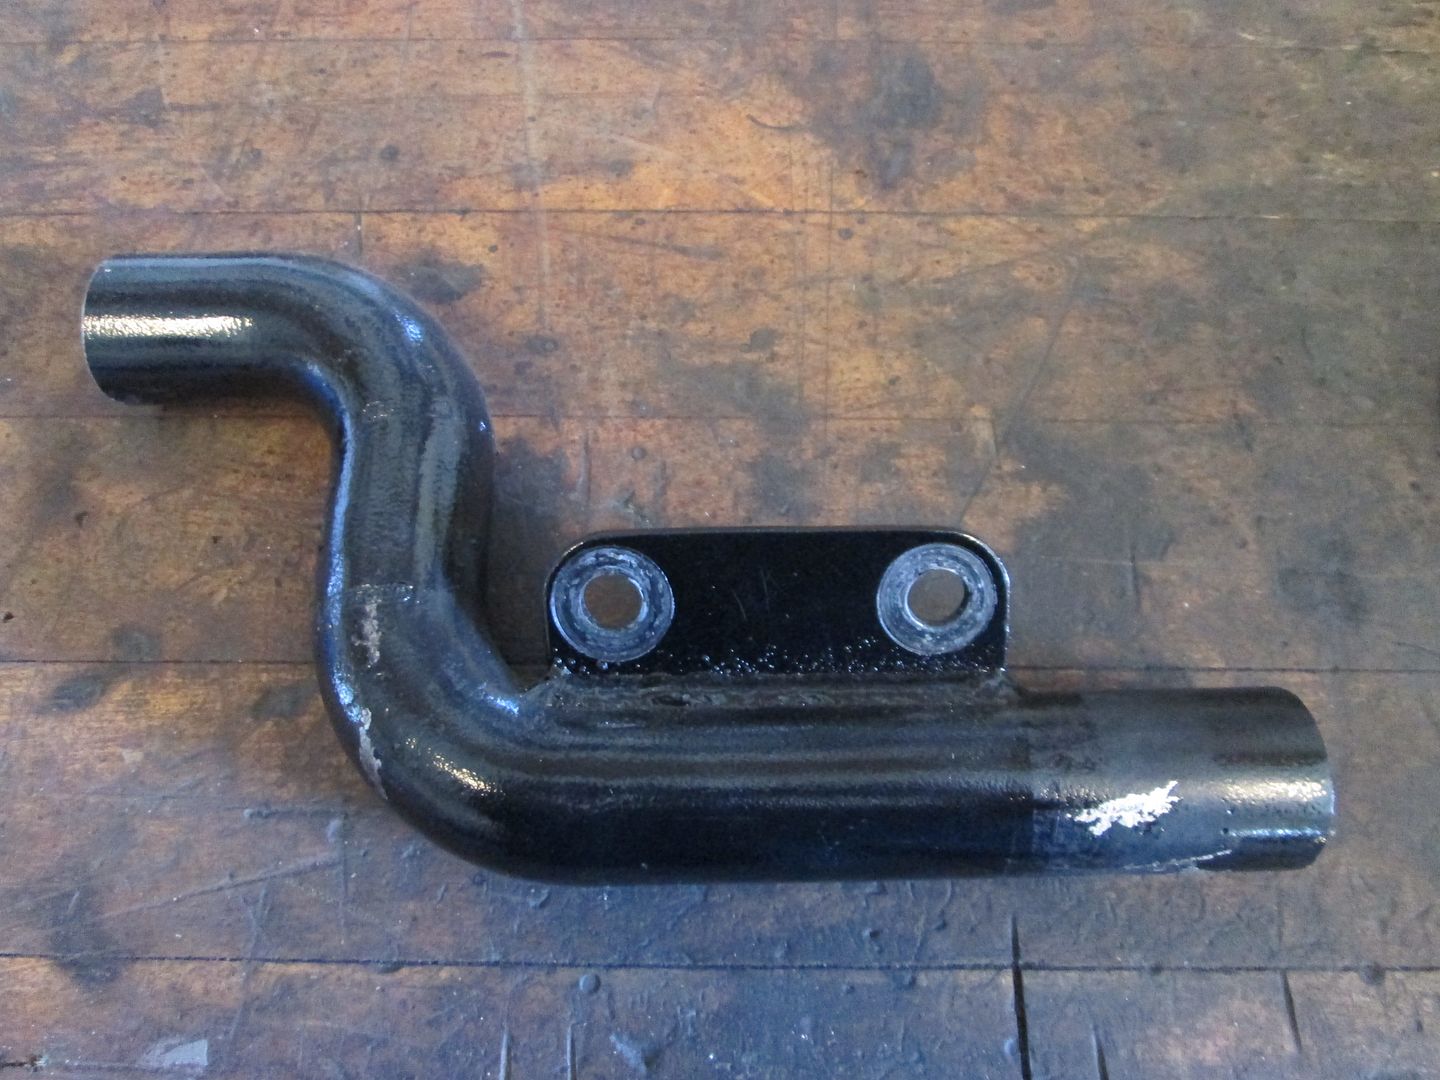
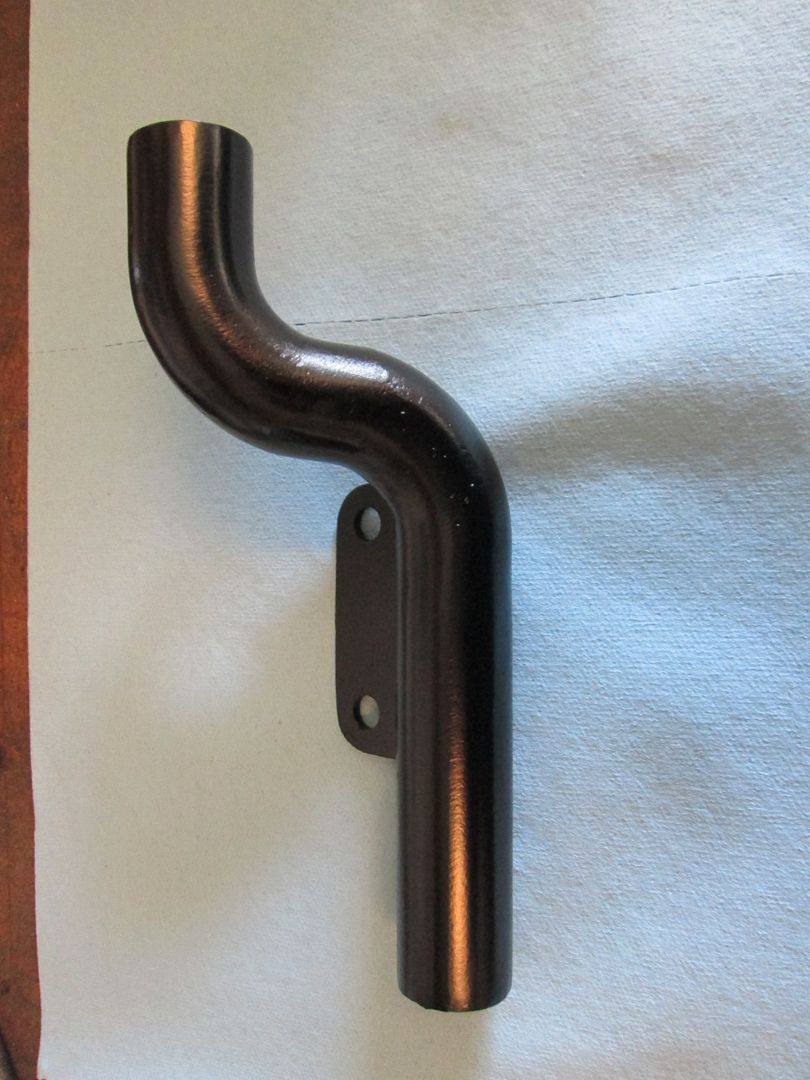
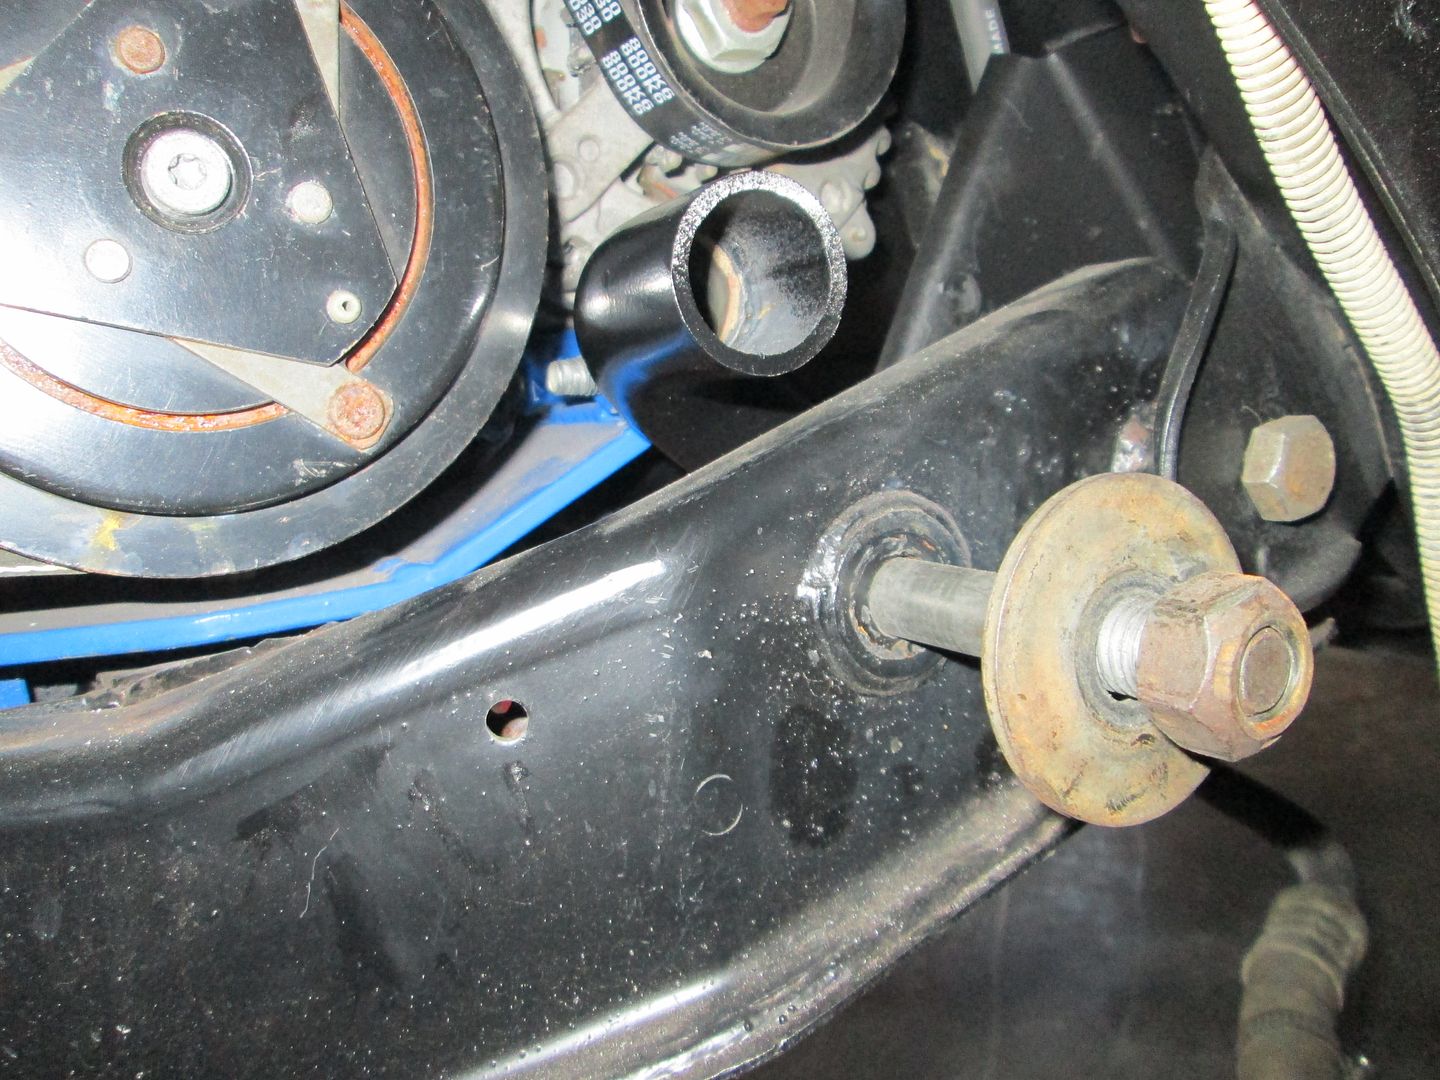
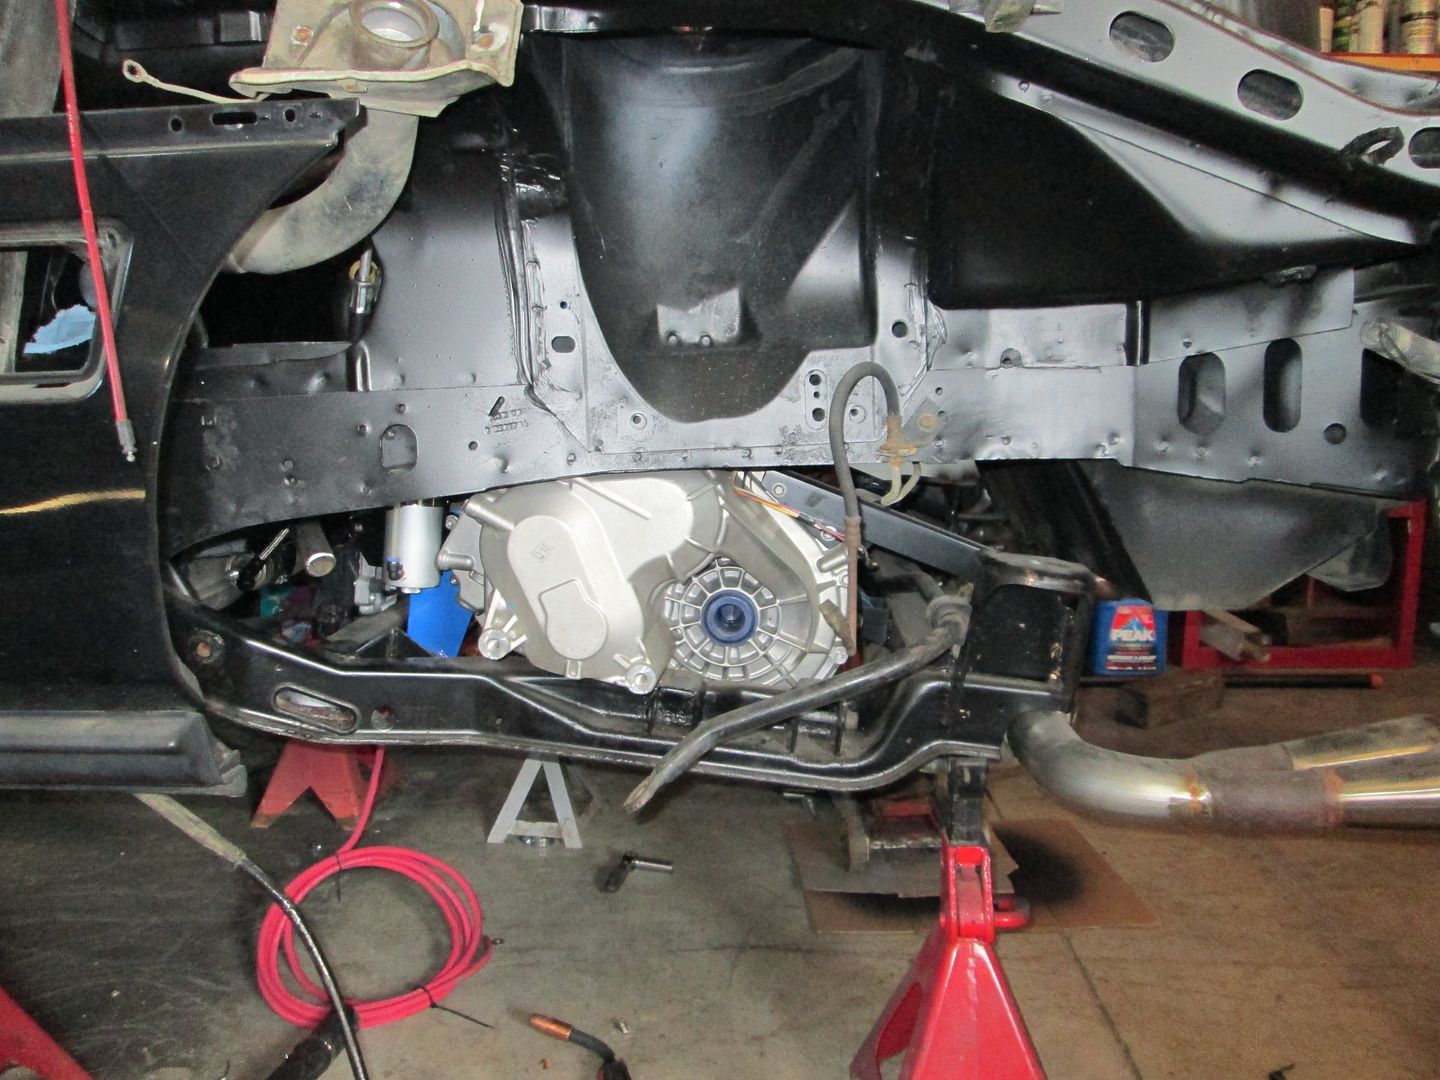
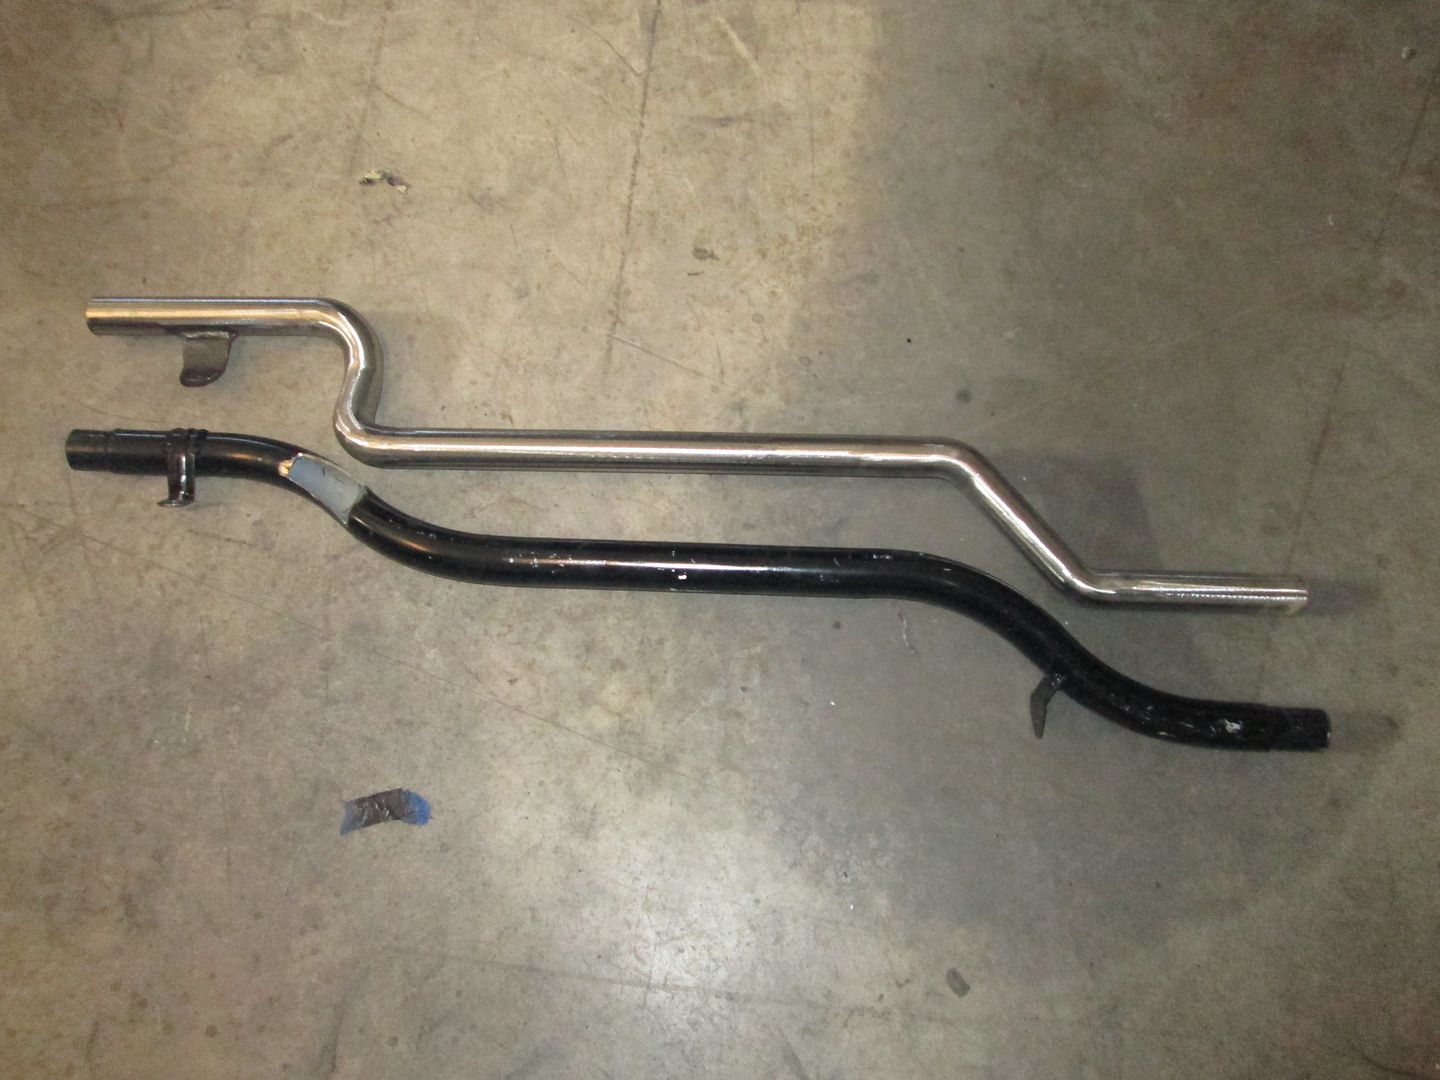
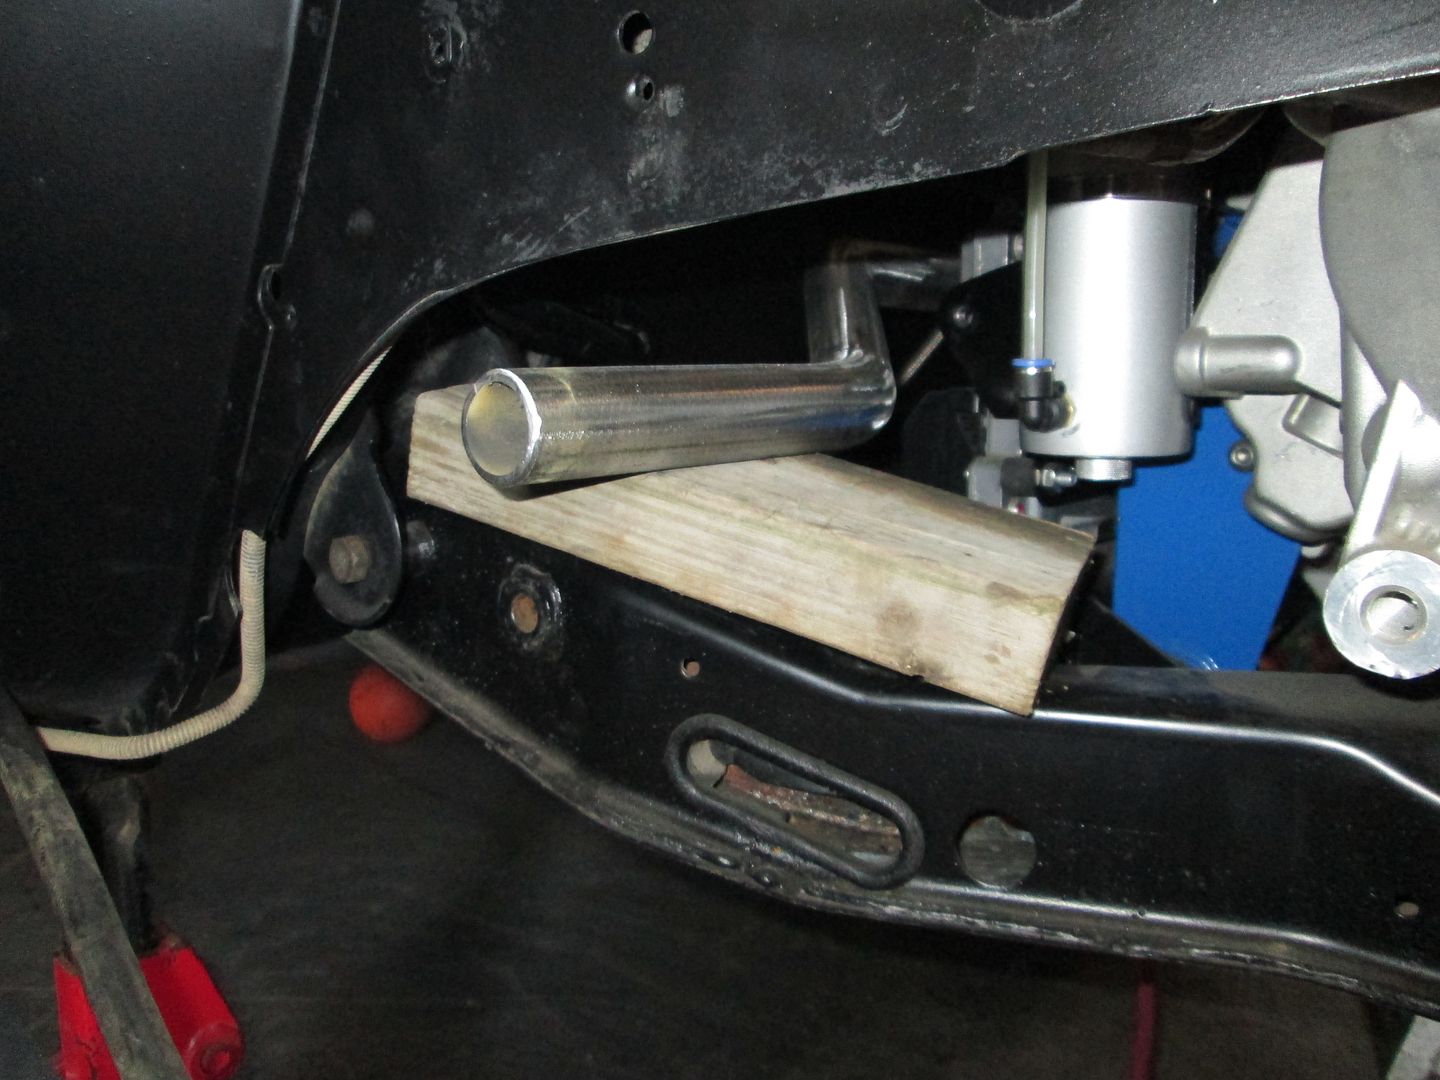
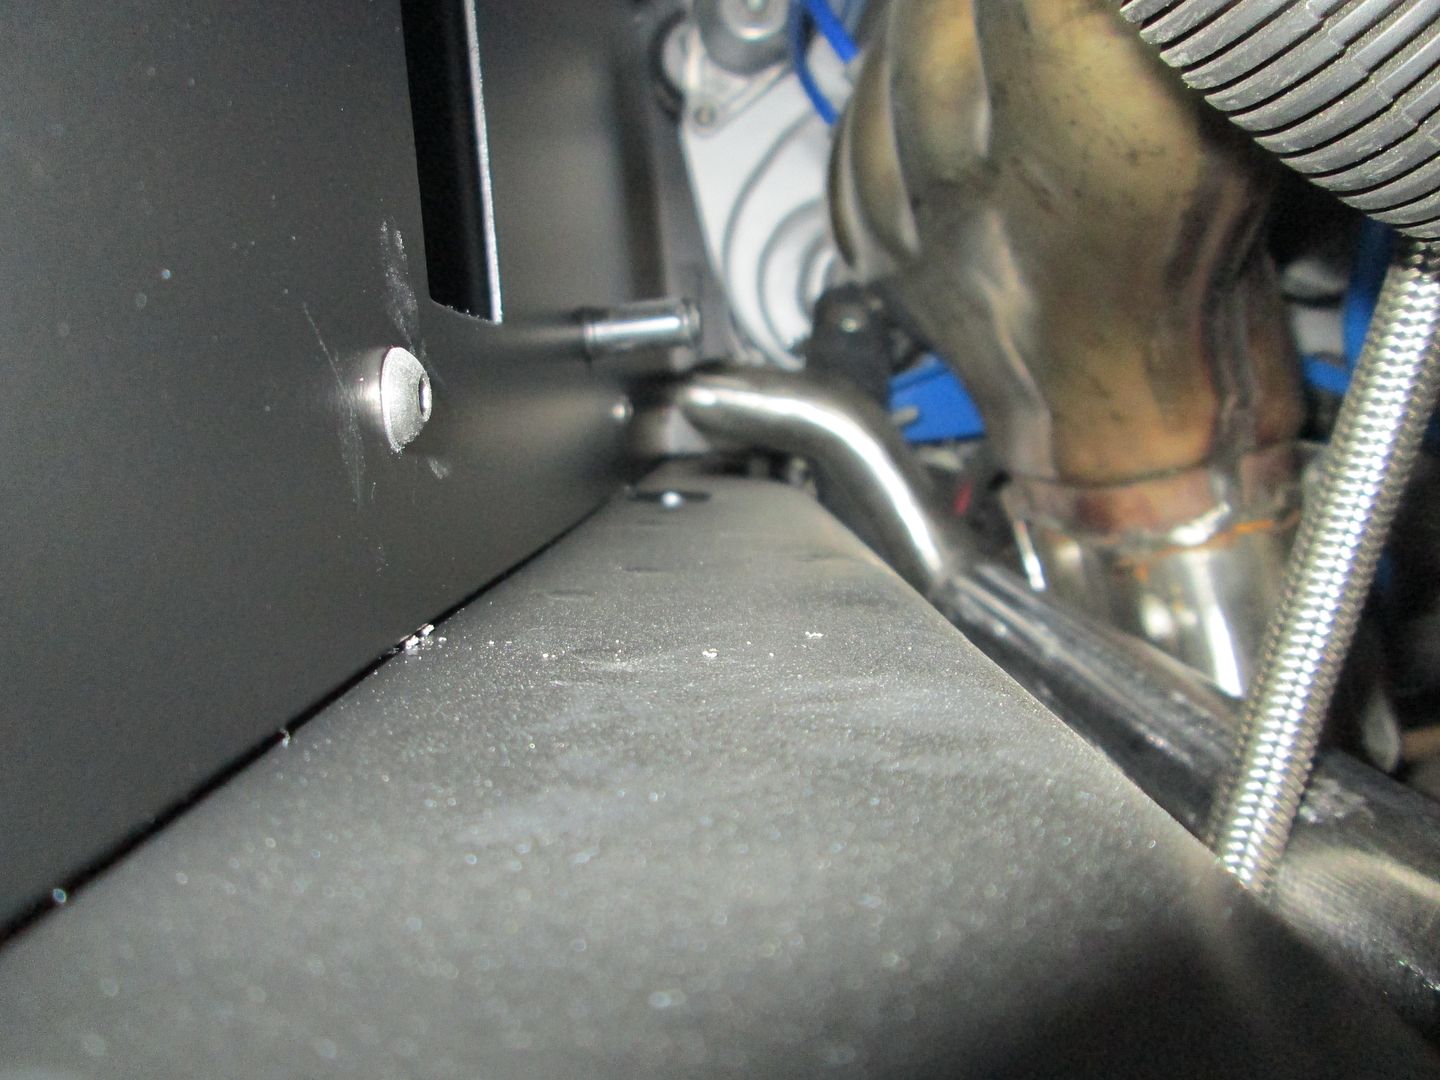
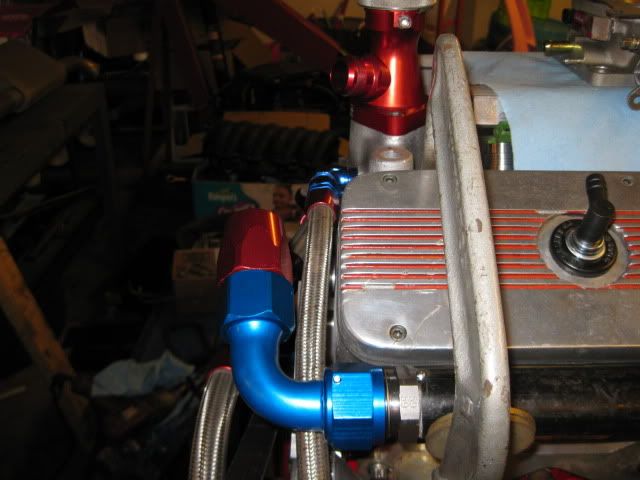
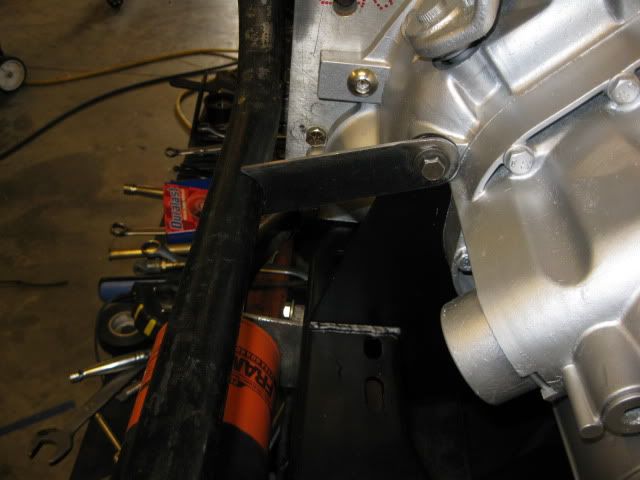
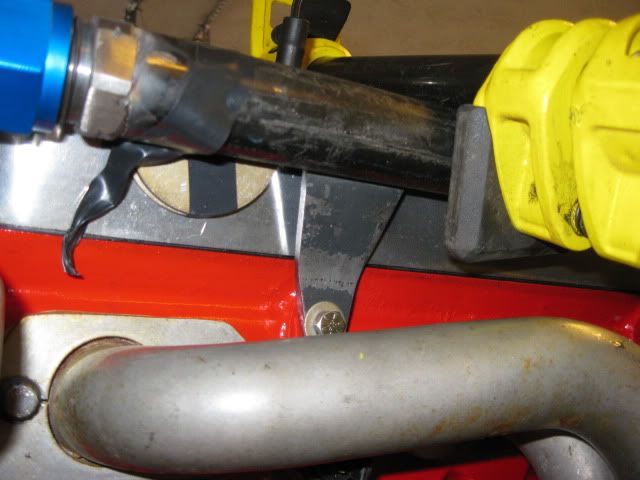
Finally got around to reworking the coolant pipes. The driver side one was an easy fix, just shorten the offset section by 1" and cut off the flange and reweld it in a new position.
Original setup:


Modified one:


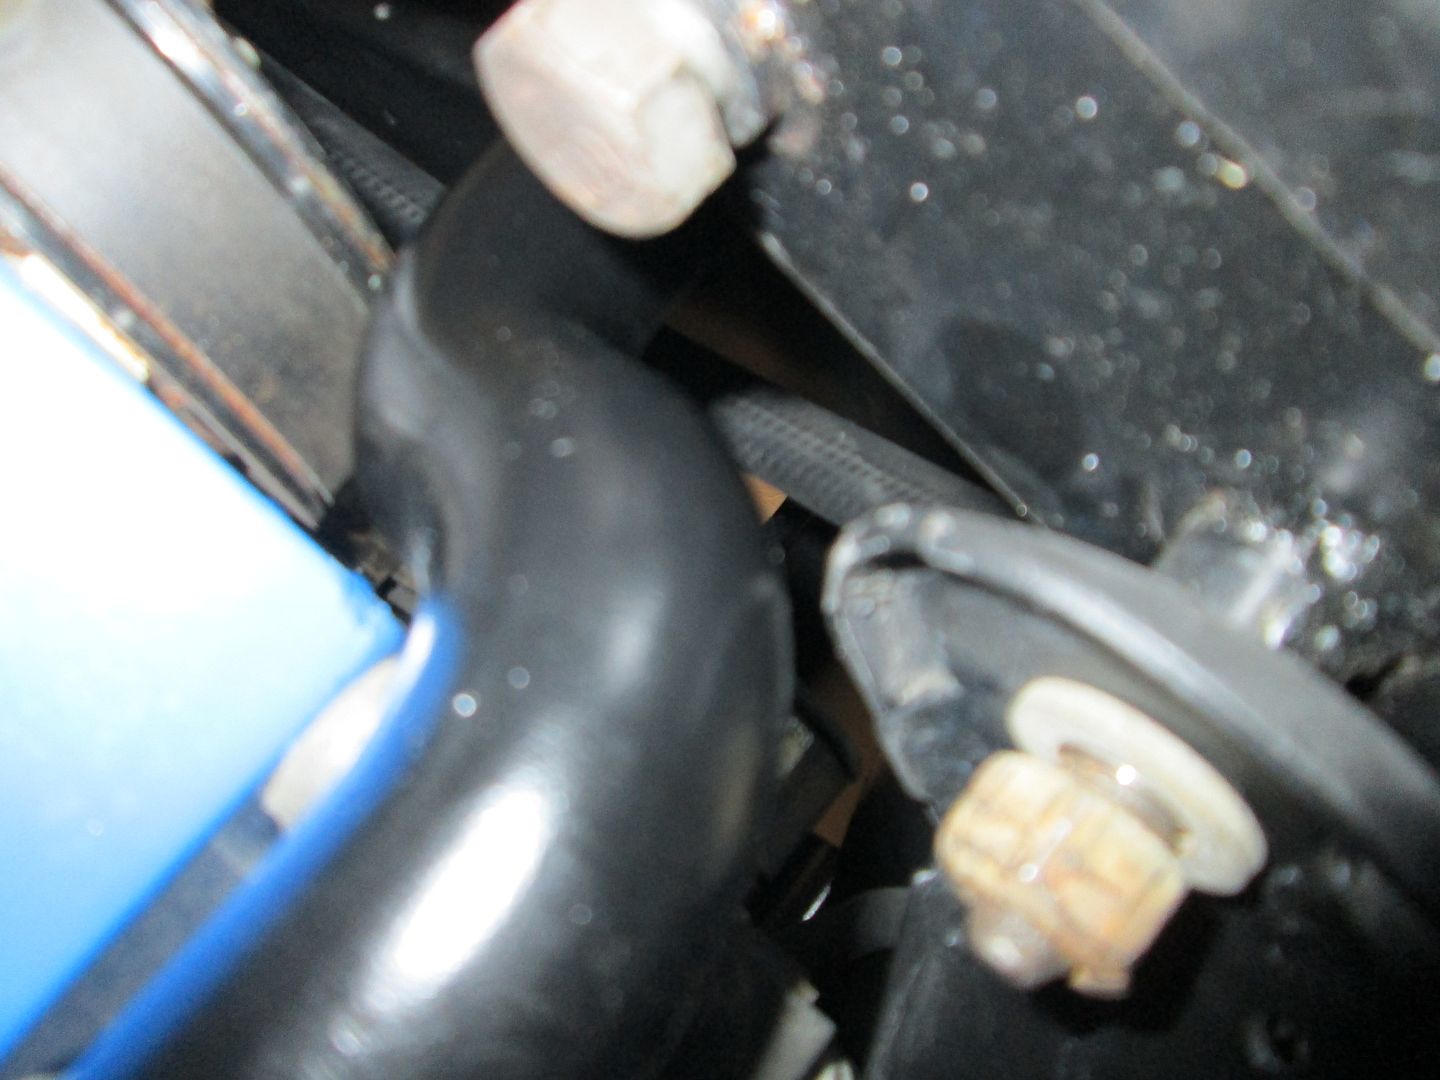
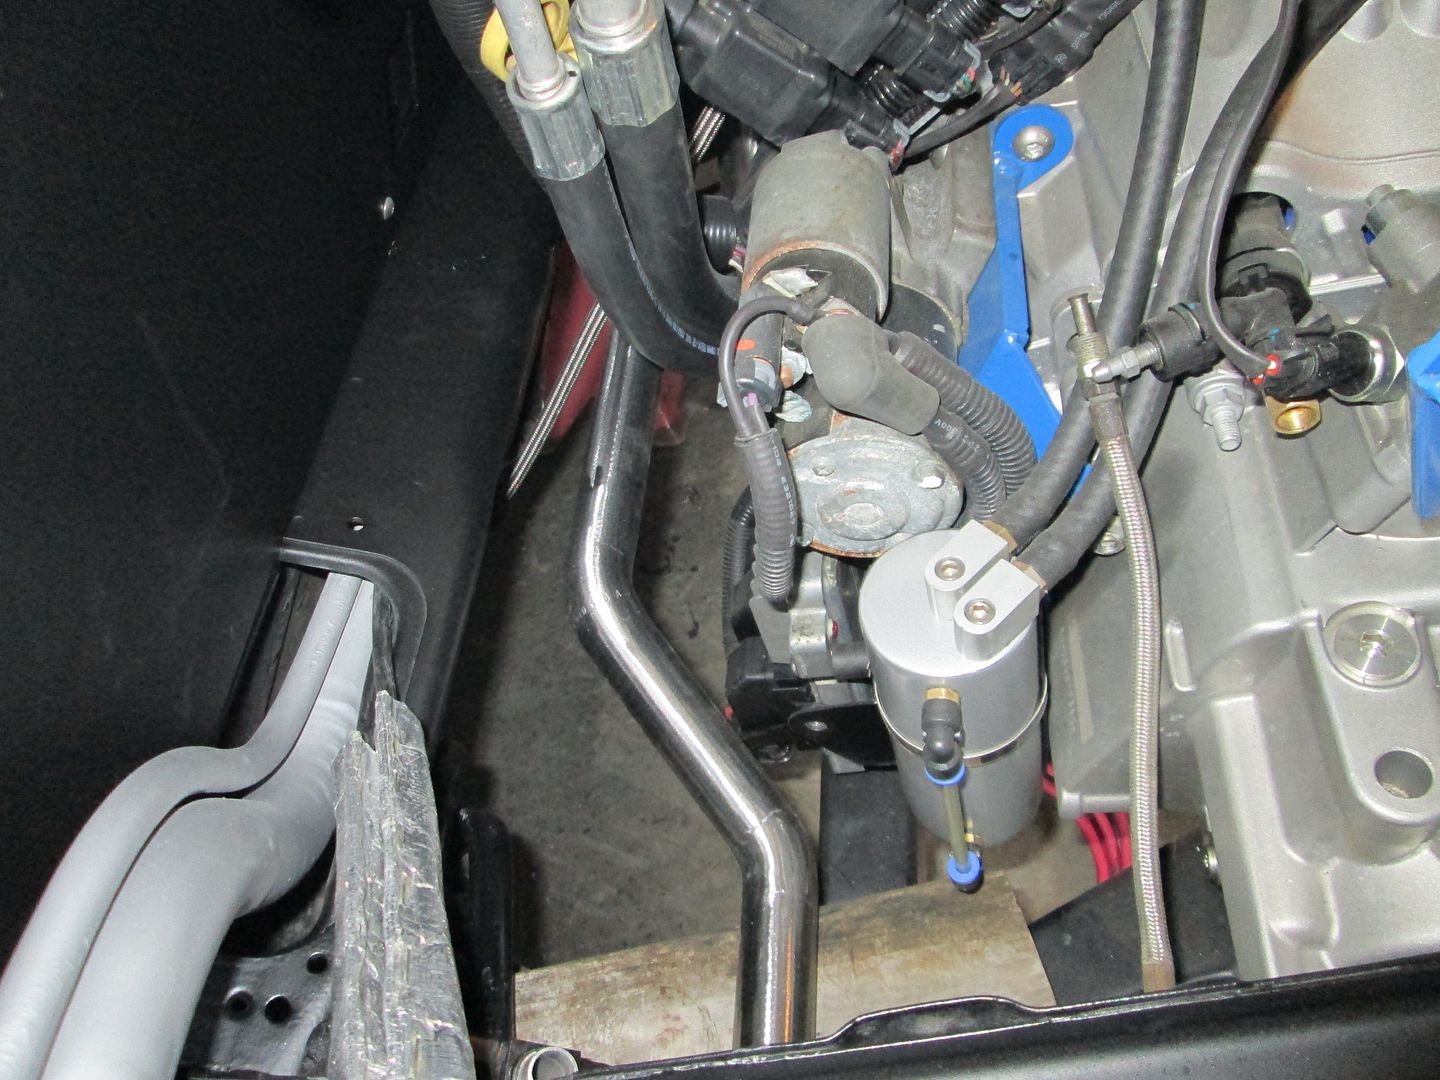
Here are a couple installed pictures. There is now about 3/16" between the tube and the PS front cradle mount tab:


The DS tube was a pain... I ended up using the cradle tip method to remove/install this tube about 10 times during the fabrication process... but now it fits quite well and is nearly complete (just need to make the last mounting tab.


IP: Logged
DPoppelll
Member
Posts: 84
From: Chatsworth, CA, USA
Registered: Dec 2011


Feedback score: N/A
Leave feedback

Rate this member

Report this Post01-20-2013 07:39 PM Click Here to See the Profile for DPoppelllSend a Private Message to DPoppelllEdit/Delete MessageReply w/QuoteDirect Link to This Post
I think that if you ever made a swap kit like this I would save every last penny to buy it. This really is a fantastic build, technically and visually.
IP: Logged
ericjon262
Member
Posts: 3109
From: everywhere.
Registered: Jan 2010


Feedback score:    (10)
Leave feedback


Total ratings: 67
Rate this member

Report this Post01-29-2013 09:09 PM Click Here to See the Profile for ericjon262Send a Private Message to ericjon262Edit/Delete MessageReply w/QuoteDirect Link to This Post
got any updates for us?
IP: Logged
fieroguru
Member
Posts: 12307
From: Champaign, IL
Registered: Aug 2003


Feedback score:    (45)
Leave feedback


Total ratings: 259
Rate this member

Report this Post01-29-2013 09:53 PM Click Here to See the Profile for fieroguruSend a Private Message to fieroguruEdit/Delete MessageReply w/QuoteDirect Link to This Post
The coolant tubes are done and installed, the harness is installed and fully connected, the fuel system is completely installed and connected (replaced the fill 90 degree hose), the battery relocation cables are connected at the engine and routed along the tank and up to the battery - these still need to be terminated at the battery.

Once the battery is connected, I can power up the ecm and HP tuners and start doing the basic sensor checkout. I will also pull the plugs and crank the engine over to build oil pressure and purge the air from the fuel rail (returnless, so air must pass through the injectors to purge). Then I need to work on the base tune for the security, larger injectors and maf change... then cross my fingers and see if she will make some noise...

My laptop/netbook (HP 2133 running 32G SSHD and windows XP) died yesterday - black screen of death, so with the help of google I tore it down to the motherboard and placed it in the oven at 395 degrees for 8 minutes. Let it cool, reassemble and the laptop is functional again! I know absolutely zero about PC's, but with the help of the internet, the wife is impressed once again at the things I can fix!
IP: Logged
ericjon262
Member
Posts: 3109
From: everywhere.
Registered: Jan 2010


Feedback score:    (10)
Leave feedback


Total ratings: 67
Rate this member

Report this Post02-02-2013 06:58 PM Click Here to See the Profile for ericjon262Send a Private Message to ericjon262Edit/Delete MessageReply w/QuoteDirect Link to This Post
 
quote
Originally posted by fieroguru:

The coolant tubes are done and installed, the harness is installed and fully connected, the fuel system is completely installed and connected (replaced the fill 90 degree hose), the battery relocation cables are connected at the engine and routed along the tank and up to the battery - these still need to be terminated at the battery.

Once the battery is connected, I can power up the ecm and HP tuners and start doing the basic sensor checkout. I will also pull the plugs and crank the engine over to build oil pressure and purge the air from the fuel rail (returnless, so air must pass through the injectors to purge). Then I need to work on the base tune for the security, larger injectors and maf change... then cross my fingers and see if she will make some noise...

My laptop/netbook (HP 2133 running 32G SSHD and windows XP) died yesterday - black screen of death, so with the help of google I tore it down to the motherboard and placed it in the oven at 395 degrees for 8 minutes. Let it cool, reassemble and the laptop is functional again! I know absolutely zero about PC's, but with the help of the internet, the wife is impressed once again at the things I can fix!


I got a laptop with a fubar'd keyboard, put a piece of paper under the ribbon cable, now it works! google FTW indeed!
IP: Logged
fieroguru
Member
Posts: 12307
From: Champaign, IL
Registered: Aug 2003


Feedback score:    (45)
Leave feedback


Total ratings: 259
Rate this member

Report this Post02-02-2013 07:23 PM Click Here to See the Profile for fieroguruSend a Private Message to fieroguruEdit/Delete MessageReply w/QuoteDirect Link to This Post
Finished hooking up the battery and put power to the car and started checking things out.

Never store a gas tank empty... I put a new fuel pump in the tank a couple years ago when I picked up this car and wanted to see if the old 2.8 would run for part out purposes. After that I drained the tank and stored it indoors ever since. Well the fuel pump was locked up and the fuel sender had zero continuity at any setting. So I spent the majority of today dropping the tank, replacing the fuel pump and then cleaning all the electrical terminals in the tank and the sender.

Sunday I will confirm +12V at the ECM/TCM pins as well as the ground connections and then power up the ECM/TCM and hook up HP Tuners.
IP: Logged
fieroguru
Member
Posts: 12307
From: Champaign, IL
Registered: Aug 2003


Feedback score:    (45)
Leave feedback


Total ratings: 259
Rate this member

Report this Post02-03-2013 08:23 PM Click Here to See the Profile for fieroguruSend a Private Message to fieroguruEdit/Delete MessageReply w/QuoteDirect Link to This Post
Fuel tank is back in and pumping gas. All the battery, ignition and ground feeds to the ECM/TCM checked out, so I hooked up HPtuners and did the initial download of the ecm/tcm calibration and worked up a base tune with the following changes...

VATS 1 and VATS 2: both set to Disable. This "should" turn off VATS
MAF Air Flow Frequency (Low): Compared to 07 Vette Table (same MAF I am using) and copied it, then confirmed the difference was 0. For MAF change
MAF Air Flow Frequency (High): Compared to 07 Vette Table and copied it, then confirmed the difference was 0. For MAF change
Injector Flow Rate vs. Pressure: Compared to 07 Vette Table and copied it, then confirmed the difference was 0. For Injector change
Tach Output- Tach Type. Originally was set for serial, the TBSS was Frequency so I changed it to Frequency. I "hope" this will enable the direct tach output like the TBSS has
ETC Scalar - Change to 4725 for 90mm TB
Effective Area Max - Changed to 8191 for 90mm TB
Effective Area Min - Changed to 0
Effective Area Min Fail - Changed to 5
RPM Limits - Extreme Cutoff - Changed to 6800
RPM Limits - Extreme Resume - Changed to 6720
Cutoff RPM vs. Gear - Changed all values to 6800
Cat Over Temp Protection: Disabled. I don't have a cat and this adds 25% fuel to protect the cat under certain conditions
Displacement On Demand: Disabled - it need to be off for all tuning. I will turn it back on at a later date
DoD RPM Thresholds - Min RPM: Changed to 1600 rpm. I only want it to work in 5th/6th gears between 45 and 80 mph
DoD RPM Thresholds - Max RPM: Changed to 2300 rpm. I only want it to work in 5th/6th gears between 45 and 80 mph
DoD Enable VSS: changed to 45 mph
DoD Disable vs PRNDL: D4 was 0, so I changed everything to 0 so DoD shouldn't care what the range switch says, even though the TCM is hard wired to show D4
DoD Disable vs Gear: 3rd gear and 4th gear were set to 0, so I changed 3rd gear to 1 and 5th and 6th gears to 0. No idea if this will work, but I changed it anyway
Engine Torque Management Spark: Disabled. I don't want any torque management
Engine Torque Management ETC: Disabled. Same reason
Transmission Diff Score: Disabled
Transmission Abuse Mode Torque Reductions vs. RPM: Set every value to 0 - no torque reductions
Transmission Abuse Mode Torque Reductions Duration vs. transmission temp: Set every value to 0 - no torque reductions
Starter Diag: Disabled. Using Fiero starter control
Clutch Interlock: Disabled. Using Fiero clutch pedal wiring
Number of Fans: Set to 1
Ignition off run time: set to 60 seconds. Reduced from 360 seconds due to my smaller battery
Speedometer - Tire Size: Set to 24.6
Speedometer - Gear Ratio: set to 3.55. F40 final drive ratio
Speedometer - VSS PP Rev: set to 78. # of teeth for F40 VSS
Speedometer - VSS PP Rev - Trans: set to 78. # of teeth for F40 VSS
Speedometer - VSS PP Mile: set to 63949
Speedometer - Revs per Dist (1 mile): Set to 819.86
Speedometer - Revs per Dist (1 mile) - trans: Set to 819.86
Speed Limiter (fuel cut off): Changed to 200mph
Speed Limiter 2 (fuel cut off): Changed to 200mph

The below Diagnostic Trouble Codes were turned off for missing components from the installation (Evap, Fuel Pressue, Post Cat O2 sensor, Cat, etc)
P0036 - HO2S Heater Control Circuit Bank 1 Sensor 2 - Turned off
P0054 - HO2S Heater Resistance Bank 1 Sensor 2 - Turned off
P0137 - HO2S Circuit Low Voltage Bank 1 Sensor 2 - Turned off
P0138 - HO2S Circuit High Voltage Bank 1 Sensor 2 - Turned off
P0140 - HO2S Circuit Insufficient Activity Bank 1 Sensor 2 - Turned off
P0141 - HO2S Heater Performance Bank 1 Sensor 2 - Turned off
P0420 - Catalyst System Low Efficiency - Turned off
P0422 - Evaporative Emission System Small Leak Detected - Turned off
P0443 - Evap Purge Solenoid Valve 1 Control CKT - Turned off
P0446 - Evap Vent Solenoid Valve Control System - Turned off
P0449 - Evaporative Emission Vent Solenoid Control Circuit - Turned off
P0451 - Evaporative Emission Control System Pressure Sensor Range - Turned off
P0452 - Fuel Tank Pessure Sensor Circuit Low Voltage - Turned off
P0453 - Fuel Tank Pessure Sensor Circuit High Voltage - Turned off
P0454 - Evaporative Emission Control System Pressure Sensor Intermittent - Turned off
P0455 - Evaporative Emission System Leak Detected - Turned off
P0461 - Fuel Level Sensor Performance - Turned off
P0462 - Fuel Level Sensor Circuit Low Voltage - Turned off
P0463 - Fuel Level Sensor Circuit Low Voltage - Turned off
P0464 - Fuel Level Sensor Circuit Intermittent - Turned off
P0481 - Cooling Fan Relay 2 Control - Turned off
P0496 - Evaporative Emission System High Purge Flow - Turned off
P2544 - Torque Management Request Input Signal A - Turned off
P2A01 - O2 Sensor Circuit Range/Performance Bank 1 Sensor 2 - Turned off

Once all these changed were saved, I did a Write Entire to the ECM/TCM.

After I pulled the plugs and cranked the engine to build up oil pressure, I had several DTC's.
0315 - needs a case learn - need to have the engine running to perform it, but some say you can do it with a manual transmission. This will wait till it is running
0340 - Camshaft Sensor - need to run through the sensor/harness diagnostics on this one. Wiring, sensor or ECM issue
0557 - Brake Booster Sensor. I didn't have the connected plugged in
1516 - TAC Control - need to run through the sensor/harness diagnostics on this one. Wiring, Throttle Body or ECM issue
2101 - TAC Control - need to run through the sensor/harness diagnostics on this one. Same as above.

When I tried to start the engine after revision 2 of the tune, the fuel pump primed for about 1/2 second (should be 2 seconrs) then shuts off. The engine cranks without starting... I need to listen better to see if the fuel pump is working while it is cranking and check for spark at the coils. I suspect it is due to the cam sensor issue and the engine not knowing which cylinder is ready for fuel/ignition.

I am please that the mini battery has been able to spin this engine quite a bit to both prime the oil (about 1 minute of cranking) and to crank the engine (for another minute or two).

[This message has been edited by fieroguru (edited 02-05-2013).]

IP: Logged
mwhite
Member
Posts: 47
From: Caledon, Ontario, Canada
Registered: Jan 2008


Feedback score: N/A
Leave feedback

Rate this member

Report this Post02-03-2013 11:21 PM Click Here to See the Profile for mwhiteSend a Private Message to mwhiteEdit/Delete MessageReply w/QuoteDirect Link to This Post
Your getting close... Don't expect to have a spark until the cam sensor is working, unless you can put the ECM into wasted spark. I don't think wasted spark is an option for your ECM.
Can't wait till you post some audio of that engine running
IP: Logged
PFF
System Bot
Kemp3
Member
Posts: 282
From: Carmel Valley CA, USA
Registered: Sep 2007


Feedback score: (1)
Leave feedback

Rate this member

Report this Post02-04-2013 10:20 PM Click Here to See the Profile for Kemp3Send a Private Message to Kemp3Edit/Delete MessageReply w/QuoteDirect Link to This Post
I bet there is a limp mode that puts fuel into batch fire and spark into wasted and a locked timming table
IP: Logged
fieroguru
Member
Posts: 12307
From: Champaign, IL
Registered: Aug 2003


Feedback score:    (45)
Leave feedback


Total ratings: 259
Rate this member

Report this Post02-05-2013 03:17 PM Click Here to See the Profile for fieroguruSend a Private Message to fieroguruEdit/Delete MessageReply w/QuoteDirect Link to This Post
With the case learn code (ECM hasn't verified crankshaft position) and the Cam Sensor code, there is no good information for the ecm to determine spark or fuel timing to the mechanical timing of the cylinders/valve movements, so I am pretty sure the ECM has those fucntions disabled until the cam sensor issue is addressed. Maybe if the case learn was complete and it has confirmed location of the crankshaft timing, then maybe is one of the other sensors faults out it could do batch fire and waste spark.

I revised the list of program changes and added all the DTC I have turned off for the missing parts.

Maybe in the next day or two I will have time to figure out the Cam Sensor issue.
IP: Logged
ennored
Member
Posts: 99
From: Pontiac, Michigan
Registered: Jan 2012


Feedback score: N/A
Leave feedback

Rate this member

Report this Post02-05-2013 05:38 PM Click Here to See the Profile for ennoredSend a Private Message to ennoredEdit/Delete MessageReply w/QuoteDirect Link to This Post
315 CASE learn code is for misfire. It's used to learn the fine variations the crank sensor sees that are normal. It's done during coast with the injectors off. Shouldn't keep it from running. I'm a bit out of my element though, do you know what GM software you have?
IP: Logged
fieroguru
Member
Posts: 12307
From: Champaign, IL
Registered: Aug 2003


Feedback score:    (45)
Leave feedback


Total ratings: 259
Rate this member

Report this Post02-05-2013 06:29 PM Click Here to See the Profile for fieroguruSend a Private Message to fieroguruEdit/Delete MessageReply w/QuoteDirect Link to This Post
 
quote
Originally posted by ennored:

315 CASE learn code is for misfire. It's used to learn the fine variations the crank sensor sees that are normal. It's done during coast with the injectors off. Shouldn't keep it from running. I'm a bit out of my element though, do you know what GM software you have?


Agreed. I know it is a cam sensor issue at the moment.

E67 ECM with 12609256 OS, T42 TCM with 12590424 OS
IP: Logged
Kemp3
Member
Posts: 282
From: Carmel Valley CA, USA
Registered: Sep 2007


Feedback score: (1)
Leave feedback

Rate this member

Report this Post02-05-2013 09:19 PM Click Here to See the Profile for Kemp3Send a Private Message to Kemp3Edit/Delete MessageReply w/QuoteDirect Link to This Post
I dont know if this is your problem , the cam sensor is wired opposite of the crank sensor. I bet you have connector views but I remember freaking out when I was toning all grounds and 12v references . Then I checked the alldata connector views and they aren't the same, so all was right in the long run.

[This message has been edited by Kemp3 (edited 02-05-2013).]

IP: Logged
fieroguru
Member
Posts: 12307
From: Champaign, IL
Registered: Aug 2003


Feedback score:    (45)
Leave feedback


Total ratings: 259
Rate this member

Report this Post02-07-2013 07:21 PM Click Here to See the Profile for fieroguruSend a Private Message to fieroguruEdit/Delete MessageReply w/QuoteDirect Link to This Post
 
quote
Originally posted by Kemp3:

I dont know if this is your problem , the cam sensor is wired opposite of the crank sensor. I bet you have connector views but I remember freaking out when I was toning all grounds and 12v references . Then I checked the alldata connector views and they aren't the same, so all was right in the long run.


I do have connector views for every sensor and found a few typos in the service manual (mostly in the circuit #'s). When I tore apart the harness, I labeled every ecm termination and coiled up the sensor wires/connectors. I also made an excel cheat sheet based on the service manual ECM/TCM terminations and the connector end views. Then when I terminated the wires at the ECM/TCM I checked the label and the cheat sheet for consistency and double checked the pin locations once they were inserted into the ECM/TCM connectors. I don't expect any actual wiring issues for the main engine sensors, but I could run across issues with the things I changed (MAF, TB) or the ones I added another connector (like the DBW pedal harness).

I checked the wiring for the camshaft sensor and everything checked out. A new camshaft sensor is on order.

Also, ordered some aluminum spacers for the terminals on the battery to make it easier to put some jumper cables on them.

For the E67 guys, this thread is a good intro to tuning with HP Tuners and covers the basics (with screen shots) and even tuning AFM/DoD. It is focused on the E38 ECM which is the sister of the E67 ECM and both are quite similar in function. I copied the main parts into a word document...
http://forum.grrrr8.net/showthread.php?t=20813

IP: Logged
Jims88
Member
Posts: 268
From: Kalamazoo MI
Registered: Jul 2011


Feedback score: (1)
Leave feedback

Rate this member

Report this Post02-09-2013 10:33 PM Click Here to See the Profile for Jims88Send a Private Message to Jims88Edit/Delete MessageReply w/QuoteDirect Link to This Post
 
quote
[B]Originally posted by fieroguru

For the E67 guys, this thread is a good intro to tuning with HP Tuners and covers the basics (with screen shots) and even tuning AFM/DoD. It is focused on the E38 ECM which is the sister of the E67 ECM and both are quite similar in function. I copied the main parts into a word document...
http://forum.grrrr8.net/showthread.php?t=20813


Intresting link fieroguru,
looks like I will be doing some more reading.
IP: Logged
fieroguru
Member
Posts: 12307
From: Champaign, IL
Registered: Aug 2003


Feedback score:    (45)
Leave feedback


Total ratings: 259
Rate this member

Report this Post02-10-2013 02:48 PM Click Here to See the Profile for fieroguruSend a Private Message to fieroguruEdit/Delete MessageReply w/QuoteDirect Link to This Post
IT LIVES! (yes, I am shouting)

The throttle body has 2 TPS sensors and I had the signal wires switched between them. I still need to confirm if they are different between the LS4/LS2 throttle body, if I made a bad assumption during the conversion, or if I just wired them wrong. These two wires switched, kept the ECM from priming the fuel pump for the full 2 seconds and would stop after 1/2 second. The TB also would not move with a push of the pedal, so I hooked up the scanner looking at the TPS readings and moved the throttle body blade by hand and the sensor values went the wrong way. On a whim I took the connector end at the throttle body, switched the two wires and the throttle body worked. Then with a twist of the key the fuel pump primed the full 2 seconds and the engine started.

Need to put coolant in the engine and fluid in the tranny so I can run it longer and continue to work on a few issues.
IP: Logged
ericjon262
Member
Posts: 3109
From: everywhere.
Registered: Jan 2010


Feedback score:    (10)
Leave feedback


Total ratings: 67
Rate this member

Report this Post02-10-2013 04:17 PM Click Here to See the Profile for ericjon262Send a Private Message to ericjon262Edit/Delete MessageReply w/QuoteDirect Link to This Post
 
quote
Originally posted by fieroguru:

IT LIVES! (yes, I am shouting)

The throttle body has 2 TPS sensors and I had the signal wires switched between them. I still need to confirm if they are different between the LS4/LS2 throttle body, if I made a bad assumption during the conversion, or if I just wired them wrong. These two wires switched, kept the ECM from priming the fuel pump for the full 2 seconds and would stop after 1/2 second. The TB also would not move with a push of the pedal, so I hooked up the scanner looking at the TPS readings and moved the throttle body blade by hand and the sensor values went the wrong way. On a whim I took the connector end at the throttle body, switched the two wires and the throttle body worked. Then with a twist of the key the fuel pump primed the full 2 seconds and the engine started.

Need to put coolant in the engine and fluid in the tranny so I can run it longer and continue to work on a few issues.


Congrats!! got a video yet???

------------------
I know these lines Look crooked on paper, but I swear I've got them straight in my head.

Built not bought...

https://www.fiero.nl/forum/Forum2/HTML/119122.html

IP: Logged
fieroguru
Member
Posts: 12307
From: Champaign, IL
Registered: Aug 2003


Feedback score:    (45)
Leave feedback


Total ratings: 259
Rate this member

Report this Post02-10-2013 06:48 PM Click Here to See the Profile for fieroguruSend a Private Message to fieroguruEdit/Delete MessageReply w/QuoteDirect Link to This Post
 
quote
Originally posted by ericjon262:
Congrats!! got a video yet???


Now I do!

Here is a video of the throttle body in action:


Here is the first start with a nasty lope... I set off the garage smoke alarms...


Here is how it idles after a couple of throttle blips... I rattled the glasses in the kitchen on this one. I need to work on the ETC settings to close the throttle faster.


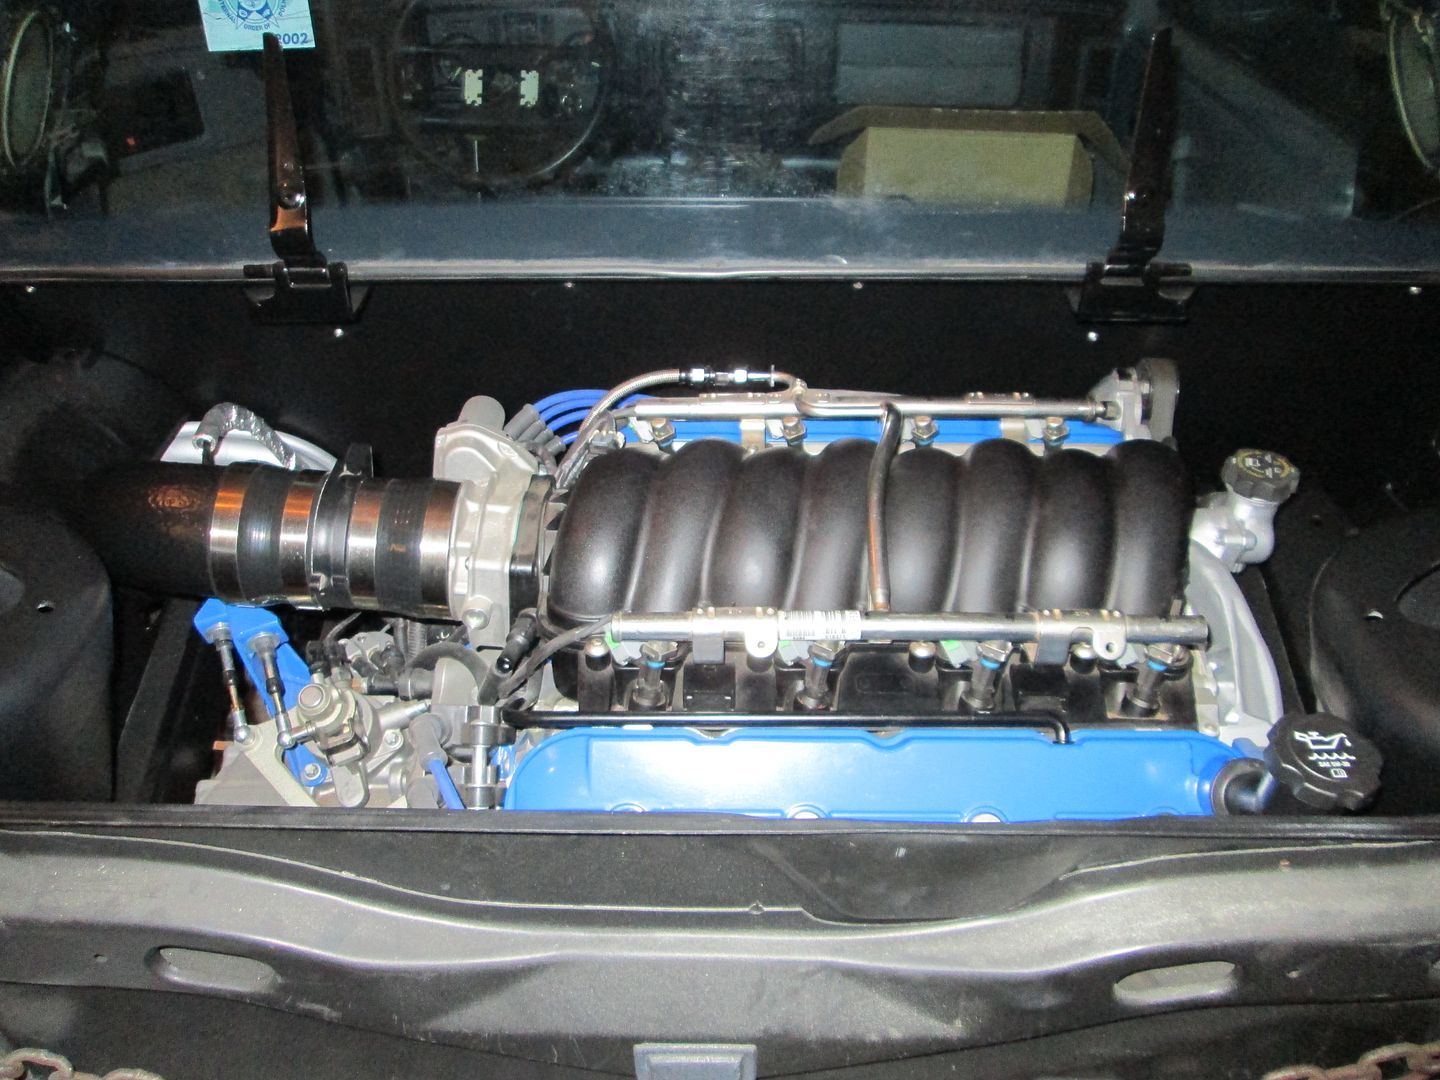
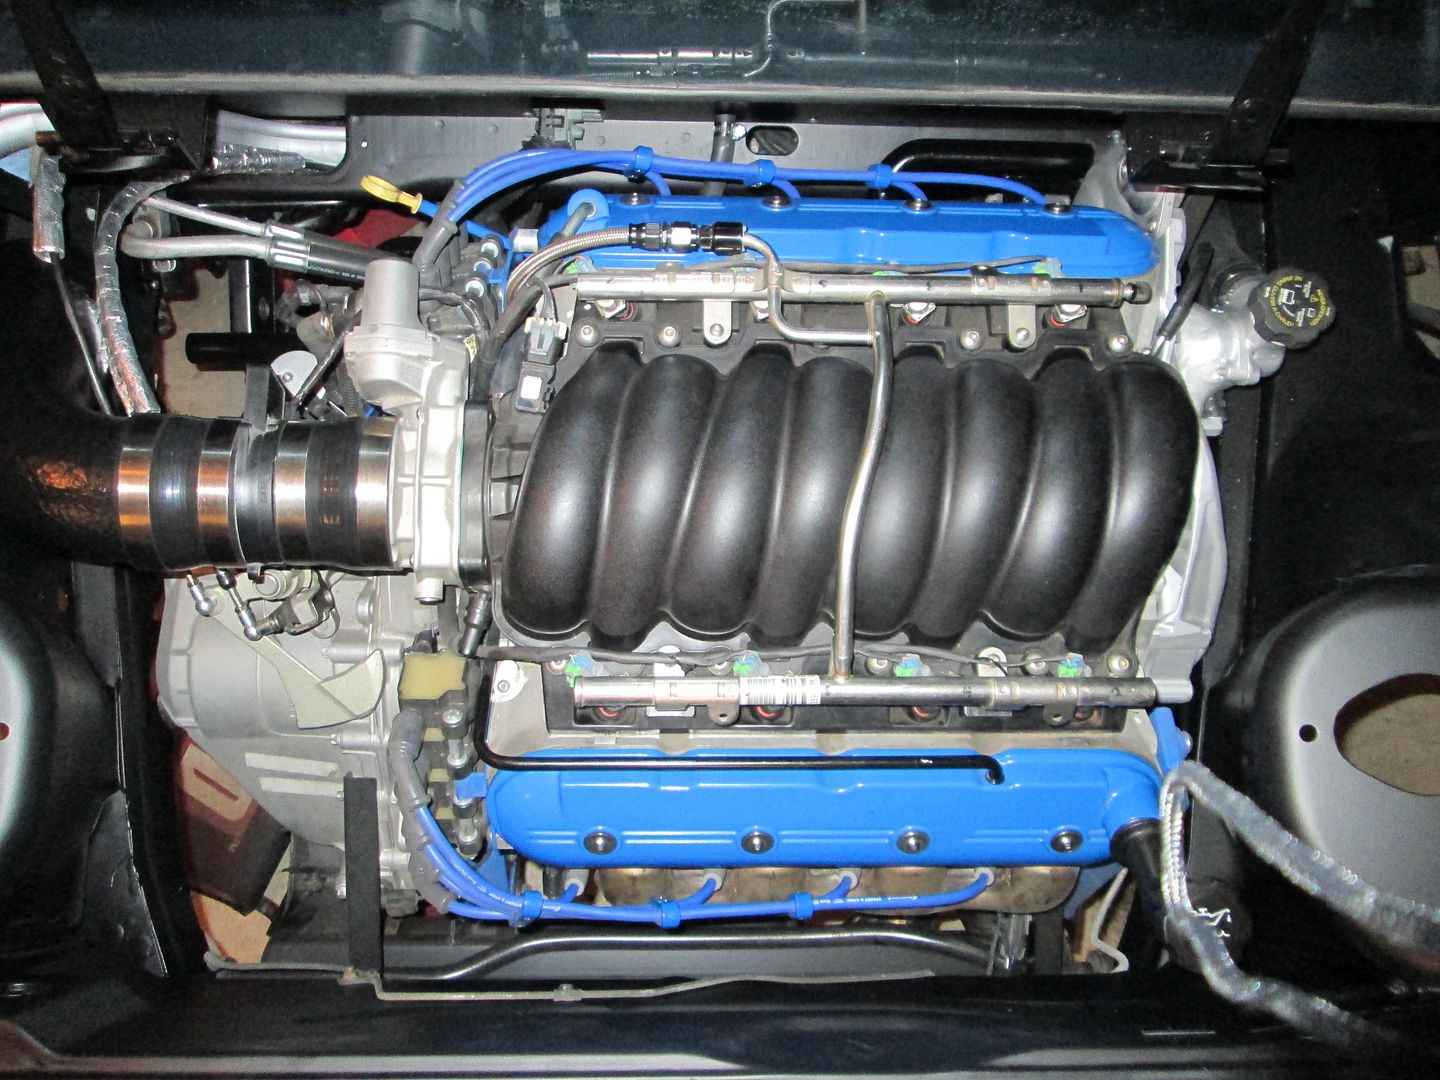
Here are a couple of pictures of the engine bay:

IP: Logged
PFF
System Bot
ZombiePenguin
Member
Posts: 200
From: Fort Wayne, IN, USA
Registered: Mar 2010


Feedback score: N/A
Leave feedback

Rate this member

Report this Post02-10-2013 07:11 PM Click Here to See the Profile for ZombiePenguinSend a Private Message to ZombiePenguinEdit/Delete MessageReply w/QuoteDirect Link to This Post
Looks good in the pics, can't see any links or the video itself, are they on YouTube?

Been following closely this entire build.
IP: Logged
fieroguru
Member
Posts: 12307
From: Champaign, IL
Registered: Aug 2003


Feedback score:    (45)
Leave feedback


Total ratings: 259
Rate this member

Report this Post02-10-2013 07:17 PM Click Here to See the Profile for fieroguruSend a Private Message to fieroguruEdit/Delete MessageReply w/QuoteDirect Link to This Post
 
quote
Originally posted by ZombiePenguin:

Looks good in the pics, can't see any links or the video itself, are they on YouTube?

Been following closely this entire build.


I can see them, but they are on You Tube. Just search for fieroguru and LS4.
IP: Logged
Jims88
Member
Posts: 268
From: Kalamazoo MI
Registered: Jul 2011


Feedback score: (1)
Leave feedback

Rate this member

Report this Post02-10-2013 07:45 PM Click Here to See the Profile for Jims88Send a Private Message to Jims88Edit/Delete MessageReply w/QuoteDirect Link to This Post
Music to the ears!
Well Done fieroguru!!!!!!!!!!!!!!
IP: Logged
Trinten
Member
Posts: 1393
From: Mebane, N.C.
Registered: Sep 2008


Feedback score:    (8)
Leave feedback

Rate this member

Report this Post02-10-2013 08:04 PM Click Here to See the Profile for TrintenSend a Private Message to TrintenEdit/Delete MessageReply w/QuoteDirect Link to This Post
Very Awesome!
IP: Logged
ericjon262
Member
Posts: 3109
From: everywhere.
Registered: Jan 2010


Feedback score:    (10)
Leave feedback


Total ratings: 67
Rate this member

Report this Post02-10-2013 09:24 PM Click Here to See the Profile for ericjon262Send a Private Message to ericjon262Edit/Delete MessageReply w/QuoteDirect Link to This Post
I love your coil setup, it's so much cleaner then anything else I've seen on a LSX motor!

------------------
I know these lines Look crooked on paper, but I swear I've got them straight in my head.

Built not bought...

https://www.fiero.nl/forum/Forum2/HTML/119122.html

IP: Logged
FieroMaster88
Member
Posts: 7680
From: Mattawan, MI
Registered: Nov 2000


Feedback score:    (43)
Leave feedback


Total ratings: 168
Rate this member

Report this Post02-10-2013 11:48 PM Click Here to See the Profile for FieroMaster88Send a Private Message to FieroMaster88Edit/Delete MessageReply w/QuoteDirect Link to This Post
Congrats! That's one clean swap.
IP: Logged
X-Body
Member
Posts: 12
From: Idaho
Registered: Dec 2010


Feedback score: N/A
Leave feedback

Rate this member

Report this Post02-11-2013 12:33 AM Click Here to See the Profile for X-BodySend a Private Message to X-BodyEdit/Delete MessageReply w/QuoteDirect Link to This Post
After a couple years of work, that has to feel real good! Simply awesome build.
IP: Logged
F355spider
Member
Posts: 1870
From: Texas
Registered: Jul 2004


Feedback score: (1)
Leave feedback


Total ratings: 108
Rate this member

Report this Post02-11-2013 06:45 PM Click Here to See the Profile for F355spiderSend a Private Message to F355spiderEdit/Delete MessageReply w/QuoteDirect Link to This Post
I'm dreaming of that day. I don’t think I could ever have my swap that clean.
IP: Logged
rcp builders
Member
Posts: 736
From: north port, Fl.
Registered: Apr 2007


Feedback score: N/A
Leave feedback

Rate this member

Report this Post02-13-2013 10:44 AM Click Here to See the Profile for rcp buildersSend a Private Message to rcp buildersEdit/Delete MessageReply w/QuoteDirect Link to This Post
 
quote
Originally posted by fieroguru:

I think the passenger side coolant tube is figured out.

1" Schedule 40 black pipe is the perfect size for the fiero coolant hoses, so I ordered some butt-weld 90's to start with like this:


Just need to weld on the mounting tab (it is just tacked in place).


Great work!! I'm looking to redo my tube on my SBC from drivers side to stat. I love the hard line idea.
Is that what the rest of the tube that stretches from drivers to stat is, schedule 40?? Thank you, Ray
IP: Logged
fieroguru
Member
Posts: 12307
From: Champaign, IL
Registered: Aug 2003


Feedback score:    (45)
Leave feedback


Total ratings: 259
Rate this member

Report this Post02-13-2013 01:15 PM Click Here to See the Profile for fieroguruSend a Private Message to fieroguruEdit/Delete MessageReply w/QuoteDirect Link to This Post
 
quote
Originally posted by rcp builders:


Great work!! I'm looking to redo my tube on my SBC from drivers side to stat. I love the hard line idea.
Is that what the rest of the tube that stretches from drivers to stat is, schedule 40?? Thank you, Ray


Thanks!

The one you picutred was 16ga, but when I redid it I went with schedule 40 for the tighter bends:


Here is the one from the last SBC I did (I bent this one).


[This message has been edited by fieroguru (edited 02-13-2013).]

IP: Logged
PFF
System Bot
fieroguru
Member
Posts: 12307
From: Champaign, IL
Registered: Aug 2003


Feedback score:    (45)
Leave feedback


Total ratings: 259
Rate this member

Report this Post02-13-2013 08:21 PM Click Here to See the Profile for fieroguruSend a Private Message to fieroguruEdit/Delete MessageReply w/QuoteDirect Link to This Post

fieroguru

12307 posts
Member since Aug 2003
Put the coolant in today and was able to idle the engine for about 30 minutes. The lifter chatter calmed down, but I think either the alternator or water pump is squeaking...

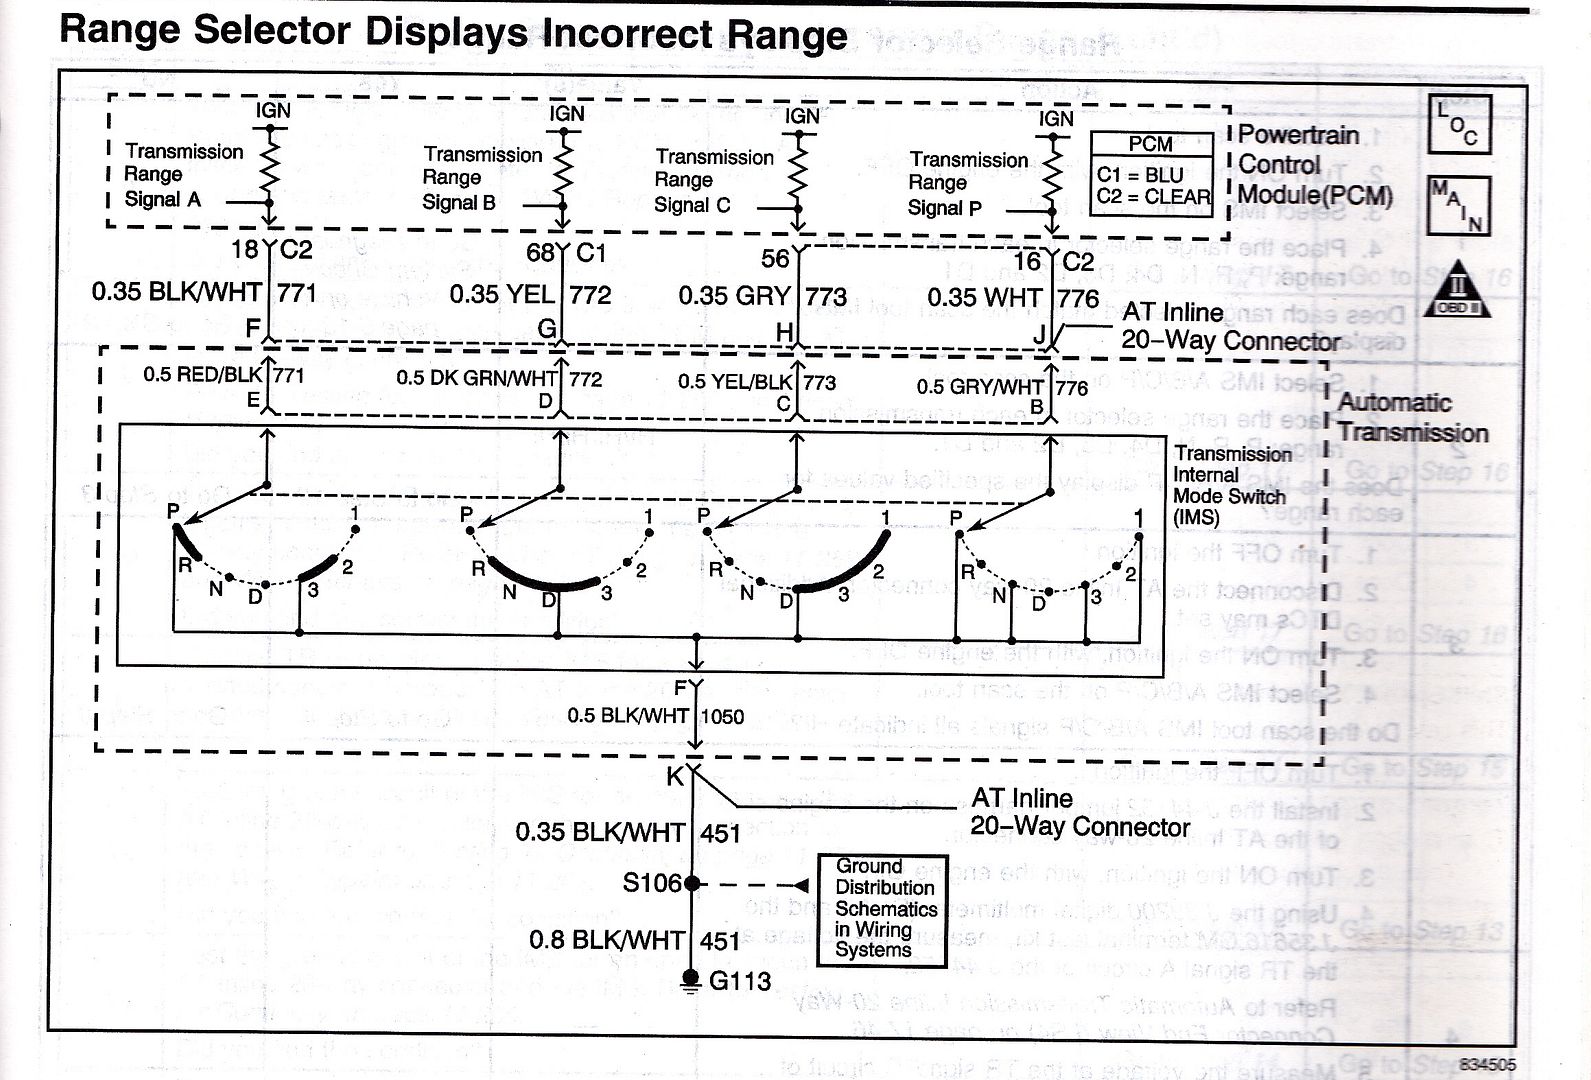
Got a new code the other day P1915 - transmission range not in P/N at engine start. Since I wired the TCM to see D4 all the time, this isn't a surprise. However, this DCT isn't listed under the engine codes and is a TCM code. The issue is currently HP Tuners doesn't have any TCM DCT's listed, so I can't turn this one off.

I wired the TCM to think it was in D all the time because I didn't want to hassle with a bunch of switches to make it change from P/N to D, but since I can't turn off P1915, I took another look:


There are 4 Range signals, A, B, C, & P and they are either open or wired to ground to determine the range selection.
Signal P is always open for every gear and how it is currently wired, so no change needed.
Signal A & B are at the same state for N and D, so no change is needed.
Signal C needs to be Open for N and Grounded for D. It is currently grounded and I need a way to break the circuit by pressing the clutch pedal. The Fiero cruise switch on the clutch pedal has a 2 terminal end that has continuity between the terminals when the clutch pedal is released and it breaks the signal when the clutch pedal is pressed. By wiring one terminal to ground and running a wire from the 2nd one back to the TCM for Range Signal C, the TCM will see N when the clutch is pressed/started and D at all other times.

This switch will also allow me to play with "no lift shift"

The oil bypass plate (that I drilled for the fiero oil sender) has been leaking since startup. I remove the plate and it was the gasket leaking. New felpro gasket is on its way... thinking about taking Vacation from work next week to put a major dent in getting this thing drivable (far from done, just drivable so I can start tuning).

[This message has been edited by fieroguru (edited 02-13-2013).]

IP: Logged
diabloroadster
Member
Posts: 269
From:
Registered: Jan 2011


Feedback score: (3)
Leave feedback

Rate this member

Report this Post02-13-2013 10:06 PM Click Here to See the Profile for diabloroadsterSend a Private Message to diabloroadsterEdit/Delete MessageReply w/QuoteDirect Link to This Post
If that wiring works on the trans, it will greatly help when it comes to tuning. You should be able to really get your tables tuned perfect.
Great work! Looking foward to hearing that LS4 ripping up the highway~
IP: Logged
fieroguru
Member
Posts: 12307
From: Champaign, IL
Registered: Aug 2003


Feedback score:    (45)
Leave feedback


Total ratings: 259
Rate this member

Report this Post02-15-2013 06:07 PM Click Here to See the Profile for fieroguruSend a Private Message to fieroguruEdit/Delete MessageReply w/QuoteDirect Link to This Post
Here is my last video before the car is drivable... I just had to rev it to 6250 to hear how it sounds.


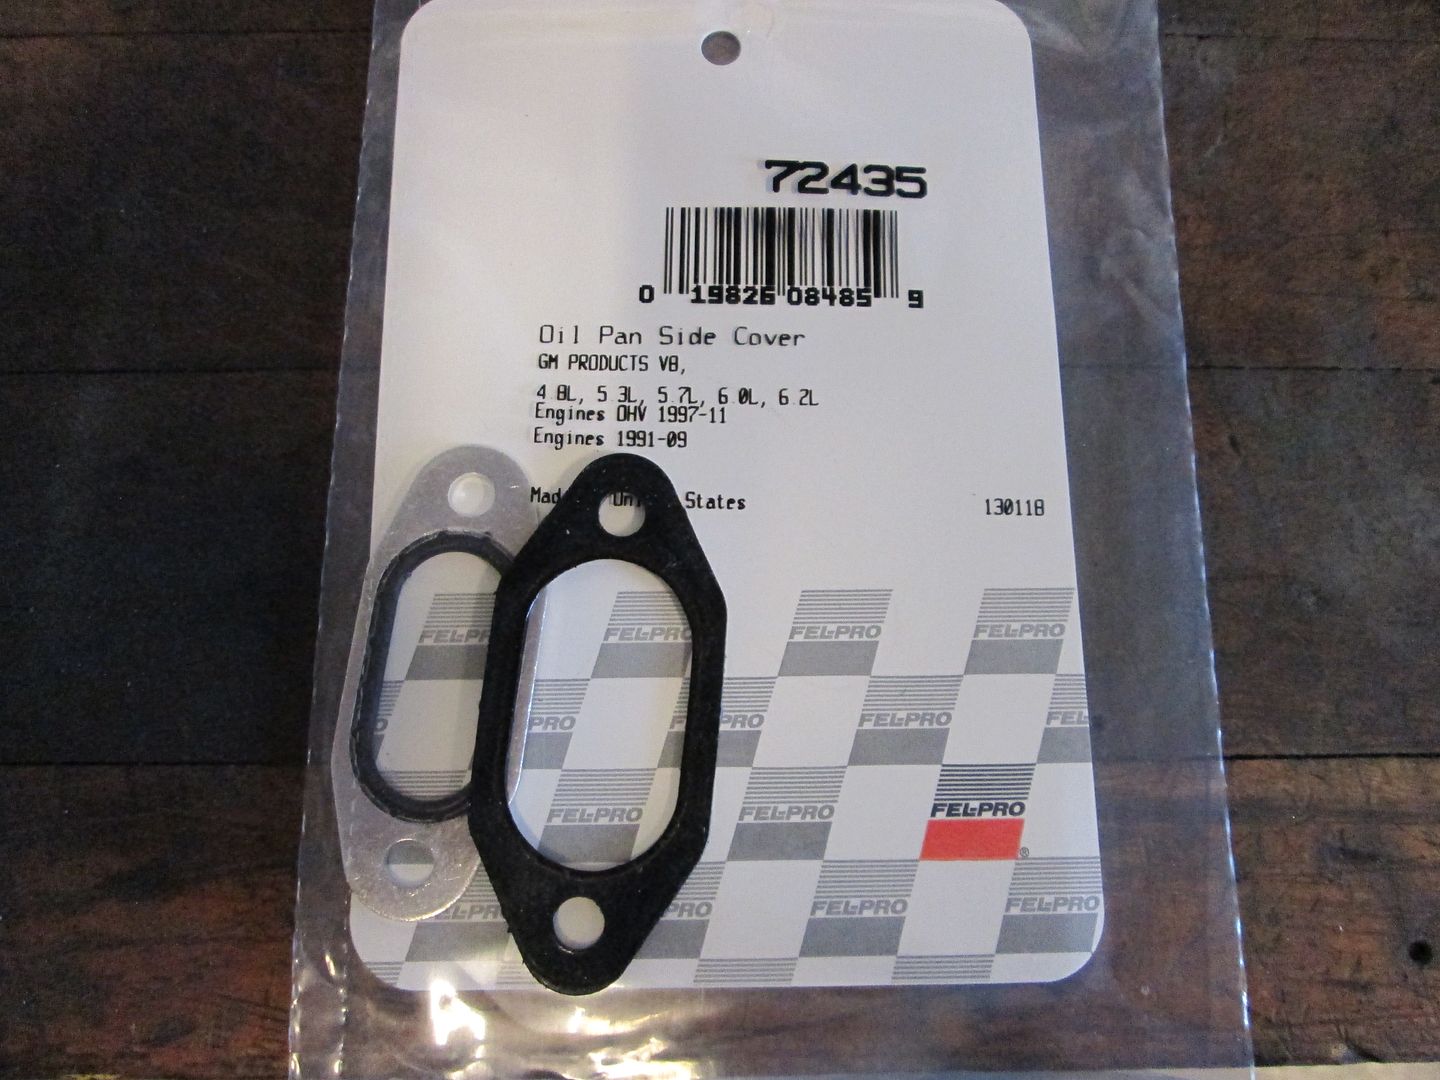
The gasket for the oil cooler cover (right off the oil pan) is wrong... Apparently the LS4 oil cooler cover uses a different gasket than all other LS(x) based engines... even though all the aftermarket suppliers list this wrong fel-pro gasket:
IP: Logged
dratts
Member
Posts: 8373
From: Coeur d' alene Idaho USA
Registered: Apr 2001


Feedback score: N/A
Leave feedback


Total ratings: 118
Rate this member

Report this Post02-15-2013 06:44 PM Click Here to See the Profile for drattsSend a Private Message to drattsEdit/Delete MessageReply w/QuoteDirect Link to This Post
Sounds really good. Mine is just running a cat off the turbo. Sounds more like a muscle car. Since I have mine in a Lambo rebody your sound would be more appropriate for my car. I call it my "Italian muscle car". Good job!
IP: Logged
Jims88
Member
Posts: 268
From: Kalamazoo MI
Registered: Jul 2011


Feedback score: (1)
Leave feedback

Rate this member

Report this Post02-15-2013 07:50 PM Click Here to See the Profile for Jims88Send a Private Message to Jims88Edit/Delete MessageReply w/QuoteDirect Link to This Post
That sounds FANTASTIC!
Driving that?
Fiero version of The Saturn V.
IP: Logged
diabloroadster
Member
Posts: 269
From:
Registered: Jan 2011


Feedback score: (3)
Leave feedback

Rate this member

Report this Post02-15-2013 08:33 PM Click Here to See the Profile for diabloroadsterSend a Private Message to diabloroadsterEdit/Delete MessageReply w/QuoteDirect Link to This Post
I found out the hard way on that oil bypass also, I purchased one of those oil supply adapters for the oil bypass like this:


Didnt fit!
Glad you recieved the ECU/TCM.....
IP: Logged
Rickady88GT
Member
Posts: 10649
From: Central CA
Registered: Dec 2002


Feedback score: N/A
Leave feedback


Total ratings: 202
Rate this member

Report this Post02-15-2013 08:50 PM Click Here to See the Profile for Rickady88GTSend a Private Message to Rickady88GTEdit/Delete MessageReply w/QuoteDirect Link to This Post
 
quote
Originally posted by fieroguru:

Here is my last video before the car is drivable... I just had to rev it to 6250 to hear how it sounds.


Cool, sounds like the belt and ALT have not committed to a long term relationship yet

Just food for thought, I have an "extra" throttle pedal and plan on installing it in the engine bay. Of course I would modify it to look more like a "joy stick" so I can "blip" the throttle from the engine bay. I plan to splice all the wires ( Y them all in) except the Main input to the PCM. That one wire would be on a toggle switch so I can switch between the front pedal and rear pedal. They wont/cant both be wired in at the same time.

IP: Logged
fieroguru
Member
Posts: 12307
From: Champaign, IL
Registered: Aug 2003


Feedback score:    (45)
Leave feedback


Total ratings: 259
Rate this member

Report this Post02-16-2013 07:46 PM Click Here to See the Profile for fieroguruSend a Private Message to fieroguruEdit/Delete MessageReply w/QuoteDirect Link to This Post
 
quote
Originally posted by Rickady88GT:

Just food for thought, I have an "extra" throttle pedal and plan on installing it in the engine bay. Of course I would modify it to look more like a "joy stick" so I can "blip" the throttle from the engine bay. I plan to splice all the wires ( Y them all in) except the Main input to the PCM. That one wire would be on a toggle switch so I can switch between the front pedal and rear pedal. They wont/cant both be wired in at the same time.


An engine bay throttle lever would be cool

Picked up some gasket material and cut a new gasket for the oil cooler bypass plate. Then added a wire to the harness and connected it to the Fuel Tank Pressure input. This is 0-5V and isn't being used for the Evap system, so I will use it for the input of the wideband. Lastly mounted the C4 Vette seat in the car, so now I can sit in the thing. On Sunday I will wire up the clutch switch and the wideband.
IP: Logged
Yarmouth Fiero
Member
Posts: 530
From: Yarmouth, Nova Scotia, Canada
Registered: May 2012


Feedback score: N/A
Leave feedback

Rate this member

Report this Post02-17-2013 08:48 AM Click Here to See the Profile for Yarmouth FieroSend a Private Message to Yarmouth FieroEdit/Delete MessageReply w/QuoteDirect Link to This Post
Amazing project. Pure inspiration for the rest of us to follow with our own builds and engine swaps. Chalk up one for the V8 guys.
IP: Logged
Previous Page | Next Page

This topic is 51 pages long:  1   2   3   4   5   6   7   8   9   10   11   12   13   14   15   16   17   18   19   20   21   22   23   24   25   26   27   28   29   30   31   32   33   34   35   36   37   38   39   40   41   42   43   44   45   46   47   48   49   50   51 
next newest topic | next oldest topic

All times are ET (US)

Post New Topic  Post A Reply
Hop to:

Contact Us | Back To Main Page

Advertizing on PFF | Fiero Parts Vendors
PFF Merchandise | Fiero Gallery
Real-Time Chat | Fiero Related Auctions on eBay


Copyright (c) 1999, C. Pennock