Quick question, How do you plan on getting to the belts in the future or replace water pump, alternator, timing belt? But looks like a good challenge. I wish you the best results with this project. already subscribed
Quick question, How do you plan on getting to the belts in the future or replace water pump, alternator, timing belt? But looks like a good challenge. I wish you the best results with this project. already subscribed
I am going to have to move the alternator and A/C compressor down low and closer to the block because of clearance issues with the firewall and hinge boxes. The waterpump is inside the timing covers and is driven by the timing belt. I will be replacing both before final engine install. I am making an access panel in the firewall where the ECM used to live to get to a couple things but a waterpump failure will result in me having to drop the engine out to repair. I'll have some more pics to post later in the week.
Looking good !!!! I wouldnt even mess with the factory engine management, Megasquirt all the way...
Megasquirt is only an engine management system. It can't shift an auto trans and I know of no stand alone trans controller that can shift this unit.. I believe that the installer has no choice but to try and work with the factory OBDII PCM. If he is using the OEM PCM on a matched powertain it should work but there would be many codes to delete and getting the VATS out might not be easy. You've got to give credit to anyone that attempts a swap like this.When all is said and done he should get have similar performanceto to a GM 3900.
------------------ " THE BLACK PARALYZER" -87GT 3800SC Series III engine, custom ZZP /Frozen Boost Intercooler setup, 3.4" Pulley, Powerlog manifold, Northstar TB, LS1 MAF, 3" Flotech Afterburner Exhaust, Autolite 104's, MSD wires, Custom CAI, 4T65eHD w. custom axles, HP Tuners VCM Suite. "THE COLUSSUS" 87GT - ALL OUT 3.4L Turbocharged engine, Garrett Hybrid Turbo, MSD ign., modified TH125H " ON THE LOOSE WITHOUT THE JUICE "
Megasquirt is only an engine management system. It can't shift an auto trans and I know of no stand alone trans controller that can shift this unit.. I believe that the installer has no choice but to try and work with the factory OBDII PCM. If he is using the OEM PCM on a matched powertain it should work but there would be many codes to delete and getting the VATS out might not be easy. You've got to give credit to anyone that attempts a swap like this.When all is said and done he should get have similar performanceto to a GM 3900.
I thought I saw this same drivetrain in a kit car project a while back and it was running megasquirt/megashift. I know it will control the 41te, so Im betting that there is someone out there that could make it work. A microsquirt/megashift combo would be a sweet place to start. One never knows what direction the builder has in mind, it very might well be nothing about performance and all about doing something different.....
I was looking into using the megasquirt and megashift to control everything. The 41TE is pretty much the same electrically as the 42LE so it would be an easy deal. The problem with the megasquirt is controlling coil-on-plug ignition. There was supposed to be a sequencer in development for that but it didn't look like it was going to come to fruition. Also, I have read somewhere that the megasquirt fuel injector MOSFET's can overheat and burn out.
In 2002 Chrysler combined the TCM and the PCM so I only have 1 computer to deal with on mine. The great thing about having a complete running donor car was I could do some experimenting and determine that, even with all of the other modules disconnected from the CAN BUS, the engine ran fine and the cluster still worked and I didn't get the dreaded "NO BUS" error message. So in the end, I have decided to use the factory computer, it should work fine for me, and there are a few places that can remove the immobilizer programming as well as remove traction control, etc for less than what a stand-alone system would cost me.
My main drive on the project was just to do something that has never been done before. Although, with 253HP and 250 ft lbs of torque, the Chrysler engine should make the Fiero scoot pretty well.
[This message has been edited by seajai (edited 11-16-2012).]
I was looking into using the megasquirt and megashift to control everything. The 41TE is pretty much the same electrically as the 42LE so it would be an easy deal. The problem with the megasquirt is controlling coil-on-plug ignition. There was supposed to be a sequencer in development for that but it didn't look like it was going to come to fruition. Also, I have read somewhere that the megasquirt fuel injector MOSFET's can overheat and burn out.
In 2002 Chrysler combined the TCM and the PCM so I only have 1 computer to deal with on mine. The great thing about having a complete running donor car was I could do some experimenting and determine that, even with all of the other modules disconnected from the CAN BUS, the engine ran fine and the cluster still worked and I didn't get the dreaded "NO BUS" error message. So in the end, I have decided to use the factory computer, it should work fine for me, and there are a few places that can remove the immobilizer programming as well as remove traction control, etc for less than what a stand-alone system would cost me.
My main drive on the project was just to do something that has never been done before. Although, with 253HP and 250 ft lbs of torque, the Chrysler engine should make the Fiero scoot pretty well.
If you cant get the factory PCM working let me know, I can help you get a megasquirt /msd6010 together that should work with the coil on plug setup. Im currently working with a Microsquirt2 only running both the fuel and spark on a LS1 off the stock crank trigger & waste spark. But my experience (very little) is only with LS engines, although I know some folks that are genius's with this stuff. Good luck with your project!
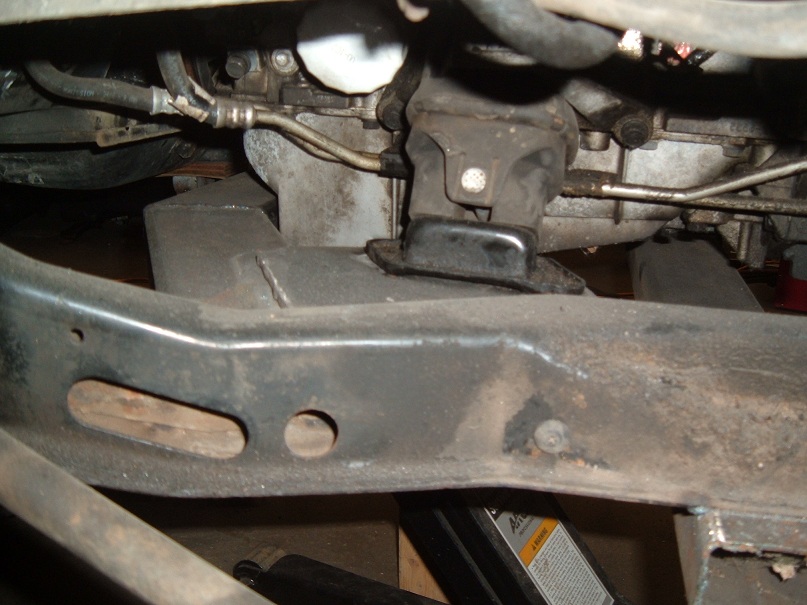
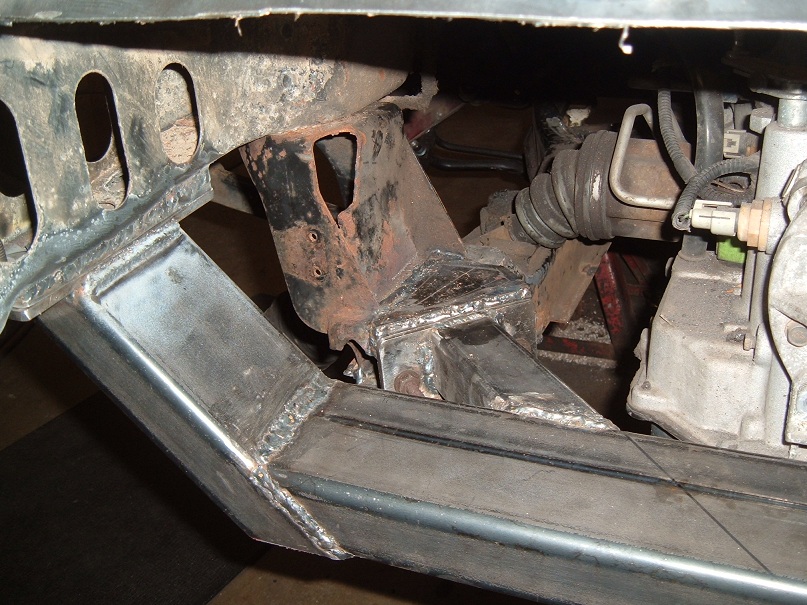
Making a little more progress in the fabrication of new crossmembers and engine mounts. Here is a pic of the new front crossmember tacked in place, it comes off of the angled front part of the cradle at a 90deg angle and has two 15deg angles to get around the front of the oil pan. It is made using 1/8" wall 2x4 square tubing.
The engine mount plates are cut from 1/4" thick plate and have a lap joint on the crossmember and are butt welded to the cradle. I will be adding gussets when I remove the cradle for final welding.
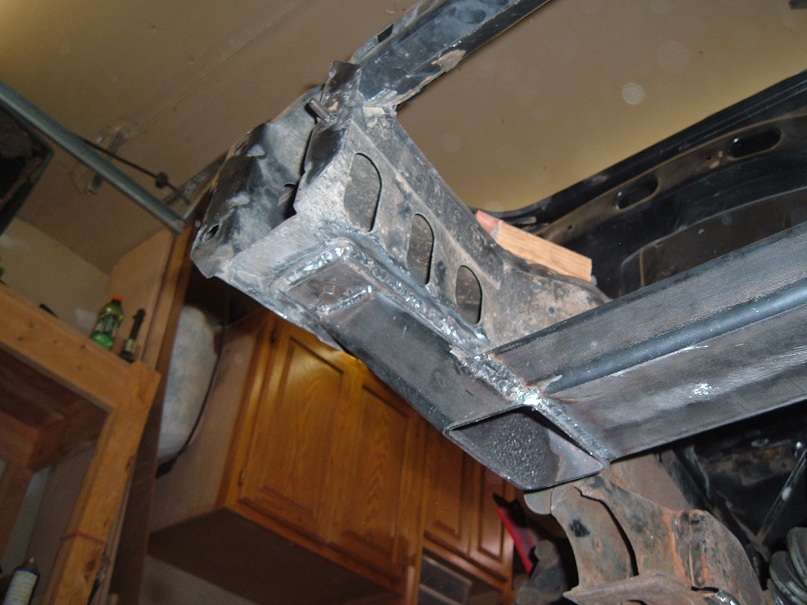
The transmission mount is about 8" back from the end of the cradle. I felt that it was too far back and I didn't want to cantilever a crossmember back and around to pick up the load of the transmission thinking that it may sag over time. So my solution was to make a separate trans crossmember and attach it to the rear frame rails. The bottom of the rail was plated as well as the crossmember and the two are bolted together. This will allow me to remove the transmission if needed without removing the engine or the cradle.
I'm open to suggestions on this part, I want to tie the rear portion of the cradle into my new crossmember. I was thinking about a couple pieces of 2x2 square tubing set in at a 45deg angle from the lower end of the cradle to the transmission crossmember. These would be plated as well so the crossmember can be removed. Do you think that would pick up the cornering loads on the cradle properly? I would like to avoid having to make an arch over the top of the transmission. I have the room but am concerned about having enough room for mufflers and exhaust, but ultimately want to do whatever is best.
[This message has been edited by seajai (edited 09-28-2023).]
Very interesting !! Just one question ... Looks like your welding the cross member in are you welding that to the bolt in cradle ?? Cause the back looks like your welding it to the car if you are how are you going to remove the motor ? This looks like a great swap hope this works good !!
Very interesting !! Just one question ... Looks like your welding the cross member in are you welding that to the bolt in cradle ?? Cause the back looks like your welding it to the car if you are how are you going to remove the motor ? This looks like a great swap hope this works good !!
~Tom
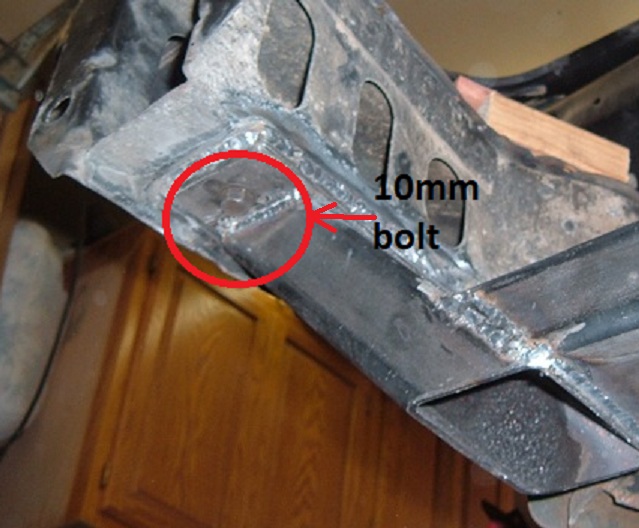
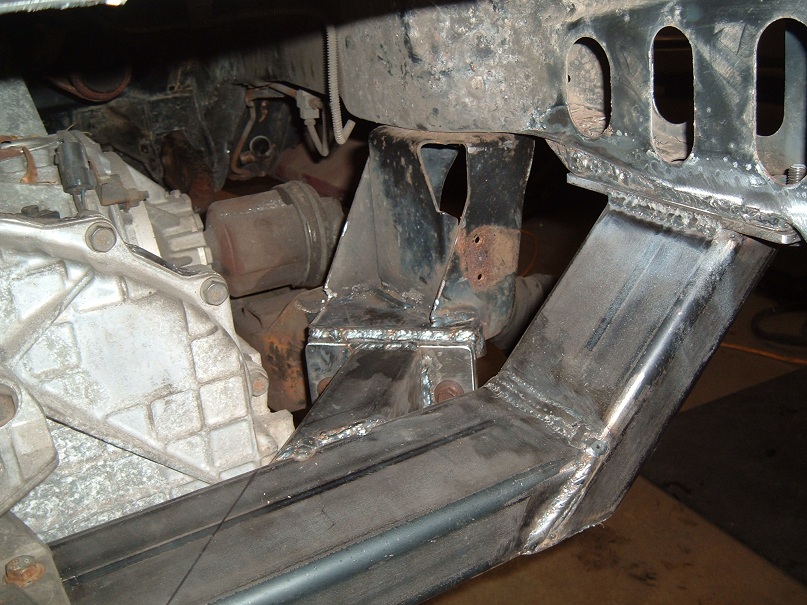
The transmission cross member is bolted to the body so it is removable. I made two 1/4" thick plates, drilled and bolted them together and welded the nut to the top plate, I then unbolted the plates. After the lower plate was welded to the car, I reinstalled the top plate to the cross member to align it. The cross member was positioned in the car and the top plates were tacked to the rails. I pulled out the bolts and removed the cross member, and the top plates were finish welded to the body. There are four 10 x 1.5MM bolts holding it in place.
I gotta give a huge thanks to my brother for helping me on this phase of the project. His equipment and welding experience was the only way it was going to happen. I'm a woodworker, so I have design and fab skills, just not with metal. And my welding skills, well, let's just say I need a little more practice.
[This message has been edited by seajai (edited 09-28-2023).]
I wonder if the 3.3 out of the dodge intrepid will work. I had one and those were bullet proof engines. To bad the Transmissions where weak on those cars. No matter how much you take care of them they where junk.
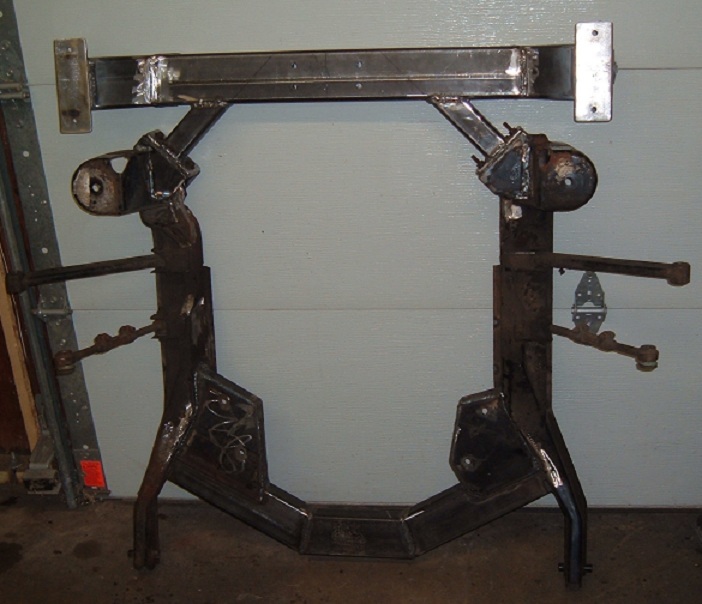
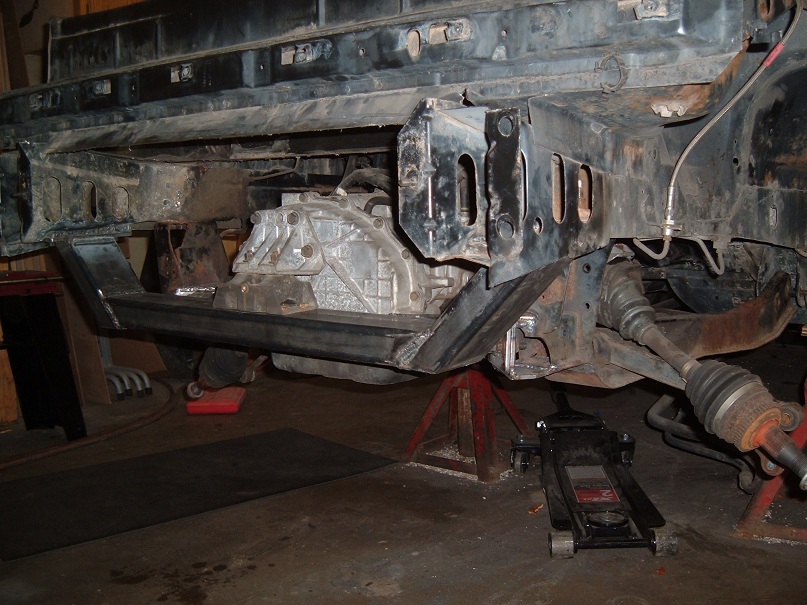
Got the last of the cradle fabrication done this weekend. The final weight of the cradle with the extra transmission cross member attached is 95 pounds, I think I may have overbuilt things a bit but I didn't want any problems. I don't have a hanging scale to weigh both engines but I think the all aluminum 3.5 is probably less than the all cast iron 2.8 so the extra 30 lbs of cradle weight isn't a big deal.
Finished cradle
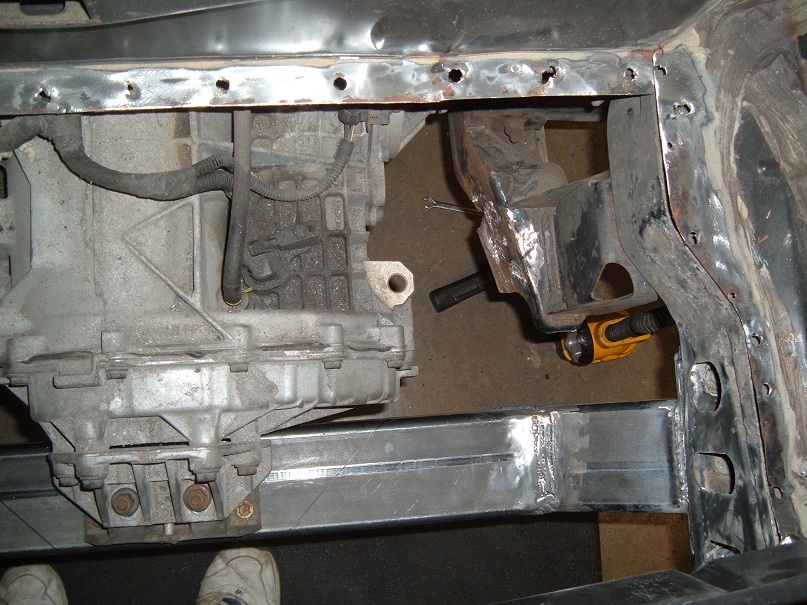
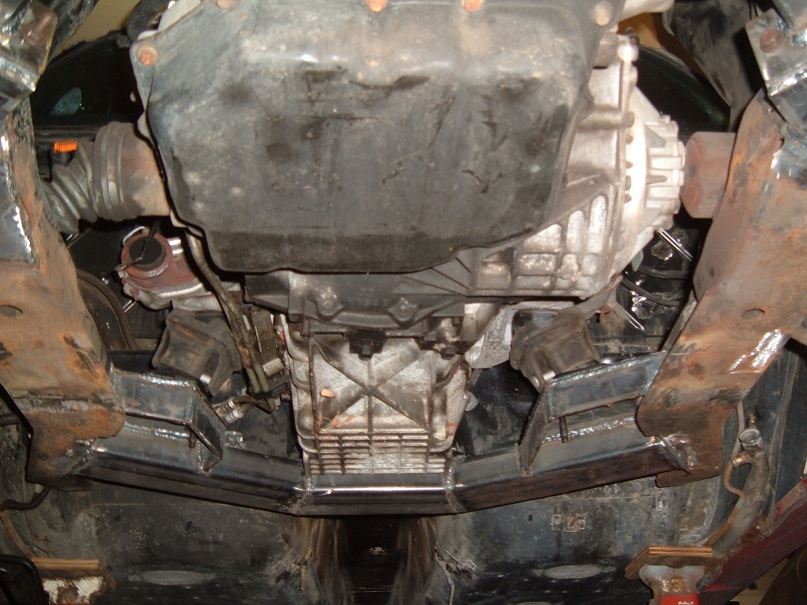
The Chrysler transmission is quite large with a deep sump so the only way I could see to tie the back of the cradle together was to triangulate a couple mounts into the transmission cross member.
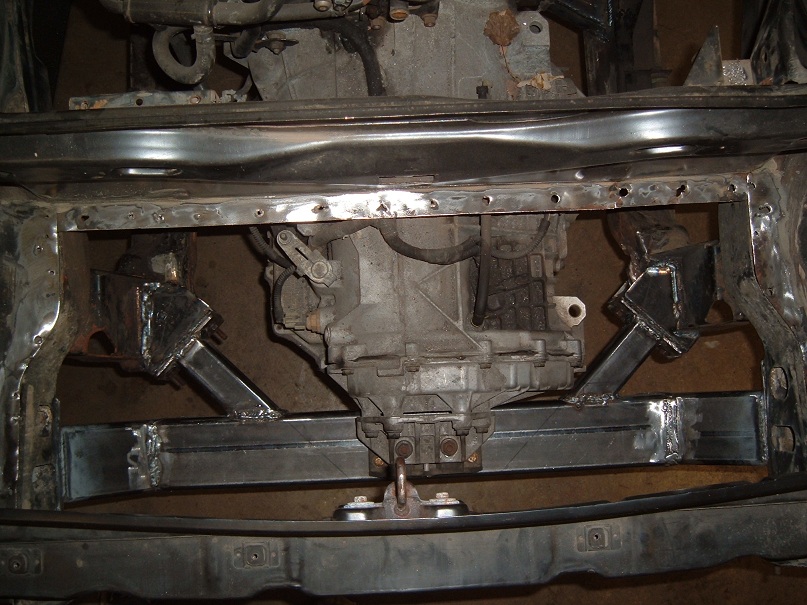
A couple shots from the back and underneath showing the mounts and brackets.
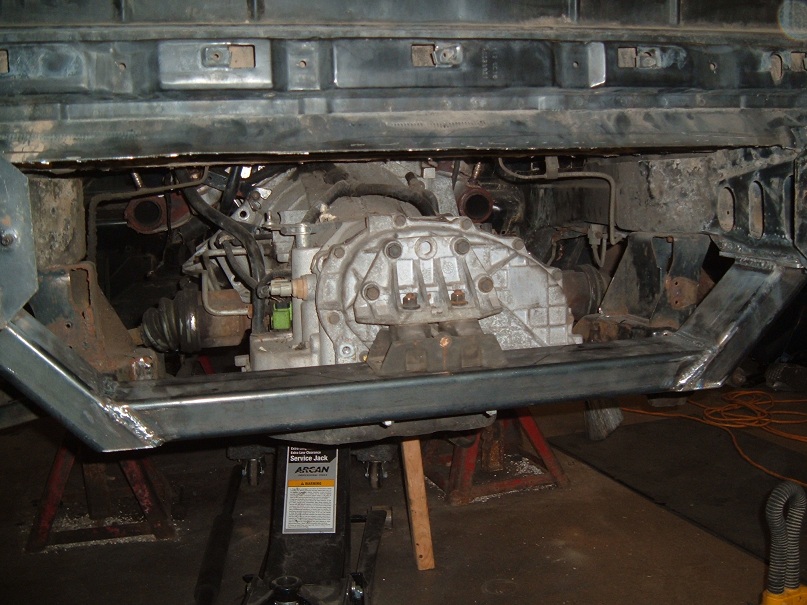
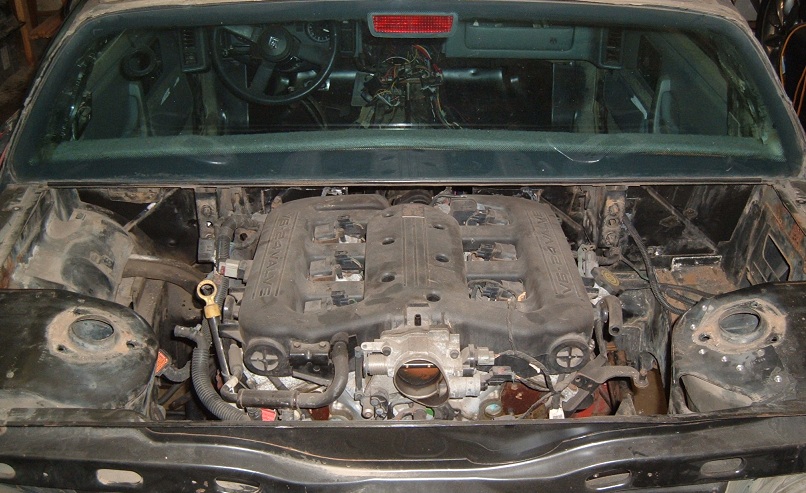
So this is what the engine looks like in it's final position bolted to the modified cradle.
Next up: The alternator and A/C compressor won't fit in their factory positions because of interference with the hinge boxes and firewall so I am looking at moving them down and in. I may end up making some custom "ZZP power log" style tubular exhaust manifolds to make that happen though. I need to lay under the car and stare at things for a while to assess my options first.
I'm pretty excited to have this first step done, it was my first time doing metal fabrication and I was surprised at how time consuming it was.
[This message has been edited by seajai (edited 09-28-2023).]
Awesome work man! Can't wait to see this in person... I had no idea you were this crazy when I met you last summer.
LOL......Crazy..... I was just thinking that the other day when I was standing the garage staring at the car and going over the list of things I still need to do. I sometimes have a tendency to jump in with both feet and worry about the depth of the water once I'm in it.
I read earlier that you are looking at the megasquirt for engine control but were not sure about COP (coil-on-plug) compatibility. If I remember correctly, the Chrysler COP has an igniter built in that is controlled by a TTL signal. If so, the Megasquirt3 and MS3X add-on boards will control sequential injection as well as ignition. Add in a megasquirt GPIO board or microsquirt with appropriate Megashift code, you have a complete system that will control your engine and trans combo. Communication between the two is by can bus, so only a few wires to string between the two. If you need any help or more information, let me know.
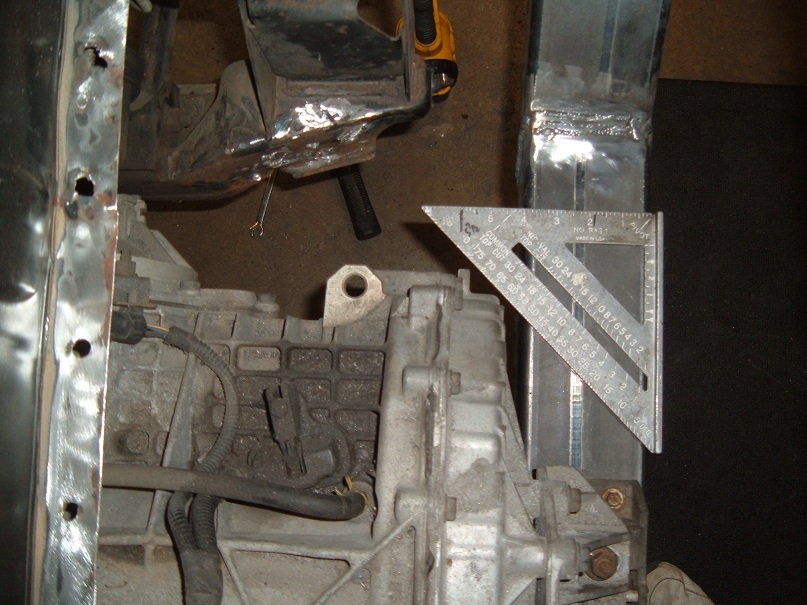
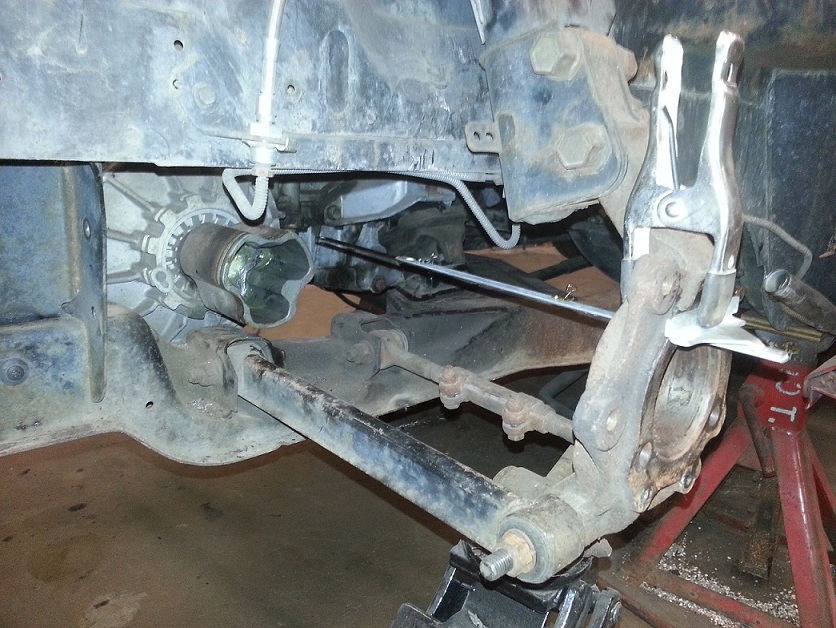
It was a busy week at work so the garage was silent all week, but got a little more accomplished today. I wanted to know for sure what my offset was going to be on my axles, so I re-installed the suspension and used a jack to compress it to ride height. I used a T-square clamped to the knuckle to extend the axle center line back to the transmission, the offset comes in at 2.5". I figured out the approximate pivot points of the axle shaft in the joint and measured the length for the axle. The right side comes in at 13" long, figure that into the 2.5" offset and you get an 11 deg C/V joint angle. The left side axle is 18" long which gives a 7.5 deg C/V angle. I'm thinking the 11 deg angle on the rt side is going to be ok, the front C/V joints on my 1 ton Chevy pickup run at about an 8 deg angle, and they have 216,000 miles on them.
I also wanted to know the weight of the 2.8 eng/trans as well as the 3.5 eng/trans. I was able to borrow a hanging scale from a neighbor who works for a crane outfit. Both engines weigh in at just a little bit over 550 pounds. So even though the Chrysler engine is larger than the 2.8, the all aluminum construction evens things out.
Got the engine back out of the car now and started working on alternator and A/C mounting. I'll have some pics of that soon.
[This message has been edited by seajai (edited 09-28-2023).]
Still working on mounting the alternator down low and in on the block. I was able to use an existing hole on the timing cover for the pivot point, and I'm half way through fabrication on a bracket for the other side. Hopefully have some pics soon.
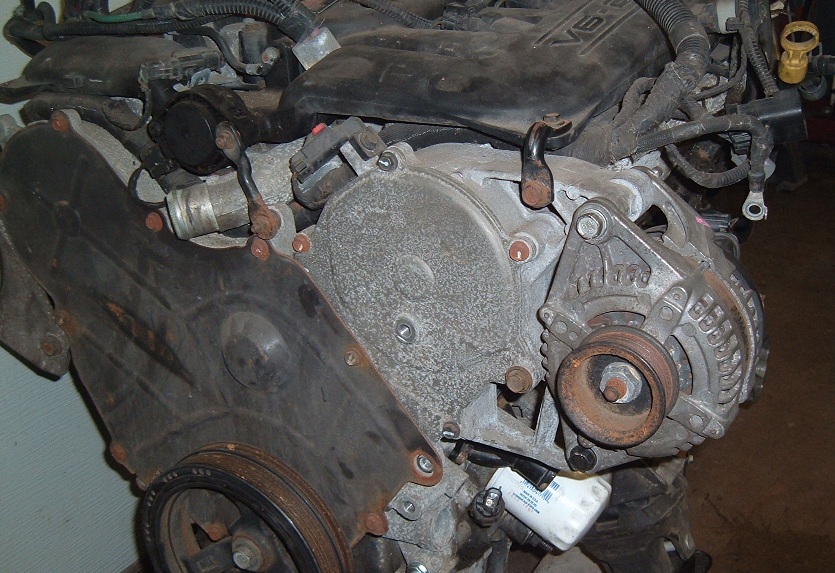
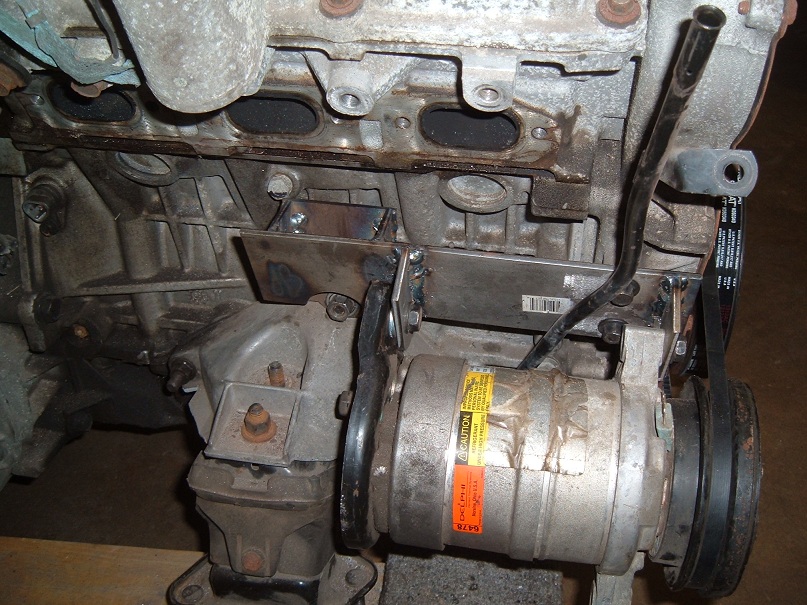
The factory alt mounting was up high on the timing cover, but that spot was too tight to the firewall for me to leave it there.
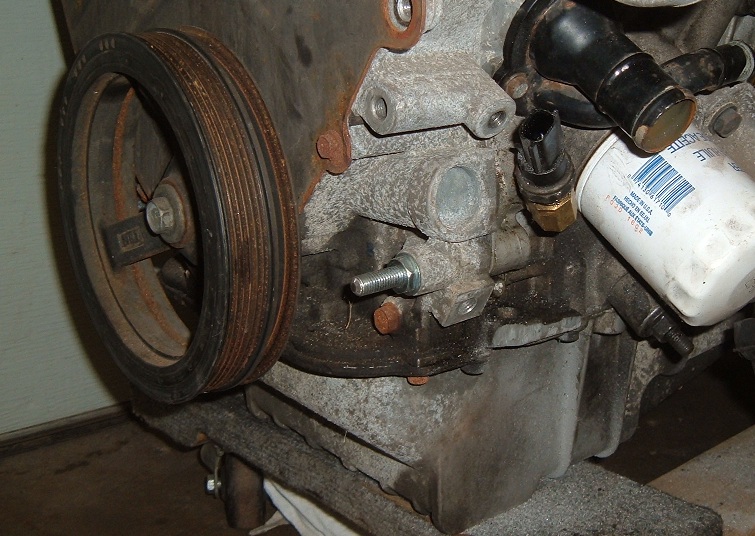
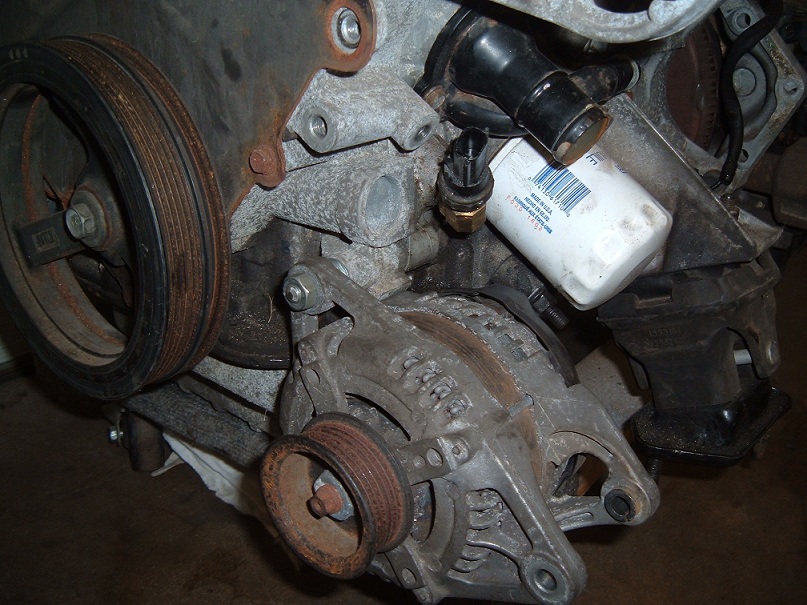
This is a pic of the area where the factory P/S pump lived. I removed the bracket and installed a stud in the lower mounting hole. I also had to install an elbow for the oil pressure switch to make room for the alt in its new home.
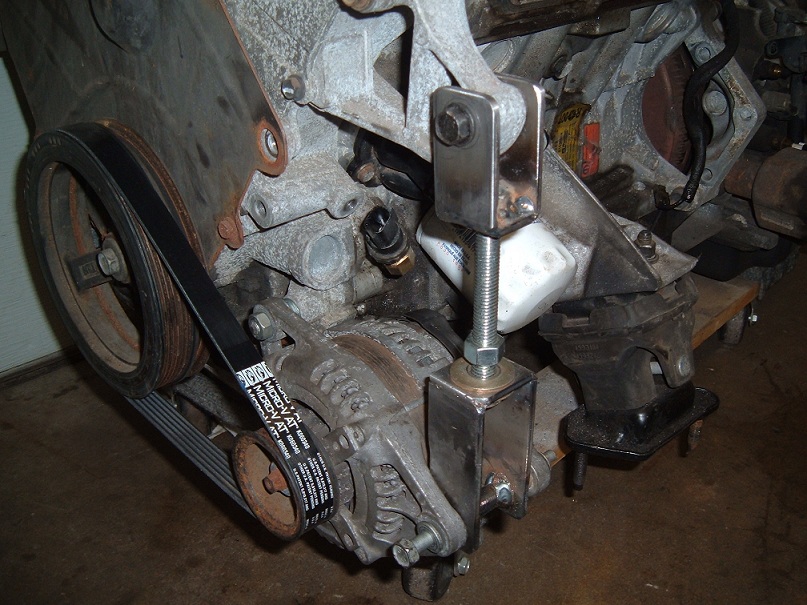
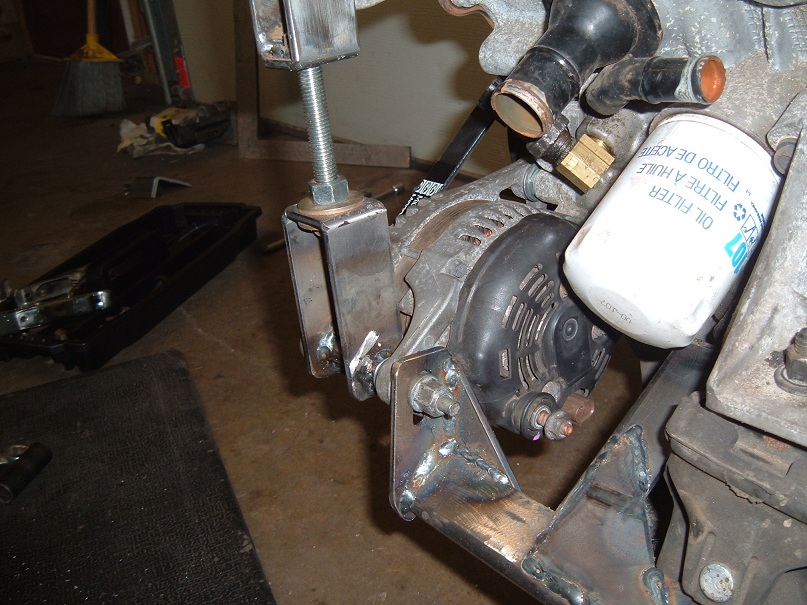
A pic of the alternator in its new location.
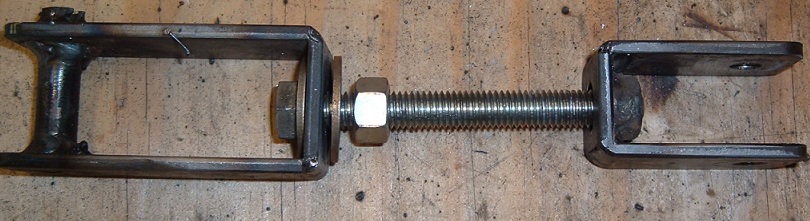
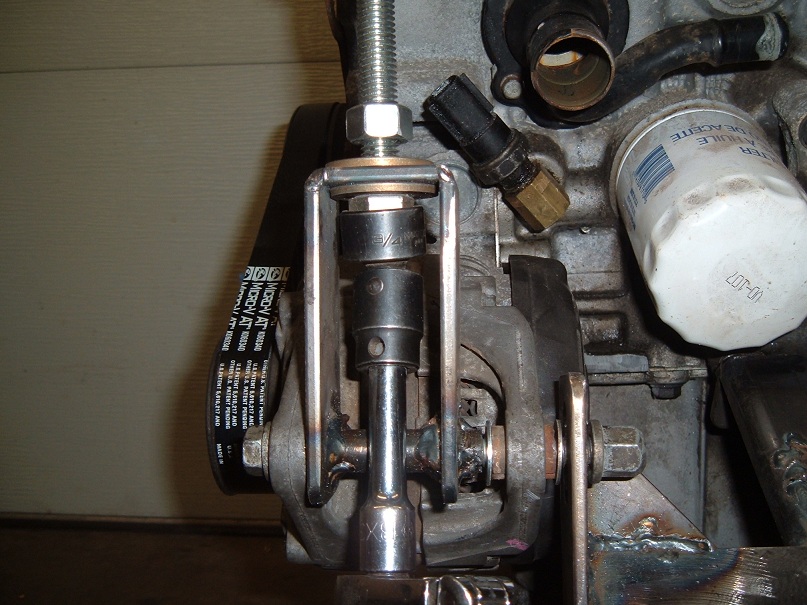
The problem here is the factory belt was tensioned by means of an adjustable pulley on a bracket but I don't have room for one. So I need to make the alt adjustable. Normally the pivot point of the alt is the double leg side and the adjustable side is the single leg. I had to do that backwards because the battery stud would have hit the oil filter the other way. Here is a pic of my adjuster assembly:
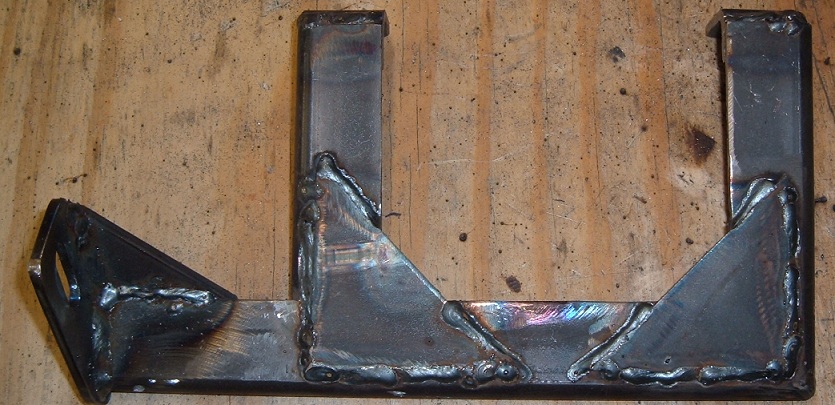
The other issue with this setup is, as the alt is pulled up to tension the belt, it wants to deflect outward. This means I had to make a bracket to support the alt and keep it in line.
Luckily I had a couple of engine mount bracket bolts down low. I removed the factory bolts and installed a couple of studs I had left over from a 3800 Regal project. (It pays to save bolts)
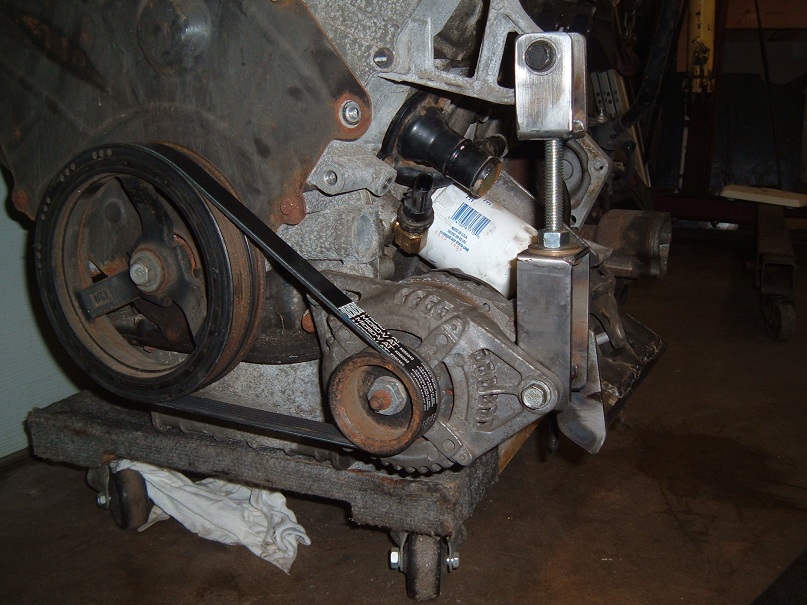
So here is a pic of the alt with the adjuster bracket installed.
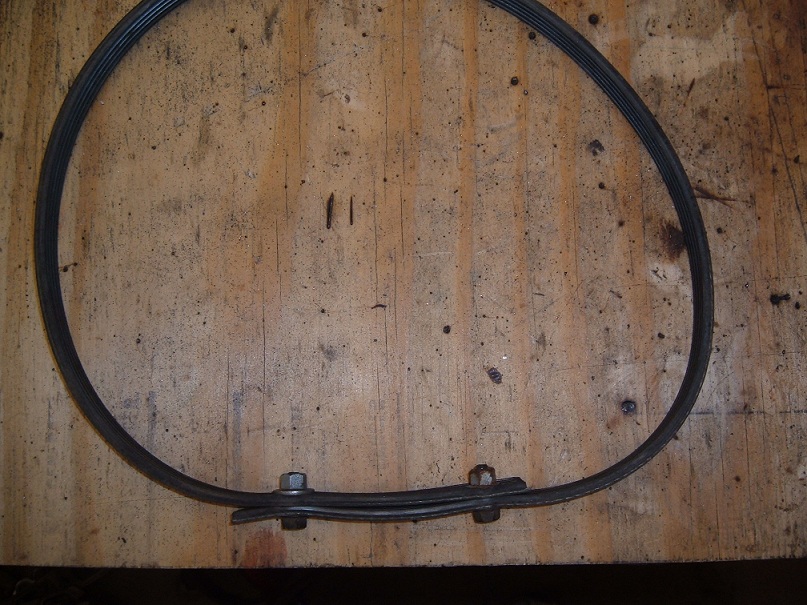
Now with the alt in place, I needed a new drive belt. I used an old belt, cut it and wrapped it around the pulleys, and bolted it back together in its new length. I took that to my local O'Reilly's and measured it on the belt tool. After a bit of trial and error, I had my new Gates 6 rib belt.
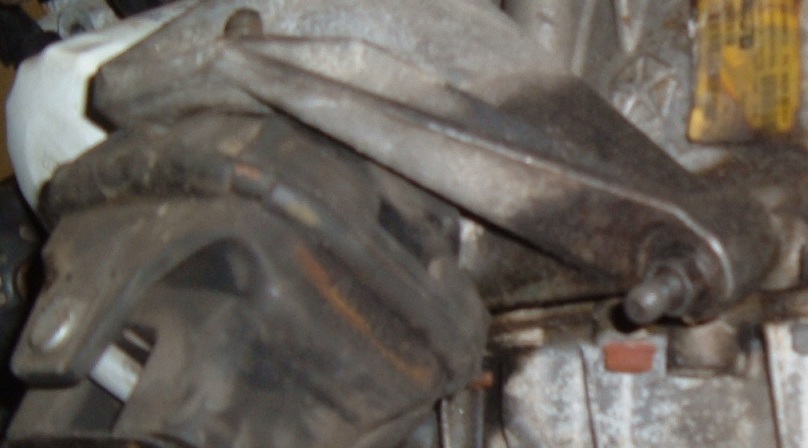
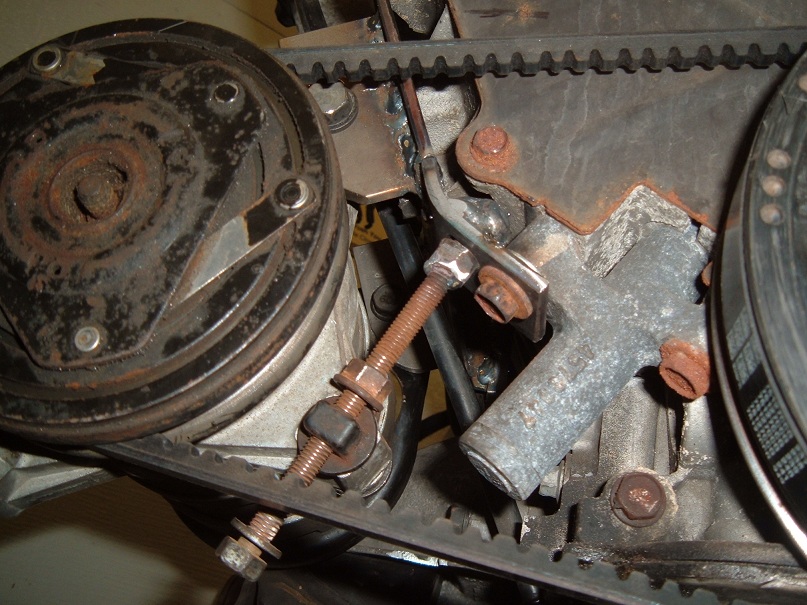
Here is the finished product in place and my new belt installed . I am able to tension the belt from underneath with a 3/4" socket.
[This message has been edited by seajai (edited 09-28-2023).]
Already looking into a WRX 2.0 turbo swap for my next one. The wife looked at me kinda sideways when I mentioned it to her though. I almost got the feeling she was questioning my sanity
Very cool project. Do yourself a favor and make sure the alternator is good before reinstalling the cradle. Peace of mind insurance. Don't ask me how I know...
Very cool project. Do yourself a favor and make sure the alternator is good before reinstalling the cradle. Peace of mind insurance. Don't ask me how I know...
Bob
Thanks. That's a great idea, I hadn't thought about testing the alternator. The power steering pump pulley was broken when I bought the car so the belt was off which means I wasn't able to make sure the alternator was good before pulling the engine. My local O'Reilly's tests 'em, I'll hafta bring it in and have them run it for me.
Wish I'd been reading this a couple of weeks ago when the hinge boxes became an issue. Someone on the forum removed them and moved the hinge mount to a horizontal position below the window. I have a link to it on a different computer. It looked great! Got all that clutter off the firewall and opened things up a lot.
[This message has been edited by sspeedstreet (edited 12-09-2012).]
Wish I'd been reading this a couple of weeks ago when the hinge boxes became an issue. Someone on the forum removed them and moved the hinge mount to a horizontal position below the window. I have a link to it on a different computer. It looked great! Got all that clutter off the firewall and opened things up a lot.
Found the thread, very interesting. The hinge boxes turned out to be only half the problem, the firewall is in the way too, so the accessories had to be moved. I would like to completely smooth out the firewall so I may end up doing the modification as well.
[This message has been edited by seajai (edited 12-09-2012).]
Found the thread, very interesting. The hinge boxes turned out to be only half the problem, the firewall is in the way too, so the accessories had to be moved. I would like to completely smooth out the firewall so I may end up doing the modification as well.
Can you post the link? I searched also, but didn't find it.
Originally posted by sspeedstreet: Someone on the forum removed them and moved the hinge mount to a horizontal position below the window. I have a link to it on a different computer. It looked great! Got all that clutter off the firewall and opened things up a lot.
Good progress this weekend. Got the A/C compressor mounted today. I decided to use the Fiero A/C compressor because the Chrysler system was electronic and would have required a lot of extra work to make it function. Here are a couple pics of the A/C bracket and a pic of the finished accessories.
I was able to re-use the factory belt tensioner adjustment screw.
The finished product
[This message has been edited by seajai (edited 09-28-2023).]


 already subscribed