|
|
|

|
EMBRACE RACING GT LED TAIL LIGHT KIT (Group buy April 2014) by doublec4
| Started on | : 03-30-2014 10:33 PM |
| Replies | : 116 (4872 views) |
| Last post by | : jetfighterv on 02-09-2018 01:11 PM |
|
|
|
|
Apr 26th, 2014
|
Sourmug
Member Posts: 4538
From: Calgary, Alberta, Canada
Registered: Sep 2002
|
Thanks for the write up Danyel!


|
11:58 PM
|
|
|
Apr 27th, 2014
|
Danyel
Member Posts: 6089
From: Lévis, Québec, Canada
Registered: Sep 2008
|
Hello to all Finally got the tail lights seperated... whewwwww cleaned them up all nice a pretty..... before doing the final install I hit a major SNAG ....the first segments on the driver side sequencial signal lights doesn't lite up..... passenger side works great...... un soldered the LEDs of that segment .... all LEDs work fine individually.... hummmmmm but the driver side turn signal main board seems to have a defect ....its not the sequencial board I swapped it over to the passenger side and works great except flashes backwards  DoubleC4 you have a PM....  regards Danyel [This message has been edited by Danyel (edited 04-27-2014).]


|
06:03 PM
|
|
Danyel
Member Posts: 6089
From: Lévis, Québec, Canada
Registered: Sep 2008
|
Found the culprit looks to be a missing trace as you can see in the pic ...... I resoldered de LEDs and tried to make a new trace with a trace maker kit I have.....but it didn't change the status of the board still no first segment... I asked Chris for help he gets back to me ... did more diags but I think its the end of the road for that main board. spent over 2 hours testing and retesting.....  missing trace ..... Chris is sending me another board ...... man that is goood service ...... will post more when I get the replacement !!! Danyel [This message has been edited by Danyel (edited 04-27-2014).]


|
09:36 PM
|
|
|
Apr 28th, 2014
|
firstclassfiero
Member Posts: 32
From: Aylmer, Ontario, Canada
Registered: Jul 2013
|
Man, I wish I had the money for these right now! Maybe I should focus on getting the car running good first though... 


|
10:33 PM
|
|
|
May 4th, 2014
|
Fierofreak00
Member Posts: 4221
From: Martville, NY USA
Registered: Jun 2001
|
Chris, PM sent. -Jason


|
08:37 PM
|
|
Danyel
Member Posts: 6089
From: Lévis, Québec, Canada
Registered: Sep 2008
|
Got the new replacement board from Chris all done and soldered ....and also the whole kit is completed and working properly  they work GREAT !!! After talking with a couple of people I PM'd Chris to offer my help since the was bogged down ... ANNOUNCEMENT !!!! I will be offering Chris's GT LED kits Assembled for 335$ USD + shipping I completed my kit but have NOT installed into my tail lights because I will be makin a test JIG for all the Assembled Kits .... I started with a working fastback tail light harness that I will be thinning down for my JIG .... more to come on my test JIG build tomorrow. I am doing this because in the kit you have to figure out which wire goes to which power board for park or brake lights ..... more about this also tomorrow.  [This message has been edited by Danyel (edited 05-06-2014).]


|
08:57 PM
|
|
Sourmug
Member Posts: 4538
From: Calgary, Alberta, Canada
Registered: Sep 2002
|
I'd be interested in upgrading to an assembled kit, how would that work?
Thanks
Nolan


|
10:06 PM
|
|
Danyel
Member Posts: 6089
From: Lévis, Québec, Canada
Registered: Sep 2008
|
| | | quote | Originally posted by Sourmug:
I'd be interested in upgrading to an assembled kit, how would that work?
Thanks
Nolan |
|
I buy the kits from Chris he sends them to me. I assemble them and ship to the customers .... I'm a retailer for Embrace Racing. If you are interested I can PM you the total to send to my Paypal include zip code for shipping cost... but I ONLY sell assembled kits ,,, Regards Danyel [This message has been edited by Danyel (edited 05-04-2014).]


|
11:25 PM
|
|
|
May 5th, 2014
|
doublec4
Member Posts: 8289
From: Oakville, Ontario, Canada
Registered: Jun 2003
|
Just wanted to confirm what Danyel has posted. I've had a few requests for completed kits, but with my work schedule and the time it takes just to put an unassembled kit together for 15+ people at a time, it is difficult to accomplish. Danyel has stepped up to provide an assembly service for the kit (obviously for a price). He has an electronics background and is more than capable of assembly, I'm very confident in his skills! How this will work is as follows. If you would like to order a kit that you will assemble yourself, please order through me. You can PM me, email me, or visit my website and email me through there. If you would like to order a fully assembled kit, please contact Danyel. He will order the unassembled kits through me, put them together for you, and then send them to you. I'm still filling orders from this group buy, but if you would like to change your order to a fully assembled kit, please contact Danyel and we will arrange that for you! Thanks again to everyone! ------------------

Check out my build and my website!
https://www.fiero.nl/forum/Forum3/HTML/000100.html
Embrace Racing


|
08:53 AM
|
|
85sliverGT
Member Posts: 1525
From: Burnsville, MN
Registered: Sep 2005
|
Just wondering how far down the list we are...car show season starts soon!


|
09:56 AM
|
|
Sourmug
Member Posts: 4538
From: Calgary, Alberta, Canada
Registered: Sep 2002
|
PM sent


|
01:05 PM
|
|
|
PFF
System Bot
|
|
Danyel
Member Posts: 6089
From: Lévis, Québec, Canada
Registered: Sep 2008
|
| | | quote | Originally posted by Sourmug:
PM sent |
|
Replied THX


|
01:16 PM
|
|
Sourmug
Member Posts: 4538
From: Calgary, Alberta, Canada
Registered: Sep 2002
|
| | | quote | Originally posted by Danyel:
Replied THX |
|
Payment sent, thanks.


|
01:50 PM
|
|
|
May 6th, 2014
|
CKDrums
Member Posts: 58
From: Murrells Inlet South Carolina
Registered: Sep 2013
|
I'd like to order the built kit as well. Any idea what the length of wait is if you were not on the 1st list and now ordering a built kit? No rush just trying to grasp an idea.


|
10:10 PM
|
|
Danyel
Member Posts: 6089
From: Lévis, Québec, Canada
Registered: Sep 2008
|
| | | quote | Originally posted by CKDrums:
I'd like to order the built kit as well. Any idea what the length of wait is if you were not on the 1st list and now ordering a built kit? No rush just trying to grasp an idea. |
|
I"ll contact DoubleC4 to see where he is with his list .... I will PM you the ETA on a set to me for you. Regards Danyel


|
11:37 PM
|
|
|
May 7th, 2014
|
CKDrums
Member Posts: 58
From: Murrells Inlet South Carolina
Registered: Sep 2013
|
Thank BIG time! | | | quote | Originally posted by Danyel:
I"ll contact DoubleC4 to see where he is with his list .... I will PM you the ETA on a set to me for you.
Regards
Danyel |
|


|
08:14 AM
|
|
87Fiero
Member Posts: 195
From: Channahon, IL
Registered: Aug 2004
|
Danyel,
I also would like to order the built kit. I am # 20 on the list.
Thanks,
Tim


|
12:55 PM
|
|
Danyel
Member Posts: 6089
From: Lévis, Québec, Canada
Registered: Sep 2008
|
| | | quote | Originally posted by 87Fiero:
Danyel,
I also would like to order the built kit. I am # 20 on the list.
Thanks,
Tim |
|
PM sent


|
01:47 PM
|
|
Danyel
Member Posts: 6089
From: Lévis, Québec, Canada
Registered: Sep 2008
|
Houston we have a problem !!!!!!While making my assembly JIG I hit a major SNAG ...... the signal light bayonet do NOT fit .... they are too short and will NOT twist because the groove pins are not reaching the bottom so it can twist and lock ..... the only way to make them reach would be to shave the sockets top part wider which is out of the question... see included pic. You can see that the bayonet's transparent plastic part stops it from going deeper and is missing 1/8 inch before it can properly seat to twist and lock into place....  Chris you have a PM ......... I'm gonna try to heat the transparent plastic to shrink its diameter .... stay tuned Danyel [This message has been edited by Danyel (edited 05-07-2014).]


|
09:01 PM
|
|
doublec4
Member Posts: 8289
From: Oakville, Ontario, Canada
Registered: Jun 2003
|
Danyel, This was an issue with the double contact bulb connectors so I sourced new ones (the ones included in the kit). The previous ones had a shoulder that wouldn't fit. I have new connectors on order. I didn't think it would be an issue with these because the plastic caps have a taper. I guess they do not clear ( I do not have GT sockets here to check.) Apparently universal bulb connectors are not universal, or the Fiero sockets are just abnormal. Not sure which one it is. If you need a solution for these right now, just pull the clear plastic cap right off. You'll be left with an empty bulb base. Solder one wire to the bottom terminal and one wire to the inside wall. Fill with hot glue and you're done! Similar to this (but this one is a double contact): 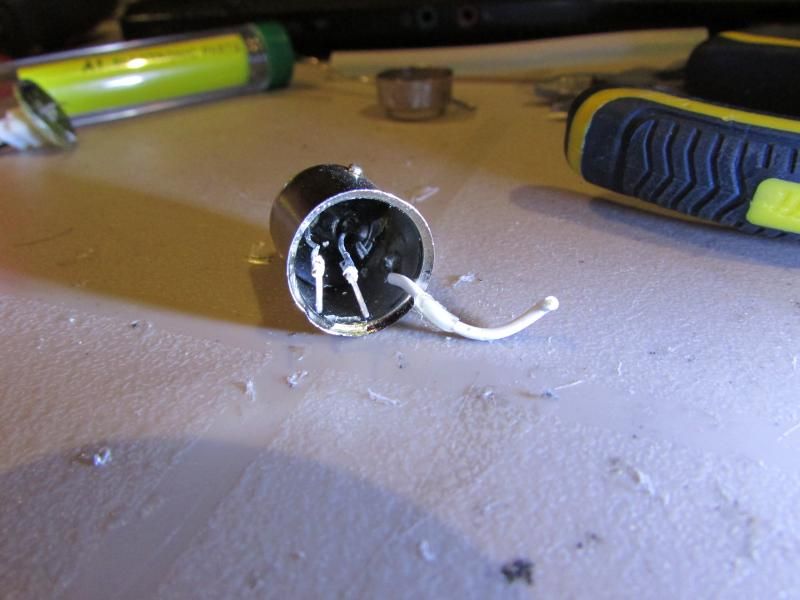 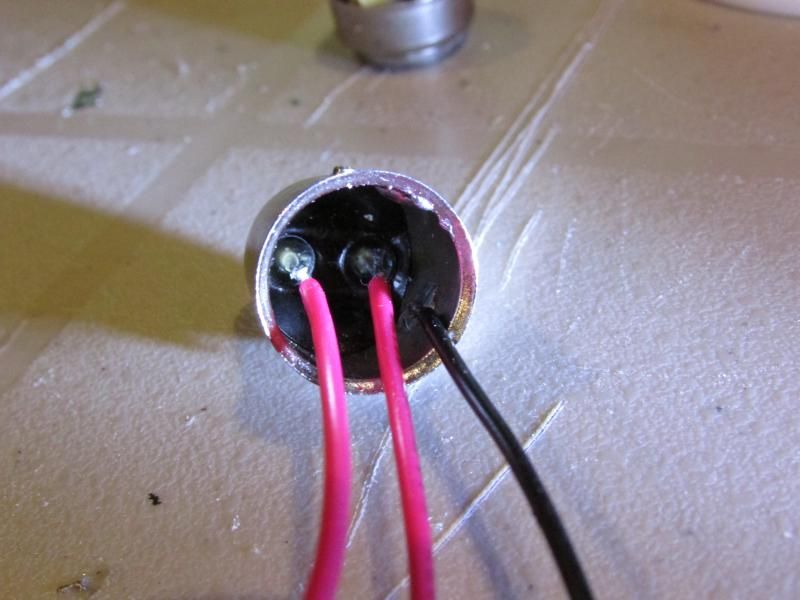 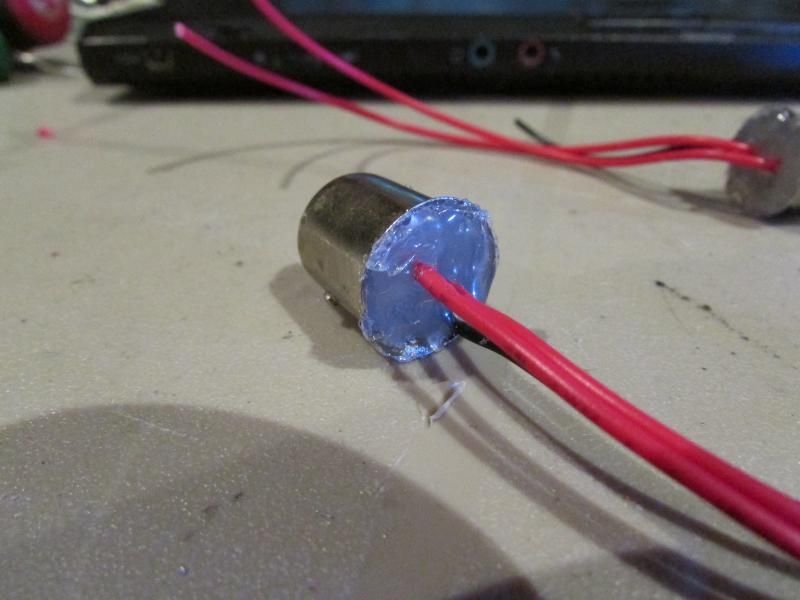 Sorry about this guys, I'm trying to get all of the kinks worked out. Something typically comes up with a new product. Thank you for the feedback Danyel. Let me know if you can make this work [This message has been edited by doublec4 (edited 05-07-2014).]


|
10:07 PM
|
|
Danyel
Member Posts: 6089
From: Lévis, Québec, Canada
Registered: Sep 2008
|
Chris I'll try to heat up and squeeze the transparent plastic part first If it doesn't work I'll do it the way you did with the 1157's....I have 6 sets heading my way will do this update to them... also PM sent on another kit regards Danyel [This message has been edited by Danyel (edited 05-07-2014).]


|
10:13 PM
|
|
|
PFF
System Bot
|
|
|
|
doublec4
Member Posts: 8289
From: Oakville, Ontario, Canada
Registered: Jun 2003
|
I've accidentally popped one out here before, just give it a good yank. Probably don't even need to heat it up.
Let me know how it turns out.
Once I get the new connectors in, I will be supplying those with the kits. Thanks!


|
10:18 PM
|
|
|
May 8th, 2014
|
Danyel
Member Posts: 6089
From: Lévis, Québec, Canada
Registered: Sep 2008
|
Hello all .......I did solve the issue with the bayonets being too short ... I used an old soldering iron to reshape the transparent plastic part that was stopping the bulb from twist and lock. Its not the prettiest mod... but it did works .... pic below  more assembly to come... Danyel


|
10:27 PM
|
|
|
May 9th, 2014
|
doublec4
Member Posts: 8289
From: Oakville, Ontario, Canada
Registered: Jun 2003
|
Good solution Danyel,
I'm going to change supplier for these connectors so this won't be necessary in the future.


|
06:10 AM
|
|
revin
Member Posts: 8684
From: Pville, TX
Registered: Aug 2001
|
Danyel ( and Chris) Same thing on my notchback LEDs. I have figured out that when my socket was too big, I grinded the metal coller down to fit. Doing that must have caused enough heat to build up and melt the solder inside making the connection. Either the ground on the side or one of the post. So be careful with the heat. Check connection after mod. 


|
09:12 AM
|
|
Danyel
Member Posts: 6089
From: Lévis, Québec, Canada
Registered: Sep 2008
|
| | | quote | Originally posted by revin:
Danyel ( and Chris)
Same thing on my notchback LEDs. I have figured out that when my socket was too big, I grinded the metal coller down to fit.
Doing that must have caused enough heat to build up and melt the solder inside making the connection. Either the ground on the side or one of the post.
So be careful with the heat. Check connection after mod.  |
|
Thank you for the suggestion... will do


|
10:25 AM
|
|
|
May 10th, 2014
|
Fierofreak00
Member Posts: 4221
From: Martville, NY USA
Registered: Jun 2001
|
Chris I'm having a secondary Issue. Please check your PM's. Thanks! -Jason


|
05:33 PM
|
|
|
May 11th, 2014
|
Danyel
Member Posts: 6089
From: Lévis, Québec, Canada
Registered: Sep 2008
|
| | | quote | Originally posted by Fierofreak00:
Chris I'm having a secondary Issue. Please check your PM's. Thanks! -Jason |
|
Maybe I can help ??


|
02:09 AM
|
|
Danyel
Member Posts: 6089
From: Lévis, Québec, Canada
Registered: Sep 2008
|
OK I just completed assembly of Sourmug's kit .... Here is a little something to help all the people assembling their own kit.... Note the colors of the wires in the pic.... if you solder them as I did you will not have to switch the wires around for the Tails or Brakes ......  Spent the week buying parts to make my assembly jig and an electronic box to test the assembled kits I'm doing for customers.  This is my LED assembly jig cuts down my time on inserting the LEDs  This electronic box simulates a fiero tail light harness.....I havent received the flasher units yet but this will make my box just like a working fiero tail light system. Brakes, flashers and tails are all individually controlled....... saves tons of time confirming if the assembled kits work right  ------------------

My Build Thread
Tylers Toy


|
02:24 AM
|
|
Fierofreak00
Member Posts: 4221
From: Martville, NY USA
Registered: Jun 2001
|
| | | quote | Originally posted by Danyel:
Maybe I can help ?? |
|
Danyel, thanks for the offer, I appreciate it. I'm having a minor issue with my wiring and Chris is trying to help me nail it down. I'll keep you in the loop once it get figured out. -Jason


|
09:36 AM
|
|
Danyel
Member Posts: 6089
From: Lévis, Québec, Canada
Registered: Sep 2008
|
| | | quote | Originally posted by Fierofreak00:
Danyel, thanks for the offer, I appreciate it. I'm having a minor issue with my wiring and Chris is trying to help me nail it down. I'll keep you in the loop once it get figured out. -Jason
|
|
No problem .... if there is anything I can do please ask regards Danyel


|
04:40 PM
|
|
|
PFF
System Bot
|
|
Sourmug
Member Posts: 4538
From: Calgary, Alberta, Canada
Registered: Sep 2002
|
| | | quote | Originally posted by Danyel:
OK I just completed assembly of Sourmug's kit .... Snip
|
|
Sweet! 


|
05:14 PM
|
|
doublec4
Member Posts: 8289
From: Oakville, Ontario, Canada
Registered: Jun 2003
|


|
05:56 PM
|
|
Fierofreak00
Member Posts: 4221
From: Martville, NY USA
Registered: Jun 2001
|
| | | quote | Originally posted by Danyel:
No problem .... if there is anything I can do please ask
regards
Danyel |
|
Danyel, I'll let Chris explain it. After spending a frustrating day installing and chasing a phantom, I can happily say they are working as they should! You tube vid here: http://youtu.be/3_F9ytNE7qk Although, I do know which end of a soldering iron to use, but some of the finer points of getting electrons from point a to b at a component level elude me! ;P BTW, I love your led jig, that will be the cat's pajamas getting them in there and lined up. I tried the tape idea but went back doing to 3 at a time after I couldn't get the tape straight. -JC [This message has been edited by Fierofreak00 (edited 05-11-2014).]


|
07:25 PM
|
|
doublec4
Member Posts: 8289
From: Oakville, Ontario, Canada
Registered: Jun 2003
|
|
Fierofreak00
Member Posts: 4221
From: Martville, NY USA
Registered: Jun 2001
|
| | | quote | Originally posted by doublec4:
Jason, thanks for posting the video!
If you don't mind, I'm just going to repost it here as an embedded video:
Great work!
|
|
It was a long road but we figured it out Thanks for embedding the link, It was my first vid posting to youtube. So I didn't know how to embed the video, but I do now. -JC [This message has been edited by Fierofreak00 (edited 05-11-2014).]


|
09:38 PM
|
|
|
May 12th, 2014
|
E.Furgal
Member Posts: 11708
From: LAND OF CONFUSION
Registered: Mar 2012
|
Total ratings: 278
User Banned
|
|
| | | quote | Originally posted by doublec4:
The Embrace Racing GT LED tail light kit is ready for a group buy 
This LED tail light kit for the notchback Fiero is a fresh and modern looking upgrade compared to the stock incandescent bulbs. This upgrade kit adds style and functionality to your existing tail light housings.
The kit features full LED lights that act as your parking/brake/turn signal lights. You retain your stock outer lenses and housings so that fit and finish is as good as stock. The inner lenses are retained and LED panels are placed behind them. It keeps everything looking stock until you turn your lights on!
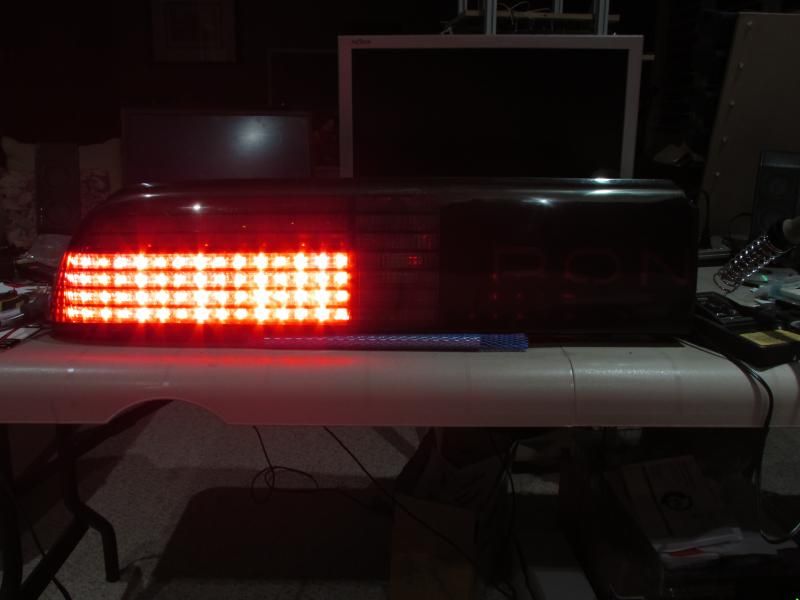
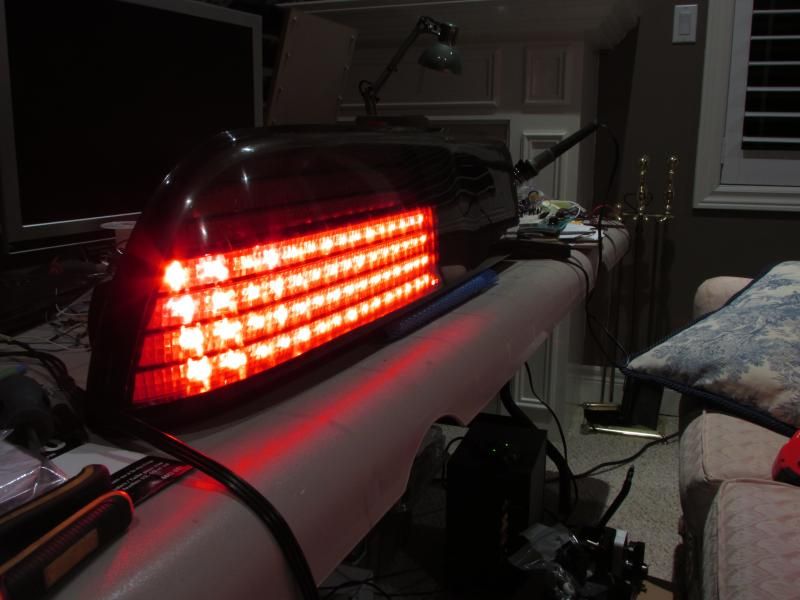
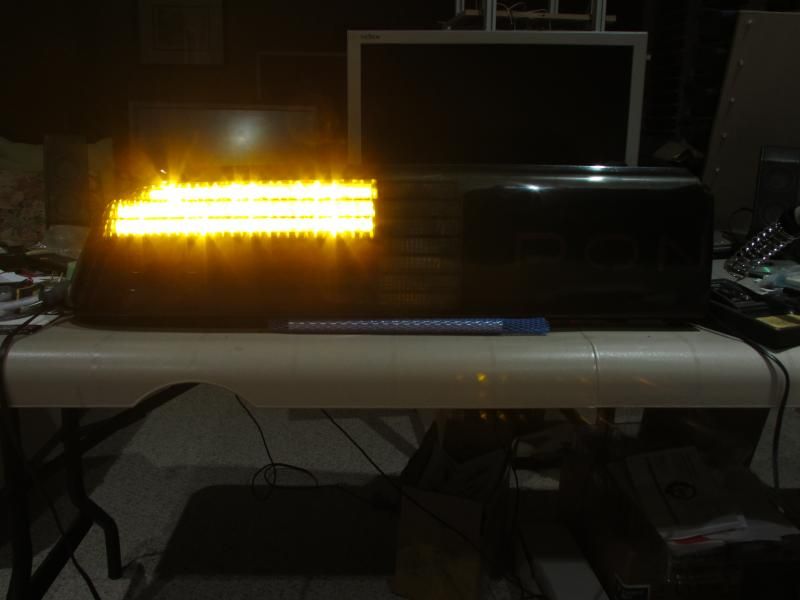
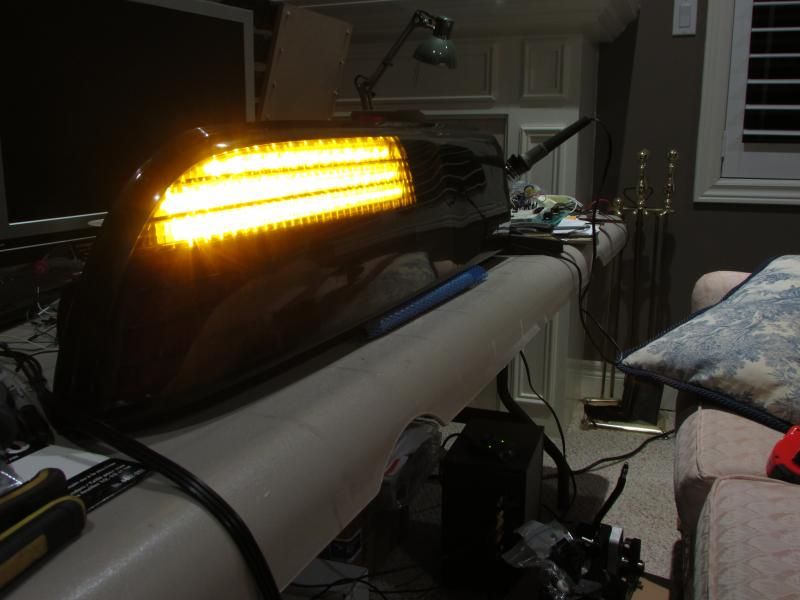
This kit DOES REQUIRE ASSEMBLY! It is very easy to build if you have experience soldering and it is extremely easy to install. It would be a fun weekend project to take on! All that is required for assembly is a soldering iron, 22AWG wire, heat shrink tubing, and screw drivers. Instructions and all other components are supplied! You will be soldering the LEDs to the provided circuit board for the parking/brake lights. There is another panel that you will solder the LEDs to for the turn signals. You will also be making connections via 22AWG wire to power the boards. It is not difficult, but if you are uncomfortable soldering LEDs and wires, please find a friend who can help you out!
You will also need to replace your flasher unit with this one here:
http://www.memotronics.com/...ef32rl-round-25-amp/
The part number is EF32RL so if you search that in google you'll find a bunch of places that carry them. THIS IS REQUIRED! Please use this flashing unit as the timing will be compatible with the controller board for the sequencing turn signal.
It is a 2 prong flashing unit so it plugs directly in place of the stock one. However, you'll notice it has a black ground cable coming out of the top. You will need to ground this under your dash somewhere.
The great thing about this kit is that it plugs directly into your stock bulb sockets. You can always change back to incandescent bulbs if you desire. No cutting or modifying original equipment at all!
What you will receive:
2x PCB controller boards
2x PCB brake signal panels
2x PCB turn signal panels
6x Voltage regulators
Package of superbright LEDs (red and amber)
Hardware and electrical connectors
Instructions
Please note that these lights do not include reverse lights. They are not included because reverse lights are rarely used and it would increase the price of the kit (not justifiable). However, some members have asked me to develop a reverse light panel. I will eventually do that and it will be sold at a later date.
The kit is being sold in the group buy for $250 + shipping.
In the development thread in the general section, there has been an overwhelming response to these lights. I've had more orders than I have materials to make them. I've had to order more materials and they're on the way! I'm going to make 25 spots available for this first group buy and the first 15 will be ready before the last 10 (waiting for parts to show up).
Since I've received so many messages from people through many different avenues, it has been extremely difficult to keep track of who messaged me first, so I'm going to do my best to put together a list of the first 25 people who said they wanted a set of lights. I will be trying to get in touch with everyone on the list this week to confirm that you want to keep your spot on the list.
If you're reading this list and you messaged me asking for a set of lights but do not see your name on the list right now, don't panic! I promise I will fill every single order I get but it will just take some time. I personally solder all of the boards myself and pre-assemble everything I can for you guys personally. It is a lot of work for one guy! Just be patient as I would be extremely happy to see these lights on a whole variety of Fieros out there!
Okay, so on to the list...
1. qwikgta
2. MadMark
3. Fierofreak00
4. Danyel
5. ANAM427
6. FieroGTguy
7. Synthesis
8. Sourmug
9. 87GT2M6
10. wd8ivl
11. TXOPIE
12. TXOPIE
13. KOS
14. Strappado
15. kraelo |
|
CONFUSEDIT SAYS KIT FOR NOTCHBACK, BUT VID AND PIC'S ARE lights for a fastback  also it says, you need to solder the leds to the boards,,, but you also say, it's taking you time to solder the boards.?????????????????  Help...


|
01:02 PM
|
|
doublec4
Member Posts: 8289
From: Oakville, Ontario, Canada
Registered: Jun 2003
|
Sorry for the confusion.
This group buy is for the GT version. It says notchback probably because I copied and pasted the beginning part of the group buy from the notchback group buy I had going on. I will correct that to read "GT"
This kit comes somewhat unassembled for $250. You will be soldering LEDs to the LED panels and some wires to connect a few other components. The other electronic boards that are provided with the kit already come assembled (these boards control the light sequencing/voltage regulation). These are the boards I was referring to when I said I've been very busy soldering boards.
If you're uncomfortable with the soldering process you can order a fully assembled kit from Danyel. Obviously this costs a little more, but you will receive a completed kit and not have to worry about the quality of the soldered joints. If you would like to go this route, please contact Danyel for his price.
Thanks!


|
03:07 PM
|
|
Fierofreak00
Member Posts: 4221
From: Martville, NY USA
Registered: Jun 2001
|
| | | quote | Originally posted by E.Furgal:
CONFUSED
IT SAYS KIT FOR NOTCHBACK, BUT VID AND PIC'S ARE lights for a fastback
|
|
Also, my vid shows my car which is a Notchback with GT tails installed. -JC


|
03:38 PM
|
|
doublec4
Member Posts: 8289
From: Oakville, Ontario, Canada
Registered: Jun 2003
|
| | | quote | Originally posted by Fierofreak00:
Also, my vid shows my car which is a Notchback with GT tails installed. -JC |
|
Haha, don't confuse him anymore!  Technically that makes your car a GT application 


|
04:20 PM
|
|


