|
|
|

|
fieroguru - Rear Coilover Kits now Available by fieroguru
| Started on | : 03-25-2018 04:45 PM |
| Replies | : 39 (7680 views) |
| Last post by | : Raydar on 01-07-2023 03:55 PM |
|
|
|
|
Mar 25th, 2018
|
fieroguru
Member Posts: 12435
From: Champaign, IL
Registered: Aug 2003
|
I have expanded my Fieroguru Performance LLC suspension product line to now include rear coilover kits offered in 4 levels. 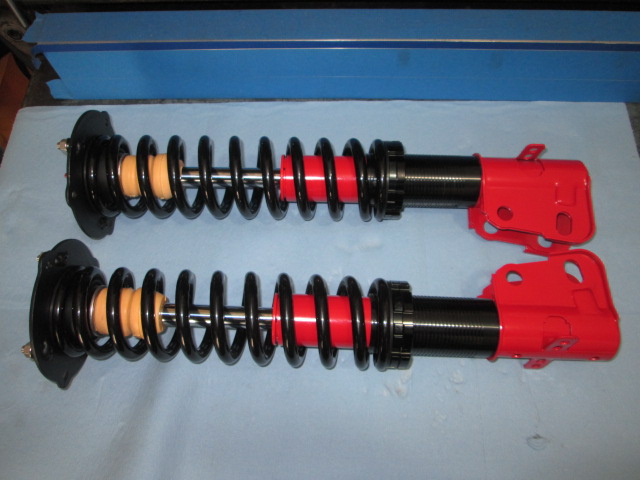 LEVEL 1 - Coilover Strut Hat Kit - $150 Shipped in the US - $25 shipping surcharge to Canada LEVEL 1 - Coilover Strut Hat Kit - $150 Shipped in the US - $25 shipping surcharge to Canada. 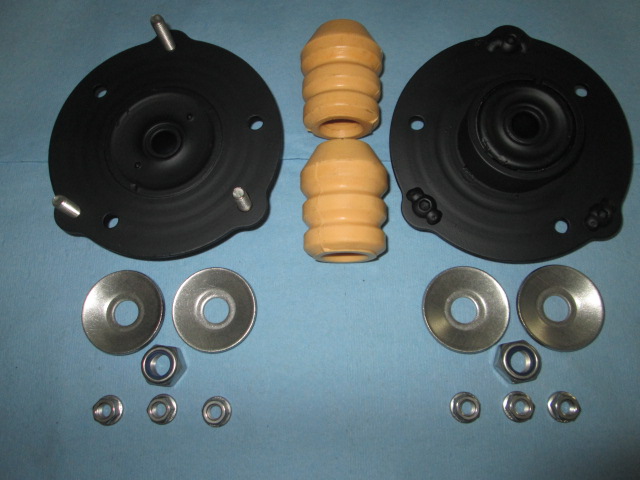 - 2 new strut hat bushing plates with stainless studs and spring centering sleeves
- 2 new bump stops
- All nuts for the strut plate and strut shaft as well as the concave washers are stainless steel
LEVEL 2 - Base Coilover Hardware Kit - $275 Shipped in the US - $25 shipping surcharge to Canada.  - 2 new strut hat bushing plates with stainless studs and spring centering sleeves.
- 2 new coilover sleeves with adjuster rings and 1 spanner wrench - ID will fit the larger bodied Koni struts, so no need to replace if you upgrade later.
- 2 new bump stops
- All nuts for the strut plate and strut shaft as well as the concave washers are stainless steel
LEVEL 3 - Coilover Kit with Springs - $425 Shipped in the US - $45 shipping surcharge to Canada. - Everything in the LEVEL 2 - Base Coilover Hardware Kits
- New springs in your desired length and spring rate
LEVEL 4 - Fully Assembled, Ready to Install Coilover & Strut Kits- Everything in LEVEL 3
- With KYB Struts - $750 Shipped in the US - $75 shipping surcharge to Canada
Options:- Sleeve Color: Black and Silver are the stocked colors, but Red and Blue are available at no additional charge.
- Sleeve Placement: On top of spring perch weld bead, or on top of knuckle mounting tabs at the base of the strut.
- Springs: Black and Silver are the available colors, spring lengths can be 10" or 12", spring rates can be between 250 lb/in to 450 lb/in at no additional charge.
- Strut Hat Orientation: Fastbacks and 88 Fieros have the option of flipping the strut hat bushing plate - no charge. Other applications this modification will interfere with the decklid.
- Strut Hat Spring Centering Sleeves - Inside is used for the stock strut hat configuration and machined aluminum spring locator used for the flipped strut hat.
Stainless steel studs, nuts & washers: 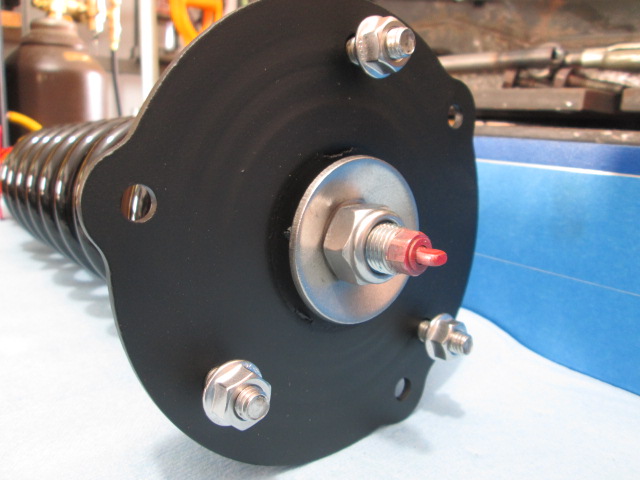 Stock strut hat orientation (bushing below the strut tower) and the inner centering sleeve: 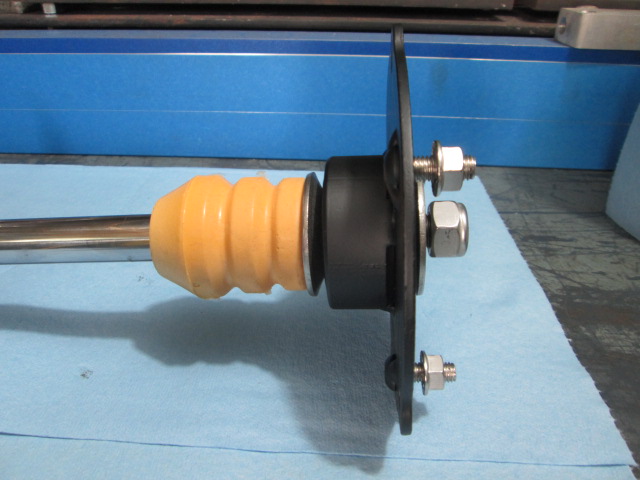 Flipped strut hat with machined aluminum centering sleeve: 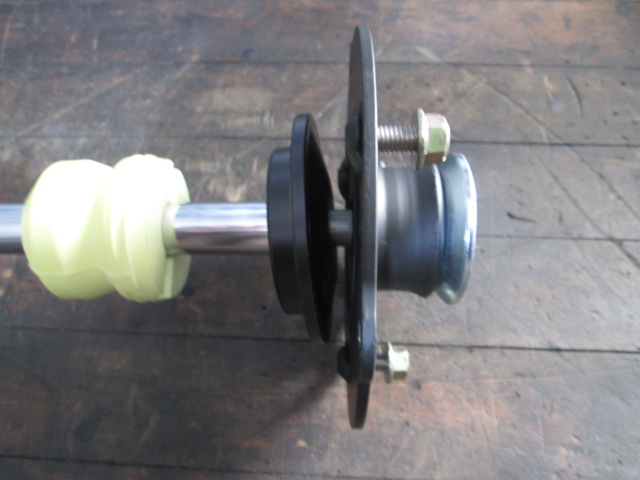 The stock setup is on the left, the flipped setup with the machined aluminum centering ring is on the right: 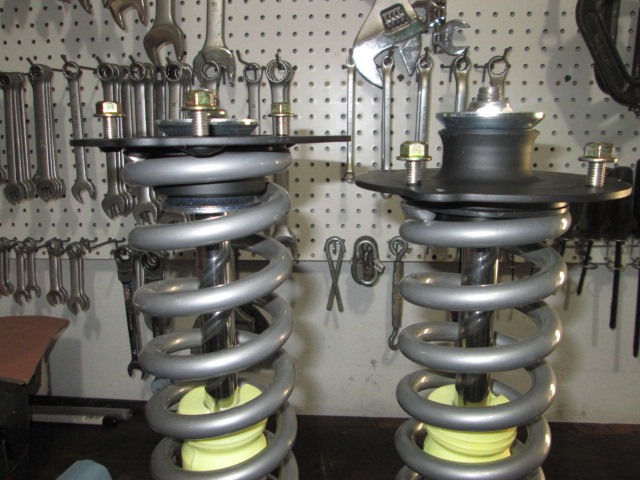 Inventory: Inventory:I keep several sets of the strut hat bushing plates, sleeves and bump stops in stock, but I don't weld on the studs, center rings or purchase the springs or struts until an order has been placed. Payment:Payment in full is due at time of order. Paypal is the preferred payment method. Once we define all the options and selections for purchase, I will send a paypal request for payment with the details specified. Shipment: Coilover kits will ship in 5-7 days from payment, custom selections of parts and colors could add a couple more days, but you will know this prior to payment. All packages ship with tracking provided. DIY Spring Perch Removal:Disclaimer - struts are a pressurized tubes and extreme care should be taken to ensure you don't cut through the tube or get the tune too hot. Failure to do so could result in personal injury. If you are not confident in your skills to remove the spring perch, buy the ready to install level of the the kit. Scribe just above the weld bead all away around the strut. The spring perch material is about .10" thick, so this scribe should be about 1/16" deep (.063") to ensure you do not cut into the strut body. 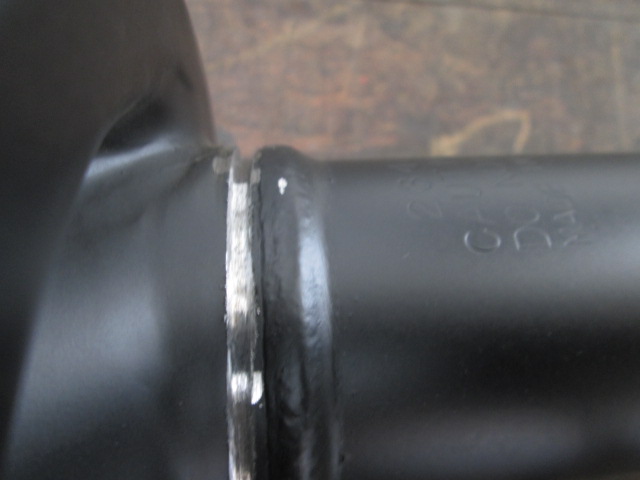 Pie cut the spring perch into 4 sections making sure the cut intersects the previous scribed cut. 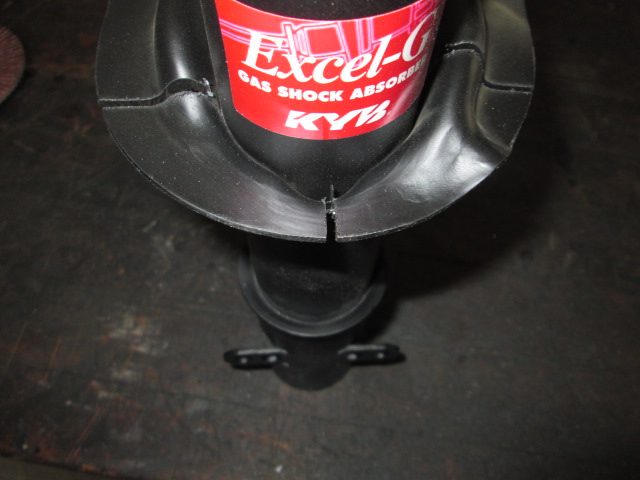 Use a hammer, large crescent wrench or large pliers to knock/bend the sections of the spring perch down. You should see the spring perch separate at the scribe cut, if it is not separating, cut the scribe a little deeper and try again to remove the section. 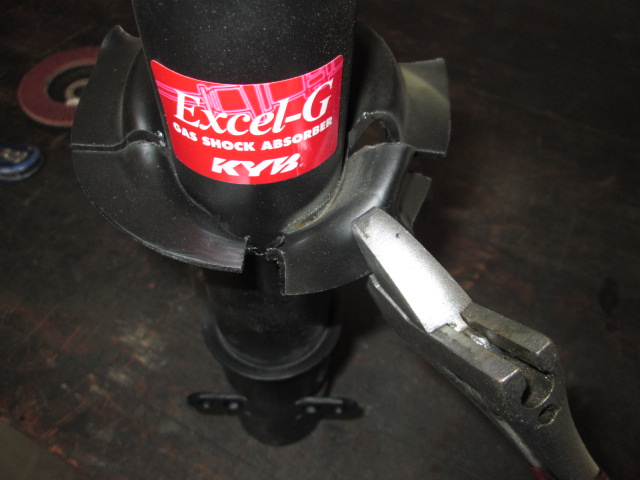 Here are the removed sections of the spring perch: 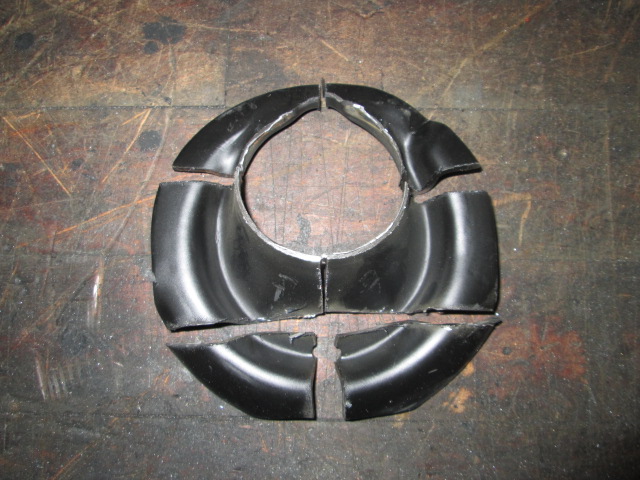 Use a flapper disk on the hand held grinder to smooth the remaining portion of the weld. Go slow and switch back and forth between the two struts to ensure you don't overheat them. If the strut has a sticker like the one shown if the sticker gets hot enough to peel back, you need to slow down. Your goal is to remove the weld w/o impacting the adhesion of the sticker. 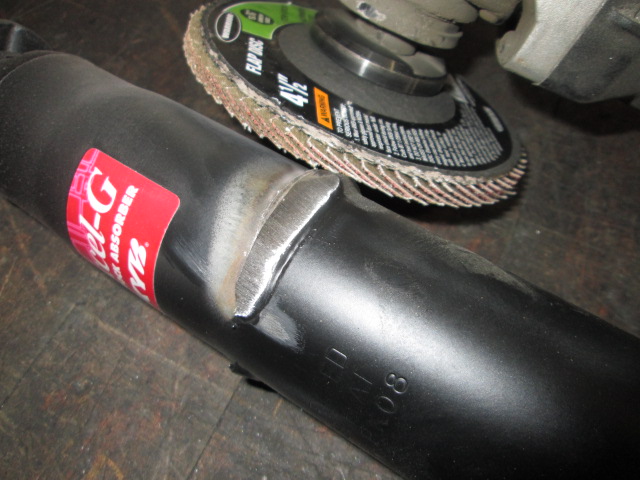 Weld bead removed (make sure to paint this area before installing the sleeve): 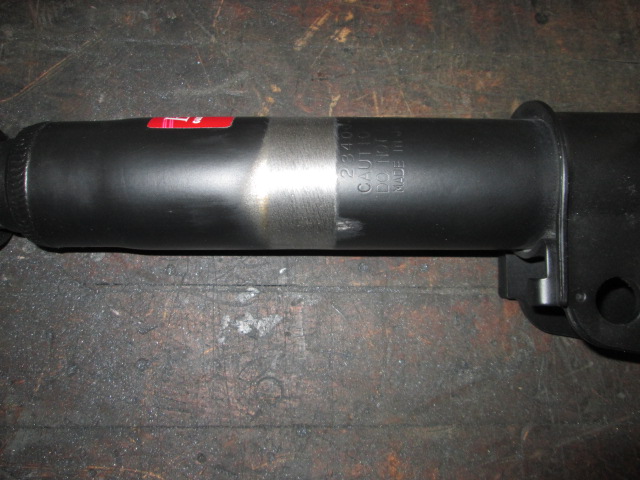 Use some electrical tape and wrap the strut body as needed to make the sleeve fit snugly. 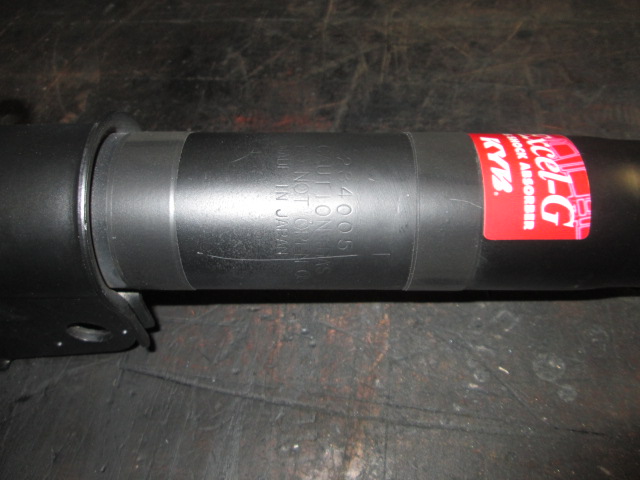 Install the sleeve, spring and then install the upper components. For the stock layout with the strut had bushing boss positioned below the strut tower, the parts should look like this:  For the strut hat bushing boss in the flipped orientation, the parts will look like this:  [This message has been edited by fieroguru (edited 01-07-2022).]


|
04:45 PM
|
|
|
PFF
System Bot
|
|
|
|
|
Mar 26th, 2018
|
Tom Slick
Member Posts: 4342
From: Alvarado, TX
Registered: May 2003
|
I want this!!!


|
09:34 PM
|
|
|
Mar 27th, 2018
|
fieroguru
Member Posts: 12435
From: Champaign, IL
Registered: Aug 2003
|
| | | quote | Originally posted by Tom Slick:
I want this!!! |
|
PM sent.


|
09:25 AM
|
|
|
Apr 1st, 2018
|
Corpsmen Ed
Member Posts: 161
From: Jonesboro, Indiana,USA
Registered: Oct 2012
|
I want a KYB set. Not sure how to determine spring length or rate. Any help on this?


|
08:40 PM
|
|
|
Apr 6th, 2018
|
cvxjet
Member Posts: 3865
From: ca, usa
Registered: May 2010
|
Hey, are you by chance doing the offset hats for an 85-87 Fiero that has been converted to an 88 rear subframe/suspension? ('Cause that's what I have but I am converting to Konis (And already have the shocks)......... If not, but you are open to it, I believe I can do up a pattern and send it to you....The main problem I am running into is that the Koni strut top will not fit into the spring....tube(?) at the top and so I need to have the centering tube be outside the spring(Rather than inside the spring) so I can have full travel....... [This message has been edited by cvxjet (edited 04-06-2018).]


|
12:42 AM
|
|
fieroguru
Member Posts: 12435
From: Champaign, IL
Registered: Aug 2003
|
| | | quote | Originally posted by cvxjet:
Hey, are you by chance doing the offset hats for an 85-87 Fiero that has been converted to an 88 rear subframe/suspension? ('Cause that's what I have but I am converting to Konis (And already have the shocks).........
If not, but you are open to it, I believe I can do up a pattern and send it to you....The main problem I am running into is that the Koni strut top will not fit into the spring....tube(?) at the top and so I need to have the centering tube be outside the spring(Rather than inside the spring) so I can have full travel.......
|
|
Right now, all I am doing is offering bolt-in coilovers and the kits for them. I haven't ventured into the custom strut hats for a cross year swap (installing an 88 cradle into an 84-87 chassis). When converting Konis to coilovers, you have to turn down (or grind down the cap) for the sleeves to pass over which should make then just every so slightly larger than your previous struts. 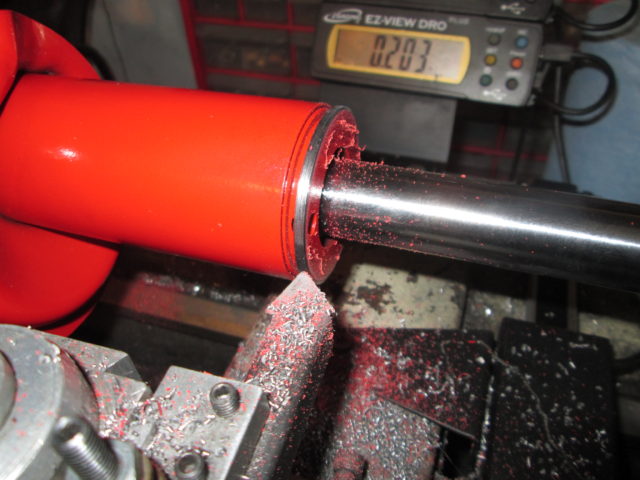 If the top of the strut body still interferes with the inner spring locator sleeve, then you can cut that portion off and use some of these aluminum spring centering caps. The ID of the spring centering lip is 2.12" and will clear all Fiero based strut bodies. I use these when customers ask for the strut hat to be flipped (when the hat isn't flipped, I use and internal sleeve the same length has the bushing housing). 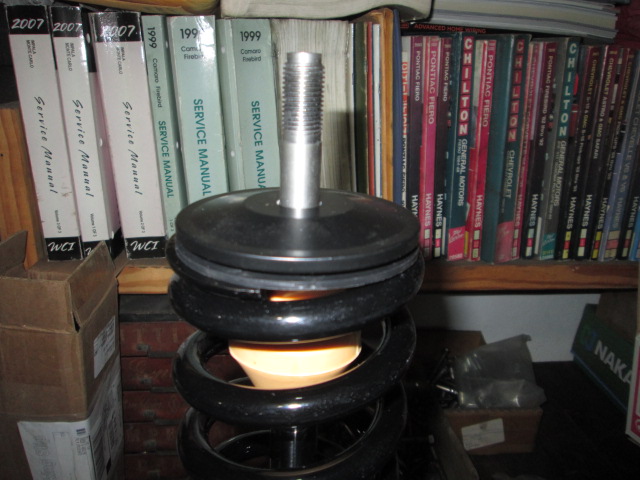 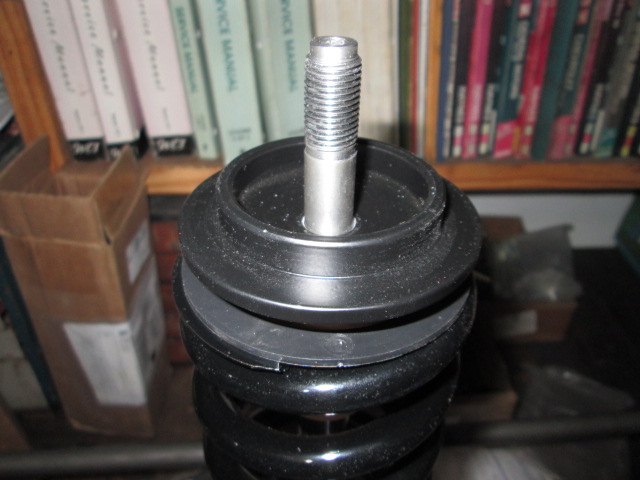


|
08:36 AM
|
|
|
Apr 9th, 2018
|
qwikgta
Member Posts: 4670
From: Virginia Beach, VA
Registered: Jan 2001
|
remind me again what "flipping the top hat" does? I remember it has something to do with lowering the ride height, but if its on a coilover doesn't the height get adjusted by the spring height.
Also, will you paint the strut before putting it all together? I like the red strut, silver spring combo in your pic, but i'm guessing that's a Koni, since they come in red. Will KYB get painted in red too?
Thanks.
Rob


|
11:33 AM
|
|
Spadesluck
Member Posts: 2169
From: Georgia
Registered: Jul 2016
|
It gives you back some travel for the strut I beleive. Even with the car lowered flipping the hat gives the strut some more travel.


|
11:40 AM
|
|
fieroguru
Member Posts: 12435
From: Champaign, IL
Registered: Aug 2003
|
| | | quote | Originally posted by qwikgta:
remind me again what "flipping the top hat" does? I remember it has something to do with lowering the ride height, but if its on a coilover doesn't the height get adjusted by the spring height.
Also, will you paint the strut before putting it all together? I like the red strut, silver spring combo in your pic, but i'm guessing that's a Koni, since they come in red. Will KYB get painted in red too?
Thanks.
Rob |
|
The flipped hat does nothing to ride height, but it does allow the wheel to travel about 1" higher in the wheel well before the strut bottoms out. This effectively give you 1" more suspension travel in compression when you lower a Fiero.  Please note this puts the top of the strut 1" higher into the engine bay. On 84-87 coupes this modification requires notching the decklid. All fastbacks the strut is under the vent, and on the 88s the strut it right at the edge. Konis may also cause some issues as the strut shaft and the adjuster stub stick up even higher. I really don't want to get into painting struts (besides the areas where the spring perch is removed). KYBs are black, Konis are red/orange. I am sure there are lower cost red struts out there, but I haven't (and probably won't) take the time to find them. If you want a red KYB strut, paint them after you get them.


|
09:45 PM
|
|
|
Apr 17th, 2018
|
fieroguru
Member Posts: 12435
From: Champaign, IL
Registered: Aug 2003
|
Bump!


|
12:10 AM
|
|
|
May 2nd, 2018
|
MulletproofMonk
Member Posts: 3092
From: Dayton, OH (Bellbrook, OH 45305)
Registered: Oct 2005
|


|
08:47 PM
|
|
|
PFF
System Bot
|
|
pcar
Member Posts: 109
From: SE Michigan
Registered: Aug 2010
|
I'd be interested in a basic kit to adapt the 88 cradle to my 87 also.


|
09:48 PM
|
|
|
May 3rd, 2018
|
fieroguru
Member Posts: 12435
From: Champaign, IL
Registered: Aug 2003
|
| | | quote | Originally posted by MulletproofMonk:
Paul,
Have you thought about making a kit to put the 88 cradle in a pre-88 car?
|
|
| | | quote | Originally posted by pcar:
I'd be interested in a basic kit to adapt the 88 cradle to my 87 also. |
|
Thought about it... yes. Ready to do something about it, not yet (and probably not within the next 6 months).


|
12:56 AM
|
|
da.slyboy
Member Posts: 504
From: Wichita, KS
Registered: Dec 2012
|
Since you have done some great explanation on some of the other questions, can you clarify between choosing 10 or 12" spring lengths?


|
01:18 AM
|
|
quixt
Member Posts: 21
From: Camarillo
Registered: Sep 2016
|
Another +1 for this. | | | quote | Originally posted by pcar:
I'd be interested in a basic kit to adapt the 88 cradle to my 87 also. |
|


|
02:42 PM
|
|
fieroguru
Member Posts: 12435
From: Champaign, IL
Registered: Aug 2003
|
| | | quote | Originally posted by da.slyboy:
Since you have done some great explanation on some of the other questions, can you clarify between choosing 10 or 12" spring lengths? |
|
The default for most people should be the 12" spring. You can go from stock to about 3" lower with a 12" spring (depends a little on spring rates), which works for what most people would want. There are few scenarios where you might want to consider a 10" spring. 1. You want maximum clearance for an excessively wide tire. 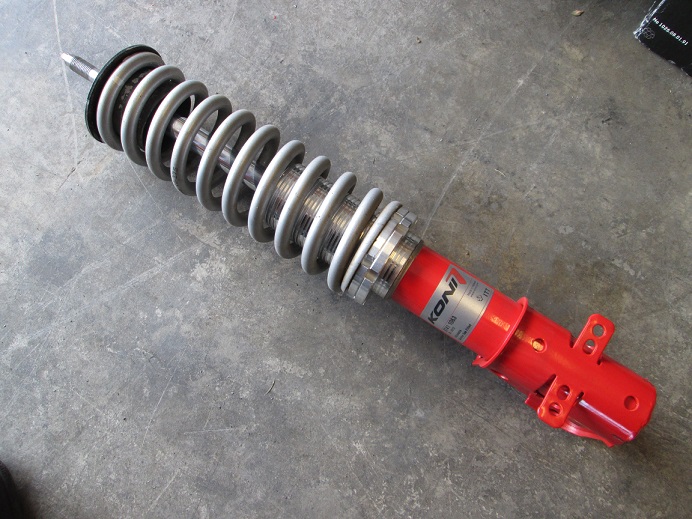 This is for wheels over 17" (84-87) and 18" (88) and targeting a wheel width greater than 9 1/2" with an offset greater than 45mm. The idea is that the sleeve and adjuster stick out 0.12" and 0.65" from the body of the strut, and by moving the adjusters above the rear tire, then the tires can be 1/2" wider. **On the 84-87 this works quite well because of the lower-arm configuration and the strut/spring combo being the limiting factor. But at full suspension compression the extreme wheel/tire package will also have clearance issues with the wheel well liner. **88's it isn't this simple as the first point of interference is the trailing link. I run 18x9.5 with 45 ET and 12" springs. My 285/30/18 tires will rub the trailing link on aggressive turns and the tires have rubbed the wheel well on full compression in a few spots. 2. You obsessively want to reduce weight. A 10" spring is lighter than a 12" one, so that is an easy way to shed some weight. 3. You want less work converting to coilovers. It is pretty simple to scribe the weld bead, make a few pie cuts, and then peel the spring perch off. This will leave the weld bead to support the sleeve, so you don't have to take additional steps to grind down the weld bead so the sleeves will slide all the way down. If you do chose to use a 10" spring, stick with the QA1 high travel version as the available strut travel will coil bind a more traditional 10" spring. My 88 started with 10" springs and Koni struts shown in the above pic (springs were non-HT, which is how I learned of that issue). With the sleeve mounted on the weld bead, I was able to get a couple inch drop with 275 lb/in springs. When I upgraded to 425 lb/in springs I was concerned that the increased spring rate and my state of lowering would require the adjuster sleeve to drop below the weld bead. This is why I went to the 12" spring and move the adjuster sleeve to the base of the strut.


|
08:12 PM
|
|
|
May 19th, 2018
|
fieroguru
Member Posts: 12435
From: Champaign, IL
Registered: Aug 2003
|
To go along with the stainless steel studs on the strut plate, I have sourced stainless steel nuts for the strut plate and strut shaft and concave washers for this kit, so those will be the standard hardware. 


|
07:18 PM
|
|
|
Jun 18th, 2018
|
fieroguru
Member Posts: 12435
From: Champaign, IL
Registered: Aug 2003
|
Bump!


|
09:21 AM
|
|
|
Jul 3rd, 2018
|
FastOwen2XLL
Member Posts: 82
From: Marysville, Ohio USA
Registered: Jul 2015
|
PM Sent!!!!


|
02:03 AM
|
|
|
Jul 5th, 2018
|
fieroguru
Member Posts: 12435
From: Champaign, IL
Registered: Aug 2003
|
Based on a few requests, You can now purchase the aluminum spring centering sleeves for $25 per pair (black and bare aluminum available) 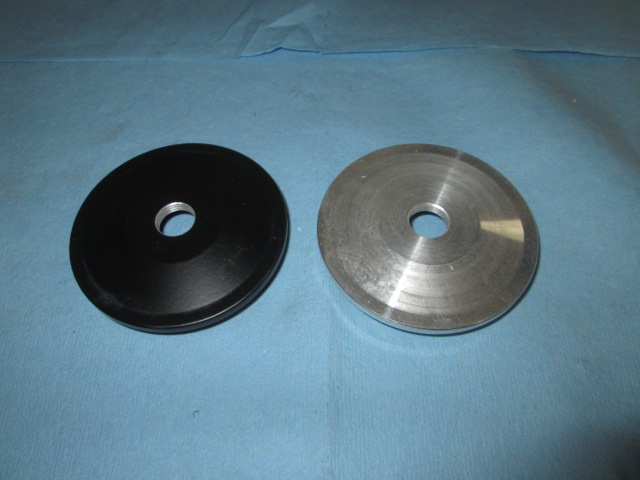 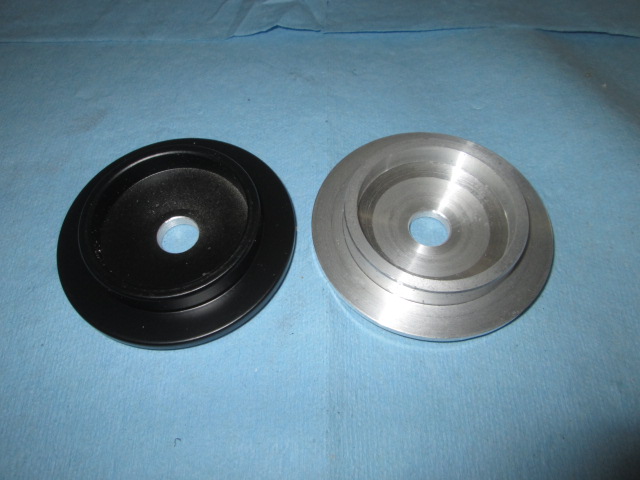 You can also purchase a Level 1 - Strut Hat kit for $115 that comes with the modified strut hats, bump stops and all stainless steel studs, nuts and washers.  [This message has been edited by fieroguru (edited 07-05-2018).]


|
10:30 AM
|
|
|
Jul 24th, 2018
|
pcar
Member Posts: 109
From: SE Michigan
Registered: Aug 2010
|
PM sent.


|
03:20 PM
|
|
|
PFF
System Bot
|
|
|
|
|
Oct 12th, 2018
|
fieroguru
Member Posts: 12435
From: Champaign, IL
Registered: Aug 2003
|
October Bump!


|
08:30 AM
|
|
Grantman
Member Posts: 1420
From: Brownton, Minnesota, USA
Registered: Dec 2011
|
finally got around to putting mine on. these are sweet! ------------------
1986 Fiero GT fastback SC3800 3.4 pulley, FSIC, N*, 1.9 rollers
1985 Honda V65 Magna


|
08:55 AM
|
|
fieroguru
Member Posts: 12435
From: Champaign, IL
Registered: Aug 2003
|
| | | quote | Originally posted by Grantman:
finally got around to putting mine on. these are sweet!
|
|
Thanks for the purchase and support!


|
05:01 PM
|
|
|
Jul 19th, 2019
|
Mike_21
Junior Member Posts: 1
From: Blairsville, GA, USA
Registered: Jun 2019
|
PM Sent.


|
08:01 AM
|
|
fieroguru
Member Posts: 12435
From: Champaign, IL
Registered: Aug 2003
|
| | | quote | Originally posted by Mike_21:
PM Sent. |
|
Replied.


|
05:46 PM
|
|
|
Aug 6th, 2019
|
GSingh94
Junior Member Posts: 10
From: London, Ontario, Canada
Registered: Aug 2015
|
Another +1 for this. Id pay any amount of money for someone to make this for me  | | | quote | Originally posted by pcar:
I'd be interested in a basic kit to adapt the 88 cradle to my 87 also. |
|


|
03:07 PM
|
|
|
Sep 19th, 2019
|
Deathcon1395
Member Posts: 16
From: Weyburn, Saskatchewan, Canada
Registered: Sep 2019
|
Hey, is the level two kit still available? ------------------
Deathcon1395
RSE parts technician
1985 Fiero GT 3800sc swap


|
11:22 AM
|
|
fieroguru
Member Posts: 12435
From: Champaign, IL
Registered: Aug 2003
|
| | | quote | Originally posted by Deathcon1395:
Hey, is the level two kit still available?
|
|
Yes, all levels except the Level 5 with Koni struts are still available. Send me a PM (or email fieroguruperformancellc@gmail.com) with your year of Fiero, color of sleeve, and email and I can send you a quote and paypal request when you are ready to purchase.


|
03:52 PM
|
|
0z
Member Posts: 54
From: Warner Robins, Ga
Registered: Nov 2018
|
There was a level 5?
What was the advantage of the Koni over KYB?


|
09:18 PM
|
|
|
Sep 20th, 2019
|
fieroguru
Member Posts: 12435
From: Champaign, IL
Registered: Aug 2003
|
| | | quote | Originally posted by 0z:
There was a level 5?
What was the advantage of the Koni over KYB? |
|
Yes. While Koni was still making rear struts for the Fiero, I offered a Level 5 version for $925 shipped. I discontinued advertising for it once I could no longer source the Koni struts. The Konis were rebuild-able, had adjustable rebound, and were red:  [This message has been edited by fieroguru (edited 09-20-2019).]


|
12:41 AM
|
|
|
PFF
System Bot
|
|
|
Jan 27th, 2021
|
Shonyman32
Member Posts: 593
From: Shelbyville, IN
Registered: Jan 2012
|
Just bought the Level 4 kit and I am very pleased with the purchase.


|
01:01 AM
|
|
|
Feb 13th, 2021
|
marc-alan
Member Posts: 375
From: pottstown, pa usa
Registered: Mar 2010
|
With the level 4 kit do you still need to use any of the original fiero components to install the new struts?


|
07:10 PM
|
|
fieroguru
Member Posts: 12435
From: Champaign, IL
Registered: Aug 2003
|
| | | quote | Originally posted by marc-alan:
With the level 4 kit do you still need to use any of the original fiero components to install the new struts? |
|
You reuse the 2 large bolts that attach the strut to the upright as well as the oval washers (84-87) or ring (88) that mount on the top of the strut towers. Everything else is all new and supplied with the Level 4 kit.


|
07:15 PM
|
|
|
Aug 8th, 2021
|
snyderman
Member Posts: 204
From: Lancaster, Ontario, Canada
Registered: Nov 2008
|
Hi there. Interesting Video you have on Youtube on this subject. Also liked the one of your daughter showing me how to fix a horn LOL
Do you still make the level 4? Looking for plug and play.
Thx


|
11:16 PM
|
|
|
Aug 9th, 2021
|
fieroguru
Member Posts: 12435
From: Champaign, IL
Registered: Aug 2003
|
| | | quote | Originally posted by snyderman:
Hi there. Interesting Video you have on Youtube on this subject. Also liked the one of your daughter showing me how to fix a horn LOL
Do you still make the level 4? Looking for plug and play.
Thx |
|
I do, but I am not accepting orders in August or September so I can focus my efforts and time on personal projects.


|
08:14 PM
|
|
|
Jan 7th, 2022
|
Groundpounder57
Junior Member Posts: 1
From: West valley city utah
Registered: Mar 2021
|
hey there Charles Cribbs here , I am building an 87gt and am very interested in the fully assembled units with 12 inch springs . if you could p.m. me about this that would be great .


|
09:06 AM
|
|
RandomTask
Member Posts: 4546
From: Alexandria, VA
Registered: Apr 2005
|
Saving this thread. Want a set for my '88. Let us know when you go back into production.


|
01:18 PM
|
|
fieroguru
Member Posts: 12435
From: Champaign, IL
Registered: Aug 2003
|
| | | quote | Originally posted by Groundpounder57:
hey there Charles Cribbs here , I am building an 87gt and am very interested in the fully assembled units with 12 inch springs . if you could p.m. me about this that would be great . |
|
| | | quote | Originally posted by RandomTask:
Saving this thread. Want a set for my '88. Let us know when you go back into production. |
|
I am back accepting orders for 2022, please email me at fieroguruperformancellc@gmail.com.


|
07:34 PM
|
|
|
Jan 7th, 2023
|
Raydar
Member Posts: 41105
From: Carrollton GA. Out in the... country.
Registered: Oct 1999
|
| | | quote | Originally posted by RandomTask:
Saving this thread. Want a set for my '88. Let us know when you go back into production. |
|
Just received mine a couple of weeks ago. Going to install them as a preliminary to my LQ1 swap. Good stuff!


|
03:55 PM
|
|


