The PurposeIn 2006, PFF member
2002z28ssconv wrote “88 Strut Replacement Step-By-Step”
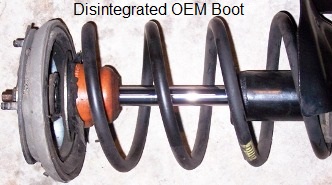
https://www.fiero.nl/forum/...070315-2-076850.htmlI was pursuing his lead as I needed to replace the disintegrated OEM plastic boots on my practically ‘new’ struts.
 So
So, I make use of the occasion to gather additional information to enhance this topic, by inserting more depth and fill the gaps with details, which includes images, as a ‘complete’ source for Fiero owners who doesn’t have much knowledge on *this* subject.
For the Sake of Transparency and Full Disclosure:The following is a compilation of
2002z28ssconv’s work, further PFF threads, member comments, the P
ontiac Fiero Service Manual, my strut experience, and then ‘massaged’ it altogether as a ‘fresh’ post.
The illustrations are from General Motors Corp’s 1988
Pontiac Fiero Service Manual and I’m sorry; I didn’t seek for a formal consent or authorization.
SO, please read and comprehend this write-up all the way through to honestly analyze and evaluate the skills, tools and requirements; particularly the risk assessment, before jumping in...
-------------------------------------------------------------------------------------------------------
‘88 Strut Replacement Step-By-Step, Revised w/ Photos plus Strut How-ToJust in case you're dreading the thought of replacing the struts on your ‘88, fear no more.
It's not too bad, but impact tools and an auto lift will make your job easier!
This Write-Up has Two Separate Tasks:
*R&R / Remove the Struts from the Fiero and then Replace Them
*D&R / Disassemble the Strut Damper/Spring Units and then Reassemble Them
*SIDEBAR: Why do you want to work on your Fiero? -------------------------------
I have
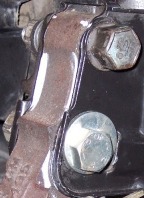
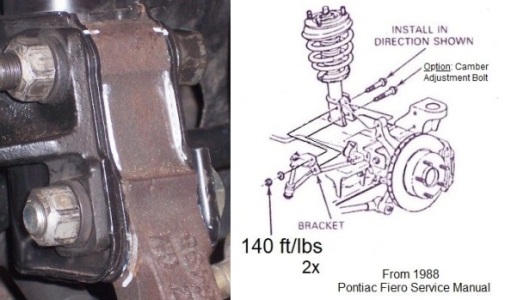
many examples when I paid ‘good money’ to get my vehicles serviced; only to find out later that the ‘technician’ was actually a nincompoop! My recent example is when I paid the shop to install new struts numerous years ago…can you see what is wrong in this picture?
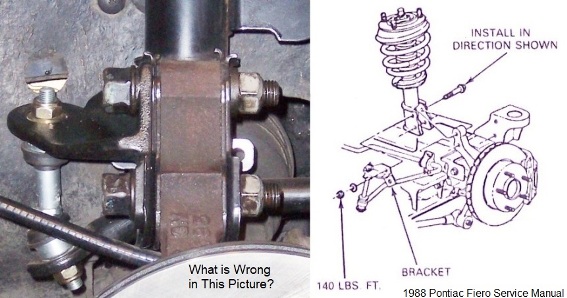 The Obvious Answer: The Bolts were Installed ‘Backward’
But what
REALLY was wrong is the torque! When I started to loosen the locknuts, they spun-off easily which I’ll guess was roughly 60-70 ft/lbs; approximately ‘half’ of the 140 ft/lbs spec.

SO,
one real reason ‘why’ I work on my Fiero is because I know ‘it’ was been done correctly!
------------------------------------------------------------------------------------------------
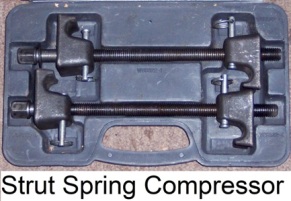
Essential Tool*Strut Spring Compressor Tool {the tool isn’t needed if you don’t intend to take the strut/spring units apart}
 Additional Special Tools
*Pontiac Fiero Service Manual {PFSM}
*Torque Wrenches {18 ft/lbs. / 65 ft/lbs. / 100 ft/lbs. / 140 ft/lbs.}
Parts2002z28ssconv ordered a ‘strut kit’ from The Fiero Store which included struts, boots, bumpers, mount plates and spring insulators. He commented that “TFS provides excellent instructions with the kit.”
My struts are nearly new; but the other parts have 136k miles and decades on them:
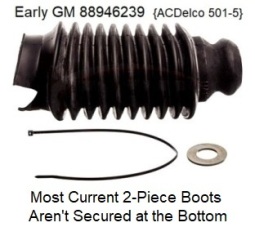
2) Boot/Bumper, 1-piece {GM 88946239 / ACDelco 501-5}
2) Plate, mount {KYB SM5190}
1) Insulator, spring, set {TFS 67983}
1) Bolts/Nuts, camber adjustment, pair {TRW 13209A}
*Note: Camber adjustment hardware is not required; it makes the task easier by allowing incremental adjustments at the bottom strut flange hole.
Whatever you decide to purchase; double-check the strut/knuckle hardware first. If they’re badly rusted; treat yourself by getting new bolts/nuts and possibly you’ll
really need them!
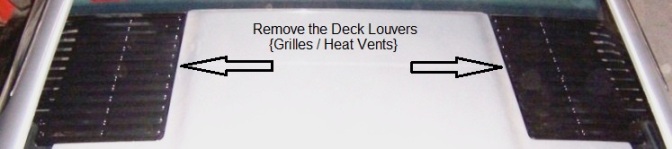
PreparationRaise the deck lid; remove the trunk light bulb/holder, OR disconnect C250 connector @ the deck lid, OR disconnect the negative cable from the battery; and then remove the louvers / deck grilles / heat vents.
 *Tip #1
Skip this step if you don’t intend to take the strut/spring units apart.
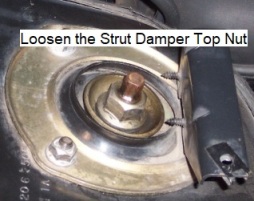
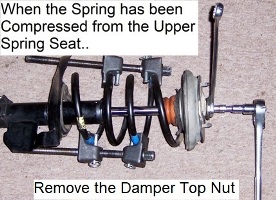
To change the struts, the springs must be removed; this tip is to barely ‘break’ the top locknut loose from the strut damper shaft threads.
I like
2002z28ssconv’s idea by using the vehicle’s weight, which compresses the spring, and it’s safer and easier while the strut is firmly secured in the vehicle.
Later, when the strut has been removed from the car, and the spring has been compressed by the compressor; the damper locknut will be straightforward to remove from the shaft than wrestling it which can be a PITA!
I cleaned the threads first, applied penetrating oil and used an impact wrench. The locknut simply needed loosened; it will only turn a little, as the damper shaft will start to spin too.
*If you don't have an impact gun; you can attempt to loosen the locknut with hand tools, but this method is harder because the concave washer.
Do Not Gall the Nut or the Shaft! It’s better to wait and use an impact wrench later when the struts have been removed…
Two Methods – Part 12002z28ssconv and the PFSM both says to remove the six top strut nuts in the engine bay; raise the vehicle, which the struts can ‘drop’ from the towers, and then remove the strut/knuckle bolts.
However, experience taught me that it’s better to discover IF the strut bolts are ‘frozen’ in the knuckle or not first. If so, the top studs in the engine bay will be very helpful by supporting the strut while struggling to get the corroded bolts free and out from the knuckle.
So, my write-up will
loosen the six top nuts; raise the car; remove the strut/knuckle bolts and
then remove the top nuts. As I go forward on my method, you can choose the ‘best’ way to remove your struts …
Raise the VehicleIf raising only the rear; chock the front tires and then loosen the lug nuts on the rear wheels.
Using the lifting points in section 0A page 11, get the rear wheels in the air; I’m using a two-post electromechanical auto lift.
If raising the vehicle with a hydraulic jack, ALWAYS use jack stands to support the car!
NEVER work under a vehicle which is only supported by a hydraulic jack - never.
Remove Both Rear Tires/Wheels
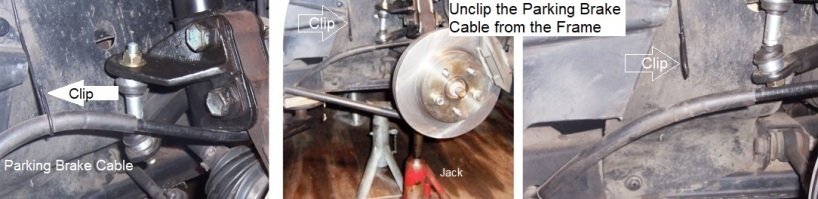
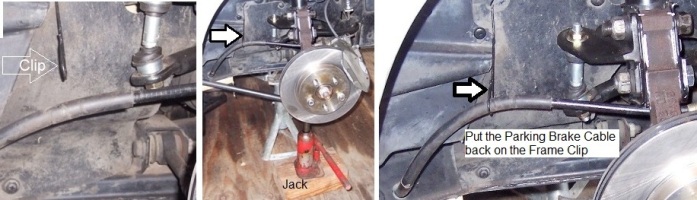
Jack-up the driver’s knuckle/hub assembly at the trailing arm boss to relax the tension on the parking brake cable; then unclip the cable from the frame, and then remove the jack. {No clip on the passenger’s side}
 Prior to Removing the Struts
As I mentioned, I’m reinstalling the same struts; I’m betting that you’re changing them out.
The PFSM shows how to scribe the strut/knuckle when reinstalling the same struts, so the original camber settings can be adjusted back; the PFSM also says don’t scribe when changing-out the struts.
I used an oil based marker than scribing and I’m not trying to avoid alignment; I want it ‘very close’ when I drive the vehicle to the shop.
I believe that this scribing / marking process can also get your camber settings within reasonable limits than a baseless start; however this step is your call…
 Remove the Struts*Tip #2
Shoot some digital photos as you work which you can refer back later in reassemble if needed.
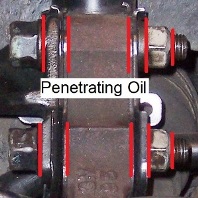
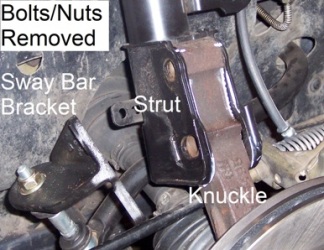
Apply penetrating oil at the four bolts/nuts {2 each per side} that hold the struts to the knuckle/hub assemblies and the sway bar mounting brackets to reduce friction and resistance.
Holding the bolts, loosen and remove the locknuts {2 each per side} that secure the strut and knuckle together; then remove the bolts which will release the sway bar brackets. {Note: the factory didn’t install the ‘88 rear sway bar in 4-cylinder coupes}
*If the bolt heads are frozen from corrosion, more penetrating oil. With a spare nut at the end of the threads; smack the nut with a BFH. Then put a wrench on the bolt and turn the head backward and forward. Repeat until they’ll move. If they’re very stubborn, saturate the bolts with penetrating oil overnight and attempt again.
**Heat is the last resort; soak a big pair of Vise-Grip pliers in cold water and apply the heat on the BOLT HEAD/NUT ONLY, not at the strut or the knuckle! With the spare nut still on the threads; smack the nut with a BFH; clamp the cold Vise-Grip pliers on the bold head and turn the head backward and forward. Repeat until they’ll move. In California, I have never needed heat to get strut/knuckle bolts out…
Caution: Avoid Drive Axle Boot Damage and the PFSM lists a special ‘boot protector’ tool.
So be aware of the boot when pulling the strut from wheel well, and prevent dropping it on the boot. I placed a thick folded towel as a ‘cushion’ on the axle boot and under the sway bar in case.
Remove the strut top nuts and the top reinforcement plate that also includes the louver support bracket at both sides in the engine bay.

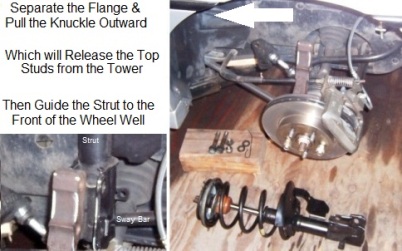
With a good grip of the strut; separate the strut flange from the knuckle and at the same time, pull the knuckle/hub outward which will release the top studs from the tower holes, and then guide the strut to the front of the wheel well and out.
*
2002z28ssconv’s Fiero had poly bushings that wouldn't allow the knuckle/hub to lean outward enough to remove the strut assembly; so, he detached the trailing arm from the hub to get the strut out. He commented that it was a big ‘pain’ to get the parts lined up again. With rubber bushings, I didn’t have any issues…
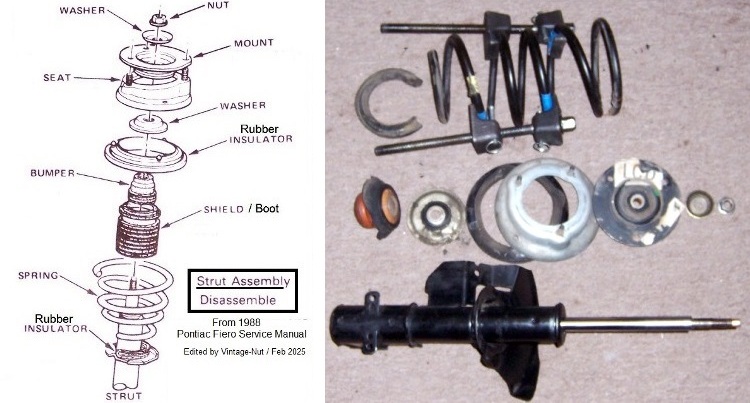
Disassemble the StrutsNow it's time to take apart the strut damper/spring assemblies…
⚠ INJURY / DAMAGEDo Not Remove the Top Nut of the Strut Until the Spring has been Safely Compressed!
Follow all directions from the spring compressor manufacturer
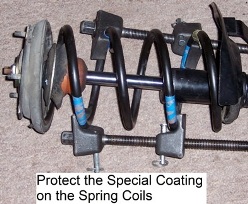
The PFSM says “care must be used not to damage the special coating on the coil springs”.
I cleaned the springs and used tape as an attempt to protect the coils from the compressor jaws.
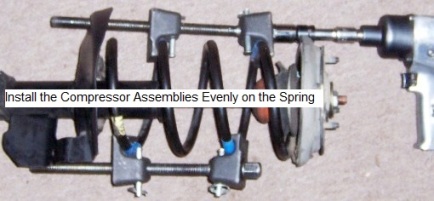
Install the compressor over the closest coil on each end, and make sure that the assemblies are evenly placed on the spring. Check that the tool and the upper spring seat plate are not touching each other; if so, reposition the tool. Also, make sure that the compressor hex bolts are available to drive the tool.
By alternate the bolts, tighten the assemblies to compress the spring until it has been pulled away from the strut spring seats. Remove the damper top locknut by holding the top of the shaft with a socket and turn the locknut with a wrench. {If you didn’t follow tip #1, break the locknut free from the shaft threads}
Remove the locknut; concave washer; mount plate/upper seat assembly/spring insulator as a unit; dome washer; bumper/boot, and the spring with the spring insulator from the strut.
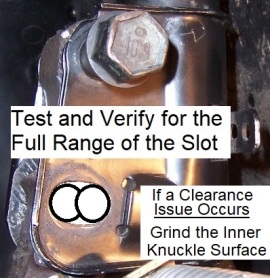
 Prior Reassembling the New Struts: Test for Knuckle Clearance
Please Note: Members had reported clearance issues when adjusting camber what affects some ‘88 vehicles.
Depending on the tolerances; the strut camber slot of the flange may not have full range when on the knuckle as the inner knuckle face may hit the inner strut flange. Some say it’s more pronounced on the passenger’s knuckle than the driver’s.
If a clearance issue occurs; some simply grinded the inner strut flange to get a little more clearance. The permanent fix is to lightly grind the inner knuckle and smooth the ‘humps’ or ‘ridges’ as it doesn't take much to get the full range.

To test your new bare struts before assembling; put the strut flange on the knuckle, install the top bolt into the strut flange and thru the knuckle, then shift the strut/knuckle to verify for the full range of the slot at the lower knuckle bolt hole.
 Reassemble the Struts
When assembling the struts; the upper spring seat position entails ‘aligning’ it to the fixed lower flange. If this position is off too much; the top studs might not fit into the tower holes once the strut is on the knuckle. And if it isn’t obvious; it will be difficult to relocate the spring seat once the spring has tension…
The PFSM lists seven special tools {which DIYers won’t have} along a strut reassemble procedure; which is almost worthless without the special tools…
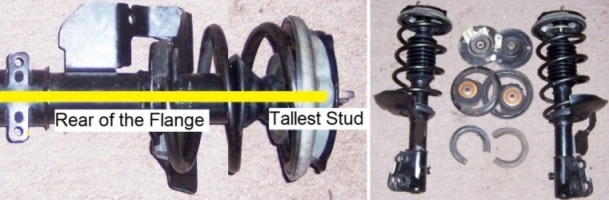
The Main Two ‘Keys’ of the PFSM Procedure:
*The location of the spring on the strut lower seat
*The location of the ‘tallest’ stud of the upper spring seat at the rear of the strut flange {180-degree from the open side of the flange}
Please Refer to this Strut Reassemble Illustration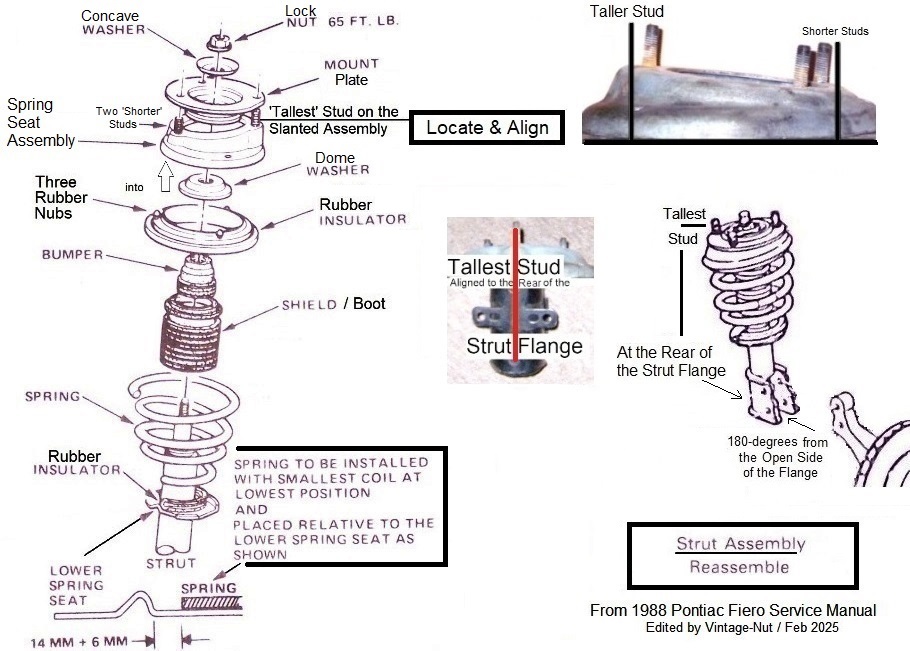
*If you brought new lower/upper spring insulators; remove and replace the rubber pads.
*If you brought new mount plates; remove and replace the plates on the spring seat studs.
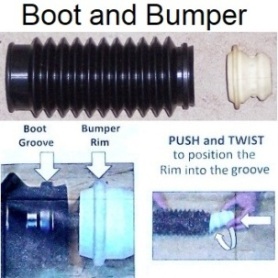
*If you brought new boots and bumpers; push and twist the bumper ‘rim’ into the dust boot/shield ‘groove’ until it ‘snaps’ in.
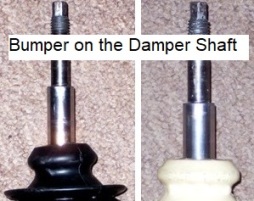
Install the boot/bumper on the damper shaft; aftermarket bumpers simply ‘hold on’ to the damper shaft by friction.
*Note: Early 1-piece boots/bumpers fit snugly over the strut damper body and is secured with a zip tie; most current 2-piece boots are not secured at the bottom.
Lower the spring with the smallest coil on the spring seat; align the lower coil insulator at the hump/stop.

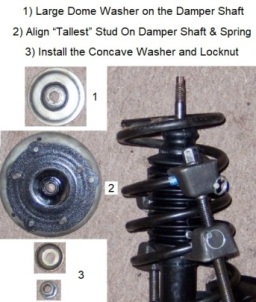
Using your knees or a vise to keep the strut standing up; place the large dome washer on the damper shaft. Eyeball the upper spring seat with the mount plate to the “tallest” stud at the rear of the strut flange and then lower them on the damper shaft and on the spring as checking the alignment. Install the concave washer and thread on the locknut.
Snug the locknut on the damper shaft threads by holding the hex of the shaft with a socket, and turn the locknut with a wrench.
By carefully and slowly; alternate the bolts to loosen the assemblies as the spring uncompress, while checking that lower coil is at the hump/stop, and the ‘tallest’ stud is still aligned at the rear of the strut flange, until the spring has been reseated on the strut damper unit.
Double-Check the Alignment of the ‘tallest’ stud with a straight edge at the rear of the flange and noting the lower coil of the spring is at the stop/hump.
 Two Methods – Part 2
Like in ‘Part 1’ of removing the struts; installing them has two techniques as well.
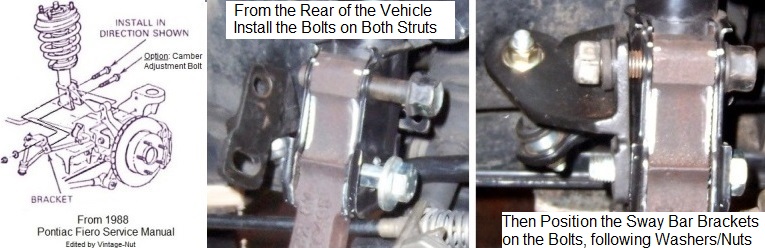
2002z28ssconv and the PFSM instruct to install the strut flange on the knuckle first, and then install the bolts/nuts, and lastly align/push the three top studs into the tower holes.
To me, that scheme is backwards and harder; I prefer to loose-fit the top studs into the tower holes first, and then tackle the bottom bolts.
Of course the final result will be the same; however the ‘step’ sequences are arranged differently. As I go forward on my process, you can choose the ‘best’ approach to install your struts…
Install the StrutsIf needed, clean the knuckle bolt holes and the inner surface where the strut flange will meet.
Caution Again: Avoid Drive Axle Boot Damage and prevent dropping the strut on the boot!
I placed a thick folded towel as a ‘cushion’ on the axle boot and under the sway bar in case.
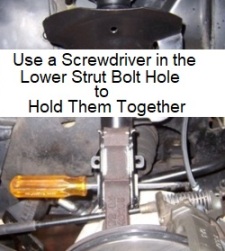
Place a long Phillips screwdriver in reach, and with a good grip of the strut; guide the strut in the front of the wheel well and up into the tower while pulling the knuckle/hub outward to slide the strut flange on the knuckle, which will allow the top studs to start into the tower holes. Holding the strut on the knuckle; place the screwdriver in the lower strut bolt hole and thru the knuckle to hold them together.
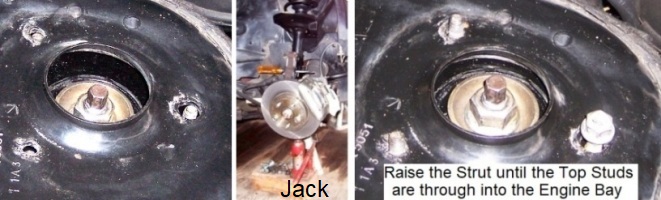
Stand up and check that the tallest stud is in the engine bay hole as it will push farther in than the shorter studs; if not, adjust the strut as needed to align the strut to the holes. When the studs are aligned to the holes; place a jack under the knuckle/hub assembly at the trailing arm boss, and raise the strut until the top studs are through into the engine bay. Loosely thread the three top nuts and then remove the jack from the knuckle. Repeat for the other strut.
From the rear of the vehicle; align the upper flange bolt to the knuckle hole by pushing the strut back and then install the bolt into though the knuckle. Remove the screwdriver, align the lower flange bolt with the knuckle hole by pulling outward, and then install the bolt. Do the other strut as the first, and then position the sway bar brackets on the bolts, following with the washers and locknuts.
*If you have standard end links; you may need to loosen their hardware to get some ‘wiggle room’.
From the ‘
Prior to Removing the Struts’ section; align the strut/knuckle if marked, so the original camber settings are within reasonable limits. Holding the bolts; torque the locknut at 140 ft/lbs {2 each per side}
 Button It Up!
Jack-up the driver’s knuckle/hub assembly at the trailing arm boss; clip the parking brake cable on the frame, then remove the jack.
Check the Brake Rotors are Clean; if you got ANY grease or oil on the discs, use a brake cleaner
Install Both Rear Tires/Wheels and Snug the Lug Nuts
Lower the Vehicle to the Ground
Torque the Rear Lug Nuts
Dry: 100 ft/lbs.
Torque the Plastic Lug Nut Covers {if used}
15 in/lbs.
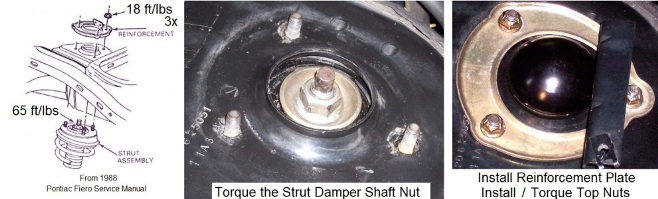
Remove the six top locknuts from the strut studs in the engine bay and torque the strut damper shaft nuts at 65 ft/lbs. {I used my impact wrench instead}. I added Rodney Dickman’s strut covers, then position the reinforcement plates on the studs, spin the locknuts on and torque them at 18 ft/lbs. {3 each per side}.
Reinstall the trunk light bulb/holder, OR reconnect C250 connector @ the deck lid, OR reconnect the negative cable from the battery, install the louvers/grilles/vents and then close the deck lid…Good job, well done!
Schedule a Wheel Alignment Appointment before putting the vehicle back in service. ------------------
Original Owner of a Silver '88 GT
Under 'Production Refurbishment' @ 136k Miles
[This message has been edited by Vintage-Nut (edited 02-25-2025).]


 .
.


